⚡ Charge smarter, live freer — power your off-grid lifestyle with confidence!
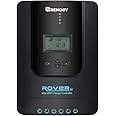
The Renogy Rover 40A MPPT Solar Charge Controller is a versatile, high-efficiency regulator designed for 12V/24V systems. It supports multiple battery types including gel, sealed, flooded, and lithium, featuring advanced 4-stage charging with lithium recovery. Built to withstand harsh environments with temperature compensation and lightning protection, it offers real-time monitoring via an LCD display and Modbus protocol, plus smart load control and optional Bluetooth app integration for seamless off-grid power management.


K**B
Works Perfectly
Quality product, does what it's supposed to do and easy installation.
C**S
Works as intended.
A bit pricey but the controller works well with my LifPo batteries.
M**.
Very well built
I upgraded from a Rover 20A Li to an 40A and installed this yesterday to replaced the Rover 20 that had gone bad. I was awed by the low price ($140) and jumped on it. It’s built like a tank. I highly recommend you read thoroughly the instructions before installing any wires! You can ruin it if you do it out of sequence.The screws for tightening down the wires are small so I don’t recommend using the Phillips option. I had better luck using the flat tip screwdriver. I highly recommend the Bluetooth module BT-2 sold separately. You can monitor the status on your smartphone as well as change the settings.
A**R
Nice product
Does the work well
J**.
Flawless so far
Easy to install, work great. Installed about 6 months ago. Each controller runs (2) 200 watt panels and charges a 280 ah battery. In total my system has (4) 200 watt panels, (2) 40 amp solar controllers and (2) 280Ah lithium iron phosphate batteries. For a total of 560 ah. This is on a boat, it also runs a 3000 watt inverter/charger and a 40 amp dc to dc charger. No issues so far however I don’t really tax the system very much. Plenty of reserve for a night on the hook.
A**A
Gave Renogy a Second Chance and they failed.
Initially, I bought a Rover 30 for my solar panels back in 2022. It failed after 6 months. Renogy would not honor the warranty because they said the charge controller for my wind generator voided it, even though there was nothing in the warranty language that prohibited it.After 1.5 years with an unbranded hybrid MPPT that could take wind, I decided to take the wind offline, add two more panels. The Rover 40 seemed to make sense in that application. I hoped that this time the Renogy, which does well in converting high voltage low amp current from the panels to 24V/high amp charging current, would serve its purpose well.For the first couple weeks, it did very well. But now about once a day, I have to take off, reposition, and re-connect the battery cables. It work fine for a while, and then stop charging. Then I am running straight off the batteries until they run down. Seems the battery cables will not stay connected despite my best efforts.I've noticed in different reviews, others have also had issues with their terminals. One person complained that the screw stripped out, which suggests to me they were trying the get a good, lasting connection. I don't think this problem is unique to me.Since I am still within 30 days and since I had poor experience with their customer service previously, I'm not taking any chances. I've orderd a Vectron to replace this, and as soon as it arrives this thing is going back into the box and back to Amazon.No more Renogy products for me. I'm done with them.
G**H
Well priced Controller - a definite must for small-scale/camping solar applications
Great replacement for the PWM controller that came with our Renogy Solar kit. Initially we had the Renogy PWM 30 AMP controller and it was an entry level controller in all respects. The previous controller was limited to a 12 volt battery source had 2 lead pairs, one for solar panel connection and the other for the battery side connection. Any load connected to the battery array had to be connected directly to the batteries and was not governed by the controller. Also you had to rely on LED indicator lights To determine when the controller was in charge mode versus float mode. Adequate for an entry level controller but not great. Now lets talk about this controller.First, this controller is capable of 12 or 24 volt wiring installations. 24 volt DC is superior to 12 volt DC because it cuts the Amperage draw in half on the DC end. A 1.2 Amp TV running on AC/120 volts will require 12 Amps on the 12v-DC end to meet the same 140 Watt requirement. A 24 volt DC setup will reduce the amperage requirement down to 6 amps on DC, which means your DC wiring gauge doesn’t have to be as robust when supporting a 24 volt application.Secondly, the LCD display is great and is a must for a solar charge controller. It’s not enough to know that the solar cells are charging the battery, you may also want to know how “fast” they are charging the battery and whether or not the panels should be angled to reach optimized charge rate. The LCD screen also provides a percentage estimate of battery remaining in addition to the amps that are being supplied by the panels, along with a running amp-hour accumulation of charge provided the panels over a period of time and current battery voltage.Third, it has a pair of positive/negative load leads that permit connecting appliance loads up to 20 Amps DC. It’s not necessary to use the load leads for connecting the devices that run off the battery, but the added advantage of using them is that your battery array is protected from over-consumption, as the leads shut off usage on the battery once it reaches a certain level of discharge in order to protect the battery array.I’ve only used the new controller once, but the instructions were easy to follow and I made a laminated copy of the LED and Menu options as a quick reference guide that will go along with the kit on camping trips. Currently the array powers my 400 Watt (4x100W) kit and 2 VMAX 125ah batteries wired in parallel, but I am seriously thinking of doubling the panel array and adding 2 more batteries in a series/parallel configuration to take advantage of the 24 volt capabilities of this controller.Quick Note on the 100 Watt Renogy panels:When I measured the charge current of the 4 x 100 watt panels connected in Parallel I noted an 18.5 amp charge rate on the new controller or ~4.6 amps per panel. That seemed low to me given that 400 watts/12v is around 33.3 amps, or 8.33 amps per panel. In discussions with Renogy support I found out that the 100 Watts is calculated at 17.9 volts * 5.7 amps, where they use the maximum charge voltage by each of the panels as basis for the calculation. Just something to be aware of when you are reading sub-5 amps per panel charge rate on your controller.This new controller works as advertised, was relatively inexpensive for what it does, and I may update the review again in 12 months after running it a few more times for a consistency check.
C**I
Great upgrade
Upgraded from a PWN, and the difference is crazy! We get so much more out of our solar panels now. The charge controller is much larger than the equivalent PWN, but so worth it.
Trustpilot
2 days ago
4 days ago