🚀 Upgrade your flush game with power, efficiency, and zero fuss!
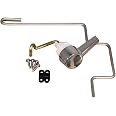
The Flushmate M-101526-F31 is a genuine, pressure-assist 1.6 GPF replacement system designed for most two-piece and one-piece toilets (excluding select Kohler and Gerber models). Made from durable US polypropylene with brass fittings, it offers a powerful, water-saving flush using compressed air technology. The kit includes all necessary components for quick, easy installation, delivering reliable, clog-free performance backed by OEM quality assurance.


| Material | Polypropylene (PP) |
| Brand | FLUSHMATE |
| Color | Black |
| Product Dimensions | 16"L x 14"W |
| Exterior Finish | Brass |
| Specific Uses For Product | Toilets |
| Special Feature | Easy to Install |
| Included Components | Nut, Screw |
| Lock Type | Nut Lock |
| Item Weight | 7 Pounds |
| Handle Material | Brass |
| Hand Orientation | Ambidextrous |
| Customer Package Type | Standard Packaging |
| Unit Count | 1.0 Count |
| Number of Items | 1 |
| Manufacturer | APR Supply Co. |
| Item Depth | 8 inches |
| Handle Attachment Mechanism | Screws |
| UPC | 648714410267 |
| Part Number | m-101526-f31 |
| Item Weight | 7 pounds |
| Item model number | m-101526-f31 |
| Is Discontinued By Manufacturer | No |
| Size | 16 x 14 x 8 inches |
| Finish | Unfinished |
| Item Package Quantity | 1 |
| Number Of Pieces | 2 |
| Special Features | Easy to Install |
| Batteries Included? | No |
| Batteries Required? | No |
F**U
Great replacement pump
Works great and was not hard to replace the pump.
K**H
Air assist toilet flush system
Excellent product. Easy to install and works very well. So far, I have ordered 3 and they work amazing.
L**D
This Unit makes good become great!
I had previously purchased components for my 12 year old Flushmate attempting to fix the leak, not realizing that the tank itself was leaking. Guess I was trying to save a dollar or two. When I promptly received this, the entire unit, I read the instructions (I had already watched the short video) I removed the old unit, cleaned the tank and whatever needed cleaning, installed the new unit all in 50 minutes. I used the step by step instructions and followed them verbatim and so glad that I did as one of the last instructions is to take a two gallon bucket and place the supply line into it and turn on the water full blast. I couldn't believe the crud that came out of the supply line that surely would have shortened the life of my new unit. I empted the bucket, and did it again just to me sure there was not any more crud in the existing water supply line. The instructions are excellent in that each one has diagrams, pictures and other suggestions and/or recommendations. The Flushmate replacement is much better than the original in that it is quieter, faster, and comes with a new "flusher" and handle that are superb. They even provide the tool necessary to make the installation so much easier, along with new gaskets and other parts to make the job easier.I think it is commendable that a manufacturer make improvements to their products to make them more efficient and easier to maintain. They provide very good instruction and even telephone support if needed. I did not need phone support, as it was much easier to install than I anticipated. I know now that when my other two twelve year old Flushmates need repairing, I will certainly do it right by installing these complete units and be done with it. And, the warranty on these new models is for ten years rather than five years as is on the original.
R**.
Water pressure is very important.
Hi, really like my three Sloan master toilets. I was having a flushing problem with 1 and Requested the tank after speaking to a technician. I received the tank only to find a valve provided some years ago slow the water pressure. After removing the valve, the toilet works fine. My thanks to the technician that assisted me in selection of the right tank. Sorry for the return.
A**R
Finally, a good flush at home
This are great and work as advertised...a little loud but the strong flush is worth it. I made it through the rearing of two teenaged boys and seldom needed a plunger. These are easy to install (especially with the companion tool, also available at Amazon). One required step not mentioned in the installation instructions is to wrap some Teflon tape around the water inlet...I did not and soon had a leaky mess to clean up. I do feel compelled to dock a star due to the plastic construction...it is not fragile but does eventually fail. We have 3 of these in the house and all of them have sprung leaks at one time or another over the course of the 15 years we've owned them. Not a big deal and service life is acceptable.
P**Z
Requires very little effort or skill to install - just drop it in.
These last about 10 years or more so we don't replace them often...but when we do? Slam dunk! It's an easy replacement!We use these in our public restrooms and in the office restrooms and they work very reliably. Several of my coworkers use this same tank in their toilets at home too.These all-in-one tanks sure beat the old flapper valve & float assembly we once used - and deliver a really powerful flush - while saving water in the process!This is a 5🌟star product...Two thumbs up!
D**N
Caution: Part Doesn't Fit American Standard Model 4086
This review is for the product, not the distributor - who provided a prompt Return Authorization: Although Sloan stated the 503 was the correct replacement for the two broken 501-B's we have had for 14 years, they do NOT fit the American Standard Model 4086. The 503 is too tall and the handle doesn't align properly. When calling Sloan, their answer was put a piece of foam between the lid and ceramic tank. The plumber laughed at the suggestion. When I called American Standard to learn if they had a replacement ceramic tank that would accommodate the 503, their answer was simply "sorry". You'd think both companies would have an interest in working with one another so replacement parts would be available. Apparently not. When ordering this product, be sure that it will actually fit your existing toilet. We now have to replace two, 14-year toilet.
C**G
Missing parts
The tank did not come with new gaskets or plastic nuts. I had to install with the old gaskets and nuts. I’ll change my review to 5 stars when a replacement parts kit is delivered.
Trustpilot
2 months ago
1 day ago