Customer Services
Copyright © 2025 Desertcart Holdings Limited


⚡ Sew Like a Pro, Finish Like a Boss!
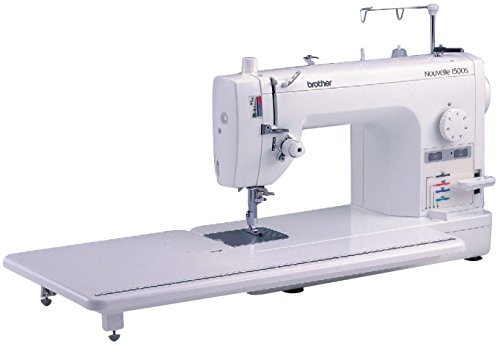
The Brother PQ1500SL is a high-speed straight stitch sewing and quilting machine delivering up to 1,500 stitches per minute. It features an automatic needle threader, push-button thread cutter, and a precision pin feed system for flawless fabric handling. Equipped with a wide extension table and 7 versatile feet, plus a removable knee lifter for hands-free operation, it’s designed for serious quilters and professionals. Supported by a 25-year limited warranty and lifetime technical support, this machine combines industrial power with user-friendly features to elevate your sewing projects.


| ASIN | B0149GG9V4 |
| Assembly required | No |
| Batteries required | No |
| Best Sellers Rank | #76,280 in Arts, Crafts & Sewing ( See Top 100 in Arts, Crafts & Sewing ) #203 in Sewing Machines |
| Care instructions | Hand Wash |
| Customer Reviews | 4.6 4.6 out of 5 stars (1,260) |
| Included Components | Carton Contents Knee lifter, accessory kit with needle packet, ballpoint needle, spool cap, fabric separator, feed pin, feed pin changer, metal bobbins (5), seam guide, cleaning brush, screwdrivers (2), spool cushion, power cord and Operation Manual|USB Cable Not Included|Warranty 2/6/25 Year Premium Limited Warranty |
| Item Weight | 29.8 pounds |
| Item model number | PQ1500SL |
| Manufacturer | Brother International |
| Number of pieces | 1 |
| Product Dimensions | 7.9 x 12.6 x 19.3 inches |
B**M
Wonderful even for a novice
I am a very novice sewer and I got this machine to do quilting. I have not taken a sewing class yet, and have taken only 2 quilting classes just so you know.I have only made napkins before... I got this machine just 2 days ago and love the features. I have used an $800 Husqvarna (spelling?) in class and like this so much better. I think it is very intuitive, easy to thread, love the knee presser foot lever and the reverse which is so easy. The bobbin winder was easy and I used it right out of the box. Getting the bobbin seated correctly was a little challenge but it just took practice. You need to make sure it "clicks" in. I am working on the automatic needle threader and I get it threaded about 15% of the time but have only tried this feature for about 20 minutes and I am getting the feel of it, having never used an automatic threader before. I also love the "thread cutter" button! Goodbye scissors! Only negative so far is that I bought the cheap thread on the large cone for about $4 and I kept getting nests of thread underneath the material. This went on for two hours even though they had sent a piece of material with perfect stitching. I changed the needle, the tension, the feed dog height and finally the thread. That was what did it. I went to a smaller spool. After having read other reviews, I am going to try the cheaper thread again but thread it over one and then three holes on the front of the machine (I have it now threaded with two holes) to see if that makes a difference. I think most would be very happy with the machine and if I can use it, anyone can! Update- I have had this machine for about a month and am still extremely pleased! I have figured out the needle threader, although it doesn't work as well on the cheaper threads it does work well with the smaller spool threads. I did run out of bobbin thread once and it would be nice to be able to see the bobbin, but that is a very minor issue. I still feel this machine is very intuitive and easy to thread and use and I am getting close to finishing my first quilt with it. Update: I’ve now had this machine for 6 months and STILL love it! I am more experienced now (having completed 2 quilts and a 4 piece quilted placemat set) and only find that the thread cutter leaves it a bit short ( but don’t usually have to retread) and the needle threader is a little difficult. But the positives outweigh the negatives and you can get this machine for about $60-100 less than what I paid. Highly recommend!!!
C**K
Perfect for small scale production sewing
I already own a Singer Quantum Stylist which has all the fancy stitches, automatic buttonhole, etc. It's a fine machine but I needed something with a lot more power and speed to it, as well as more room in the throat. I make weighted blankets to sell, and during the holiday season I'm sewing up to 12 hours every day at moderate to high speeds. This machine goes SO fast. At top speed, when I'm doing 2 yard straight seams, I can just put the pedal to the metal and it feels like I'm in an industrial sewing warehouse. It gets really loud at top speed, and the neighbor I share a wall with finally got what was coming to him after hearing him blast his EDM music at all hours of the night. Ha! For sewing other projects, it does a really great job going through thick fabrics, especially with the walking foot. I love the size of the extension table. Also I love that it has a physical pedal for the backstitching. I really really hate that all the digital machines have buttons for reverse stitching. I need to be able to grab the pedal without looking for a button on a panel of 10 other buttons. Cons: - bobbin case is side loading, and there's nothing that alerts you when your bobbin thread has run out. I did eventually learn that there's a different sound when the bobbin has run out, so I can tell just by that. - the top thread tension dial is kind of hard to see. The numbers are labelled on the top so I have to really lean over the machine and get at the right angle. It also took me FOREVER to figure out that the dial shows different numbers when you have the presser foot lever up vs. down. - After heavy use for 1 year it's gotten super squeaky, despite proper lubrication. I've even tried over-lubricating and nope, it's still squeaky as an old wagon. - the pin feed stopped working. When I use the feed dogs on the pin feed setting, the pin lever doesn't move up and down anymore. Not sure what happened there. It was nice while it lasted. - the needle threader is complete trash, but it's better than nothing. Overall, it's a really great machine for the price, and I would buy it again. Brother is a good company that I trust. My local sewing machine repairman says that Brother is the best company to purchase from as far as repair and support goes, and he says after all his years repairing machines, the Brother machines have fared the best. He did mention that I probably shouldn't have purchased the PQ1500SL through Amazon...something about more parts being made out of plastic than if I had purchased it directly from Brother, but I can't find anything that supports that claim.
C**L
Strong machine.
Pay close attention to how this is threaded. I had the upper thread in the tensioner wrong. Also the needle threader is awkward to learn. Once you do, it works fine. The machine itself is awesome. Love it, does what I wanted it to do.
M**.
Excellent machine; great value.
This machine is a workhorse. It's very heavy, single stitch, has a large throat, and is fast. I wouldn't recommend it for beginners- get a Brother cs6000i if you're just starting out (I've had mine for 12 years and it's still going strong). However, if you're wanting something more heavy duty and have been eyeing a Juki 2000, but they're just a little too pricey- this Brother machine is perfect- and it's walking foot works very well without the clunking that the Juki has. Learning to thread it and load the bobbin takes a little time if you're used to a fancier machine or a drop-in bobbin; however once you figure it out, it's very easy. I do burn through needles on this machine though (they get very dull quickly)- probably because it goes so fast, but it's worth it. The extension table is very large. Bulky seams and thick material don't cause any problems. It is a high shank machine, and can be used to free-motion quilt. The only thing I wish it had was a free arm. I've owned this for 6 months, and I'm still very happy with it.
A**E
Ha sido mi mejor compra!! La amo
M**E
I thought the price was great and so was the product. You get numerous accessories and even a walking foot! The automatic threader works great! I know a few people said they found it hard to use but I don't know why? It works great for me; Perhaps because I watched a video and read a couple pointers that other people on-line pointed out. The only negative thing I can think to say is that, I wasn't fussy with the closed toe plastic covered free-motion foot that is included with the machine! I would think that most free motion quilters use an open toe foot without the plastic. I ended up ordering an open toe foot which cost $40.00 CAD. All in all though, it's a great machine!
R**O
Me encanta mi nueva máquina de coser! es cómoda, practica, robusta, sencillamente maravilloso precio-calidad!
C**X
I've only had this machine for a few days but what a work horse! I've done some small quilting and the 1/4 " foot is great. I used the walking foot to repair the canvas cover for my husband's boat and it didn't bat an eye at it. Strong, fast and surprisingly quiet. I'll update when I've used this a little more but so far I'm impressed. I'd read some reviews and it takes a bit of getting used to the threading and bobbin on this machine. This is definitely not a beginner or entry level machine. Also the needle threader is probably the most pathetic thing I've seen, but so far that's the only drawback.
C**A
This is a great sewing machine for all quilters out there. It is super fast and not complicated. Great little machine for quilting and sewing. Very solid and everything you need comes with it.
Trustpilot
1 month ago
1 week ago