Desert Online General Trading LLC
Dubai, United Arab Emirates
Desert Online General Trading LLC
Dubai, United Arab Emirates


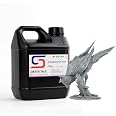
🎉 Unleash Your Creativity with Blu Tough Resin!
Siraya Tech Blu Tough 3D Printer Resin is a high-strength, user-friendly resin designed for LCD/DLP 3D printers. With improved workability, low viscosity, and high-resolution capabilities, this versatile resin is perfect for a variety of applications, ensuring durable and detailed prints without the hassle of strong odors.
S**E
Best Resin I've Ever Used
I can't sing the praises of this resin enough. Not only does it print beautifully, but you can get all the details you'd ever want just by being careful with your layer exposure settings (< time = more details).You can get any amount of flexibility/hardness depending on the amount of time spent curing.5 minutes or less of curing, and it's so flexible that it's basically a nylon. 5 to 10 minutes of curing it's not nearly as flexible, it gets harder but still doesn't break easily.It took me 30 minutes of curing to get it to a point where I could snap off supports with my fingers; anything less than that, a good pair of toenail clippers will be required.Ideal print settings on a Creality HALOT MAGE (regular, not pro) are 0.25mm layer size. 1s light delay. 2 - 3s per layer with 3 to 5 bottom layers at 10 to 30s, depending on the weight of the model.At 10s, you can easily just tug firmly, and it comes right off the build plate. At 30s, I was using a metal spatula and a rubber hammer to get it off, (it still didn't break, but I did have to completely realign my print head).If you want a really cool effect, mix this 50/50 with the Sunlu "abs-like" resins in blue or red.It also mixes so well with other resins. It's my go-to resin to fix other resins. I even used this to fix the super crappy Yousu silver resin.I wish I could buy this stuff by the drum.Long story short, this is the best resin I've ever tried, and completely worth the money.*I use the AnyCubic Wash and Cure 3 for curing, but you can also cure in direct sunlight, and the properties get really interesting.
A**R
Good stuff
Very tough, virtually no odor, very accurate. Needs to be at 25°C to print well, as it's fairly thick. Slightly translucent very dark blue/purple. Can be dyed opaque black with RIT Proline dye. (Don't waste your time trying to use the new consumer dye - it's garbage. The old stuff works if you have any though.)Best print settings with an Anycubic Photon Mono X seem to be 3 burn-in layers @ 14 sec. / 2.6 sec exposure time 50um layers.You need to be certain that the bottom of your build plate is flat and parallel to the LCD. I had to surface mine on a milling machine with a 6" flycutter to get it flat. Had to take off almost 0.010". If it's not dead flat you will probably have print failures.If you don't have a milling machine (why not?) then you should be able to get it flat with various grades of wet/dry sandpaper and a [minimum] 1/4" thick glass plate. Start with 80g and go up to about 320 max. in 4 steps. Start with 320 to see how far off it is first. If it's as far off as mine was, you will be there quite a while. Or mill it.Best way to get perfect prints (on any machine that uses the same clamping setup as the Mono X) - loosen the build plate screws , home the machine (do NOT put a piece of paper on the LCD - put your vat on the machine - empty, of course). Once the machine is homed, lightly press it against the LCD and tighten all the screws. Raise the build plate, loosen the clamp knob, and insert a piece of 0.003-0.005" thick paper between the build plate upper support and the carriage effectively raising the build plate by ~0.005". This also seems to damp some of the vibrations inherent in the machine resulting in better print detail. This only works on machines that clamp the plate to the carriage the way the Mono X (or regular Photon Mono) does it. BE CAREFUL - if you don't know what I'm talking about, don't try this - you may end up breaking your LCD.If you have difficulty getting prints off the base, try sticking it in a deepfreeze for a few hours. The print should just slide off. Put something under it in the deepfreeze to catch drips. Please note that any food in the freezer that isn't totally sealed will end up smelling/tasting like resin. Don't assume that something is sealed just because it's in a box. Ask me how I know...
D**L
One of my favorite resins
I've been resin printing since 2017, using a Qidi S-Box (largest MSLA print at the time for under $1000), and since mid summer of that year, I started using Siraya Tech resins.I've used other brands, like anycubic, Elegoo, and bunch of other brands.But eventually I end up coming back to Siraya Tech, the quality of resin for the price is really good.Over the years I've used Tenacious, Blu original, Build Smoky Black, and many others.But recently this past month, I bought a Elegoo Saturn 4 ultra, and it's been since March of 2024 that I made my last resin print. So I wanted to see what Siraya Tech had to offer lately, and saw a sale on the Blue Tough Easy Grey.And I have to say, the stock resin profiles on the Siraya Tech website for the Saturn 4 ultra have been really great! I thought I would have to spend hours tweaking profiles to get perfect prints. But I just had to load the stock profiles and go, which is something I'm not use to. It even makes really decent prints on the Elegoo high speed mode.As far as odor,it's not that bad compared to other resins I've used, your still notice it but it's not a really strong smell.Toughness, I've been using it to prototype linear screw drives, and it has been holding up pretty well, I'm not 100% on the wear resistance.But either way, I'm like always, pleased with the quality and price of Siraya Tech products, so I end up buying 4Kgs of resin during their sale, used up 700Mls so far
A**S
Great resin, very durable.
Great resin, quite a bit tougher than the resin I was using. It's slightly translucent when cured, but works really well in my AnyCubic Photon 2 Mono. Only issue I have is it still feels a bit tacky for a while even after curing, I just let it dry out for a few hours before priming.
Trustpilot
2 weeks ago
1 month ago