
Desert Online General Trading LLC
Dubai, United Arab Emirates
Desert Online General Trading LLC
Dubai, United Arab Emirates


🚀 Upgrade Your 3D Printing Game!
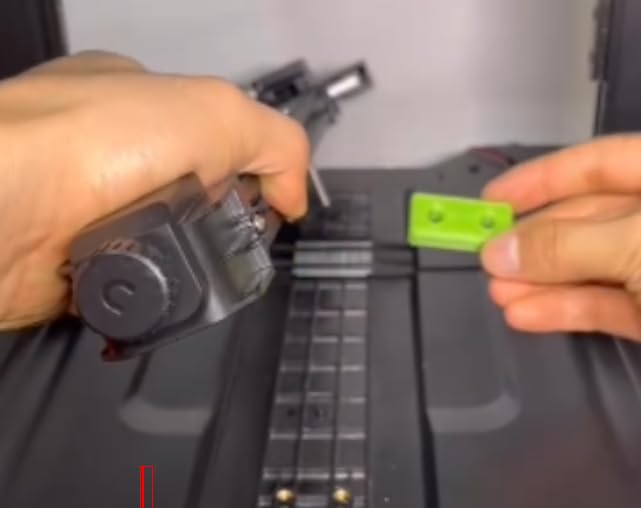
The 3D Printer Y-Axis Linear Guide Upgrade Kit is designed for Ender 3 series printers, including Pro, V2, and S1 models. This kit features MGN9 linear guide rails made from durable aluminum alloy, enhancing printing accuracy and extending the lifespan of your printer. Installation is straightforward and does not affect print size, making it an ideal upgrade for both novice and experienced users. Access additional resources and community support through Thingiverse.
W**Y
Works great out of the box
The media could not be loaded. I have a Ender 3 v2 with the Sprite Extruder Pro upgrade. I also upgraded the linear motion from rollers to linear rails on X, Y, and Z. The linear rail I originally had for the Z axis mounted on top but did not have a suitible way to mount the Sprite extruder. I ended up printing adapters which worked but I lost build volume and the belts did not sit right. I switched to a front mounted rail which sat right with the belts but I still had an offset Y by 15mm and lost volume. When I saw this upgrade with the MGN9 rail and top mount, I was instantly excited and bought it with out hesitation. When the package came I was able to install it with no issues. The video is showing the install for a Ender 3 S1, but was able to figure out the install pretty easy. The only confusing part was the two sets of holes on top of the mount for screwing on the rails. I got it by trial and error. Once the rail was mounted the rest was easy. Put the belts on, screw your hotend mounting plate and reinstall the hotend/extruder. I'm so happy to get back my build volume and no more Y offset. See my pic and video of my first print with the new X rail.Everything was however not perfect. The metal color for the mount to the MGN block was different for some reason. I got a gray one and a dark gray one.Notable mention that the MGN9 rail and block were butter smooth. I've bought quite a few of these that were cheap and have gotten lucky and not so lucky at times with the quality. I generally had to clean and grease them to make them work well. These were smooth out of the box.Overall I'm happy with this upgrade. I wish I didn't waste my time with the other ones. Don't let the price scare you away. These will save you time and effort.
S**S
Does NOT fit an Ender 3
Got this and was excited to put it on. First red flag that this was horrible was after getting it out of the box I noticed the carriages did not slide smoothly. I figured they would ease up with use so continued installing.Second red flag, I got to mounting the rails and neither fit. I had to move my belt adjuster as far back as possible and it still would not fit on the right side due to the y end stop. I moved back the end stop as far as possible and it BARELY fit. I was also missing screws for the rails to mount. After getting the rails mounted and feeling worse about the purchase, I attached the mounts for the bed carriage and then noticed that the holes on the mounts didn't come close at all to matching up with the stock bed carriage.This item should be taken down for falsely stating that this is for an Ender 3 when it clearly is not.
A**S
Seems good so far
I was able to get the rails installed fairly easily using the video instructions on the item's listing page, though it would have been nice if they included instructions in the box to show what screws go where.One star removed for it not including a guide to use to keep the rails aligned while installing them onto the frame of the machine. I had to use a combination of eyeballing it and order-of-operations when tightening the blocks to the slider bits so that it would keep everything aligned. I did this after watching a few YouTube videos showing how to install other linear rails.For the price, though, I can't knock it. Everything seems to be made of high quality materials, and they include extra hardware which I appreciate.
B**Y
Stable Printing
This thing saved my first ever printer. I bought an Ender 3 Neo V2 last summer and got some prints off of it but had a constant problem from the start. The carriage wheels were not tight enough allowing wobble when the boudin tube pulled on the whole thing (hot end an all) if it went to far to the left or right X axis.The printer was basically useless for good prints and the first layer was always a disaster. I was lucky if an easy taller print actually came out ok. I ended up buying an E5S1 to make up for it for the time being. I randomly found this while looking for a new hot end for the S1 and got it. Took maybe 20 min to install, and it works like a dream. My Neo v2 prints how I thought it would when I first got it.If you have any carriage sag or no matter what you do you can't get you gantry carriage to tighten to prevent wobble, this is literally a machine saver. Don't do what I did and just leave your old boudin printer collecting dust. Get this thing and install it. It can be a bit tricky depending on the printer but its well worth it and if you don't already, you will learn more about how to maintenance your machine and become better acquainted with it.
Trustpilot
2 weeks ago
1 month ago