We remain fully operational. Our teams are working around the clock to ensure your deliveries continue safely.

DOWNLOAD THE APP


Customer Services
Copyright © 2025 Desertcart Holdings Limited
DOWNLOAD THE APP


⚡ Debug Like a Pro, Connect Like a Boss!
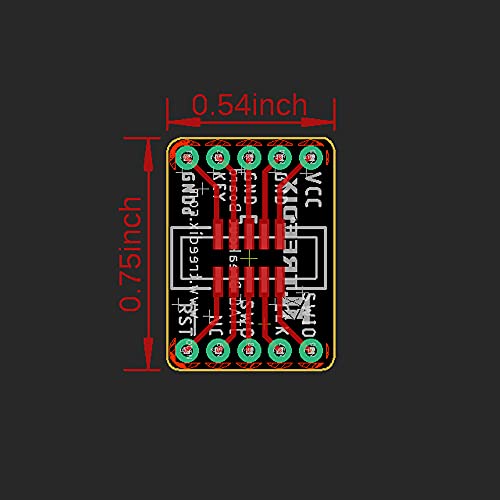
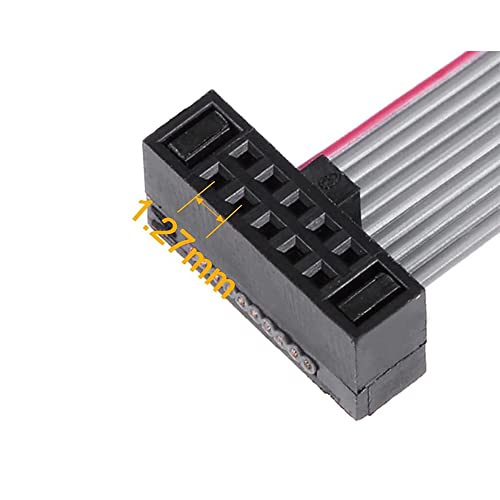
The Treedix 2pcs JTAG Breakout Board Adapter Converter is a professional-grade debugging tool featuring 10-pin female IDC connectors with a precise 1.27mm pitch, paired with a 200mm flat flexible ribbon cable. Designed for seamless JTAG and SWD data transfer, this dual-pack set offers robust build quality and FCC certification, making it an essential accessory for developers seeking reliable, high-performance circuit board debugging solutions.


| ASIN | B09DKDG7XN |
| Are batteries included? | No |
| Best Sellers Rank | #131,154 in Industrial & Scientific ( See Top 100 in Industrial & Scientific ) #271 in Jumper Wires |
| Brand | Treedix |
| Cable Type | USB |
| Colour | Grey |
| Compatible Devices | Charging Adapter |
| Connector Gender | Female-to-Female |
| Connector Type | 10 Pin Female to Female IDC |
| Country of Origin | USA |
| Customer Package Type | rigid box or protective cardboard mailer |
| Customer Reviews | 4.1 4.1 out of 5 stars (35) |
| Date First Available | 5 September 2021 |
| Indoor/Outdoor Usage | Indoor |
| Item Dimensions LxWxH | 19 x 14 x 2 Millimeters |
| Item Height | 0.06 Inches |
| Item Weight | 52 g |
| Item Width | 0.54 Inches |
| Item model number | Treedix-XXX |
| Manufacturer | Treedix |
| Model number | Treedix-XXX |
| Net Quantity | 2 Count |
| Number of Items | 2 |
| Number of Pins | 10 |
| Number of Ports/Connectors | 1 |
| Outer Material | Other |
| Product Dimensions | 1.91 x 1.37 x 0.15 cm; 52 g |
| Recommended Uses For Product | Debugging/Programming, Charging |
| Shape | Flat |
| Special Feature | Data Transfer |
| Specification Met | FCC |
| Voltage | 5 Volts |
M**R
Two boards included, solid build, very handy for development.
P**O
Very good quality,fit is tight and PCB is clean. I will recommend highly 😁👌
J**.
I used this breakout board adapter to connect to a J-Link EDU Mini.
K**A
This apparently only comes with wires but the listing explicitly says it's a breakout board with wires. I first thought this was a mistake but when the replacement came I saw that there is still no breakout board. The wire is useless to me without the breakout board.
P**E
I needed these for connecting JTAG to my projects. Works great. Pin labels are correct. Pin labels aren't quite the names I expected/use, but easy to figure out.
Trustpilot
1 month ago
2 months ago