
DOWNLOAD THE APP


Customer Services
Copyright © 2025 Desertcart Holdings Limited
DOWNLOAD THE APP

🚴♂️ Ride Ready, Rain or Shine – Carry More, Worry Less!
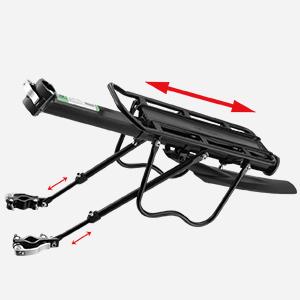
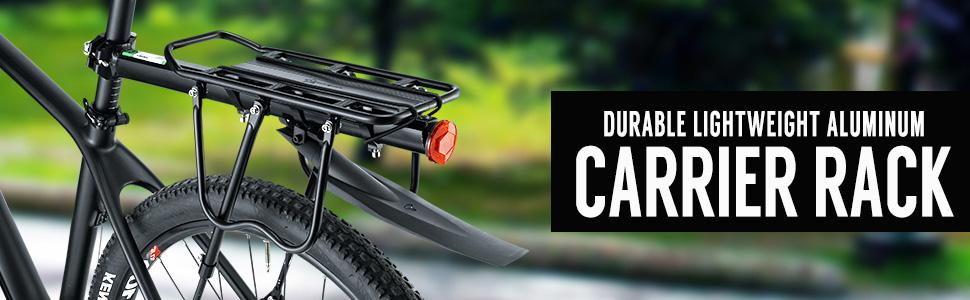
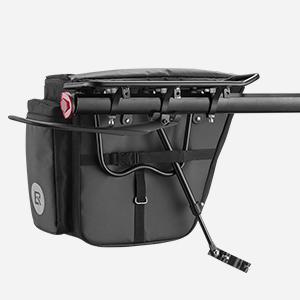
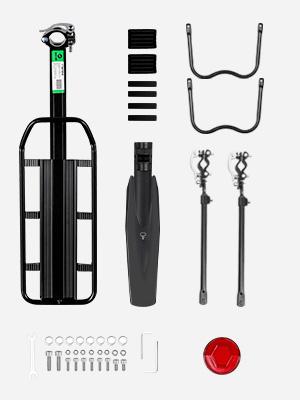
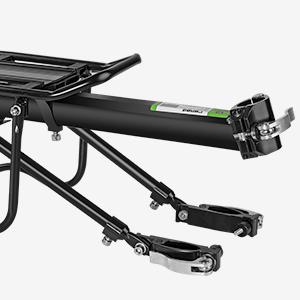
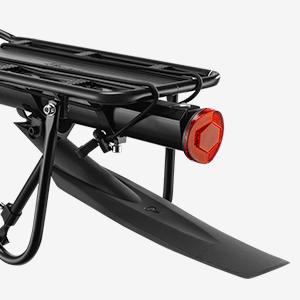
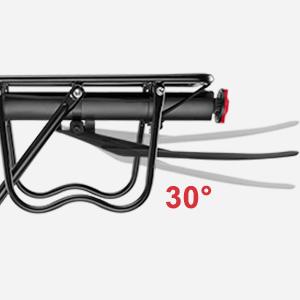
The ROCKBROS Rear Bike Cargo Rack is a versatile, quick-release aluminum alloy rack designed for 26-29" mountain bikes. It features an adjustable frame, removable mudguard, and integrated reflector, supporting up to 55 lbs of cargo with durable stainless steel hardware. Perfect for commuters and adventure seekers who demand reliability and style on every ride.


| ASIN | B07219CDH7 |
| Best Sellers Rank | #37,961 in Sports & Outdoors ( See Top 100 in Sports & Outdoors ) #9 in Bike Cargo Racks |
| Brand | ROCKBROS |
| Brand Name | ROCKBROS |
| Color | black |
| Customer Reviews | 4.3 4.3 out of 5 stars (3,041) |
| Date First Available | June 8, 2017 |
| Included Components | Elastic luggage rope, Installation tool, Rear bike rack, Removable mudguard |
| Item Dimensions LxWxH | 20.67 x 5.51 x 20.67 inches |
| Item Package Dimensions L x W x H | 22.2 x 7 x 4.2 inches |
| Item Weight | 1200 Grams |
| Load Capacity | 55 Pounds |
| Manufacturer | ROCKBROS |
| Material | Aluminum |
| Model Name | rear bike rack |
| Mounting Type | Rear Seat Mount |
| Number of Items | 1 |
| Orientation | Rear |
| Package Weight | 1.59 Kilograms |
| Part Number | HJ1008-1 |
| Product Dimensions | 20.67"L x 5.51"W x 20.67"H |
| Size | One Size |
| Sport Type | Cycling |
| UPC | 783057040556 |
| Warranty Description | 1 Year |
| Wheel Size | 29 Inches |
N**R
Great cargo rack & bag
Two people easier & faster to install it. Cargo rack well made & when everything is said & done looks sturdy once everything is tightened. Next week will test this on the trails. Bought the bag separate since I like the design & quality of the bag. Overall great price for bought purchase.
L**T
GOOD QL Carrier.
Great commuting/shopping rear rack at a great price. The seat stay bars solved any sway issue I had with a prior beam-only rack (returned). This carrier stands up to a reasonable amt of cargo - again, compared to beam-only. BUT I'm glad other reviews mentioned assembly was bit tedious for them, too (took me > hour). All parts/hardware fit well, instructions are adequate. The full quick release was the selling point for me and the mudguard is perfect bonus. Weight; After unboxing, I weighed the different components (below) for this rack, to compare against other racks. Rack & QL 680g 2 Seat stay arms & QL 337g 2 Side W-frames 120g Mudguard 41g Reflector 22g (Total weight 1200g) Happy with this rear carrier.
C**I
Good all around rack. Light. Stylish. Easily removed.
My only real complaint is the way the bolts that secure the adjustable parts such as the seat stay anchor supports or the sliding rail for the platform cut into the painted aluminum. As shown in the picture, it leaves a circular dent which is not just a cosmetic problem. I got a very nasty aluminum shard in my finger just from brushing over it. The bolts dig into the aluminum and leave very sharp splinters. Once you are aware of it, it shouldn't be much of an issue. I will likely sand and paint these rough circles. The included tools worked adequately. They were the correct size but you need to get the angle just right for the wrenches while tightening. The rubberized material for the clamps works well but it would be good if they included a flexible adhesive to hold them in place. It is tricky to get them aligned while tightening the clamps. You go through this process each time you reinstall the rack so gluing them in place makes sense. I see the instructions say this is not for carbon fiber bikes but I assume that is because the seat stay mounts could crack the carbon fiber and the maximum weight would be reduced as well. But I've installed it on my Specialized Diverge which is a carbon fiber model. I have been very careful to not tighten the seat stay clamps to much. As others have said... Install the reflector first! I didn't and had to do it all over again because with the deck pushed back to where I wanted it (needed to clear the seat bag), the reflector was underneath the deck requiring the deck to be moved for installation. You will want to loose fit everything first then set the deck screws and then install the fender. Leave the adjusting of the seat stay braces for last. The seat tube clamp is a little wide and I find my thighs just touch it at times. The clamp lever itself needs to be rotated upwards to keep it clear as well. I've not loaded it down with much yet and I will try to update this review once I've put it through its paces.
G**N
Functional and good looking
I had a triangle frame bag before I decided to go to this rack along with the hardshell bag. The frame bag always interfered with pedaling as the inside of my thighs would always rub on it. This caused me to have to constantly adjust my legs. I wanted the frame bag gone a long with more storage, plus the option to expand with side bags if the need arises. I was hesitant to put on the cargo rack at first, I wasn't sure it would look that good. But now that it's installed I like it. It has the same matte black finish as my bike frame and really looks like it could have come with the bike to begin with. It did add a noticeable amount of weight to the bike. I realized this lifting the bike up to place it on the wall rack I have. But the extra weight isn't noticeable while riding. I was pleased to find that the ride quality of my bike has improved since installation. I think the extra weight on the rear allows the bike to absorb the impacts better. I noticed that while riding on the uneven brick roads in my neighborhood that the comfort of the ride had improved significantly. Plus, when jumping off or on tall curbs at speed, the bike feels much more solid. Installation was easy following the YouTube video. I found that using a tape measure to ensure the bars that connect the rack to the lower rear frame are exactly the same length made it much easier. This also ensures the rack is level and centered on the bike. So, overall I am pleased and would highly recommend this rack.
C**N
5 Star
Why did you pick this product vs others?: Great value for the money. Easy to install Very sturdy Sturdiness: Very sturdy able to hold heavy items Mountability: Easy to mount
G**S
Looks good can’t give opinion yet on durability. Hopefully it will stand the test of time?
J**S
Its not Rock Bros as shown , i received diffrent item as i ordered shown .
م**د
وصل ناقص بدون رفرف
Trustpilot
2 months ago
3 days ago