✨ Light Up Your Life with Style!
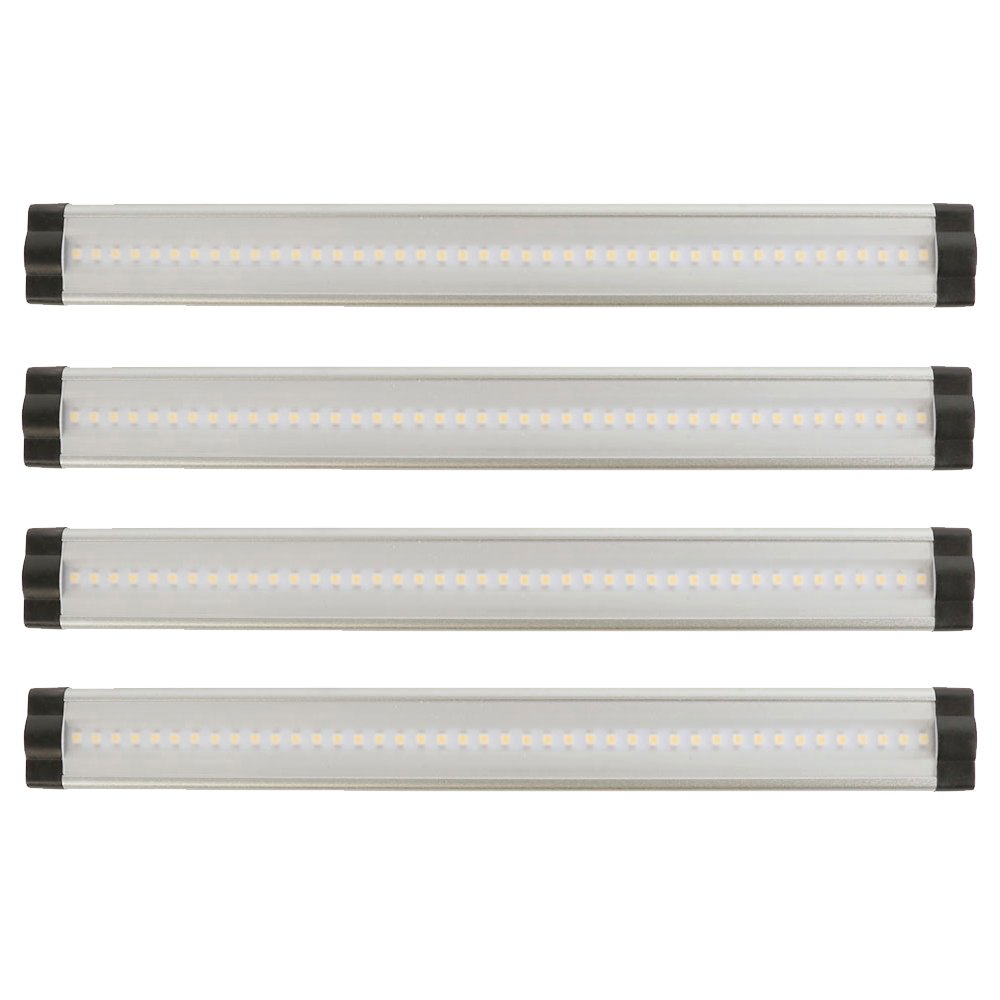
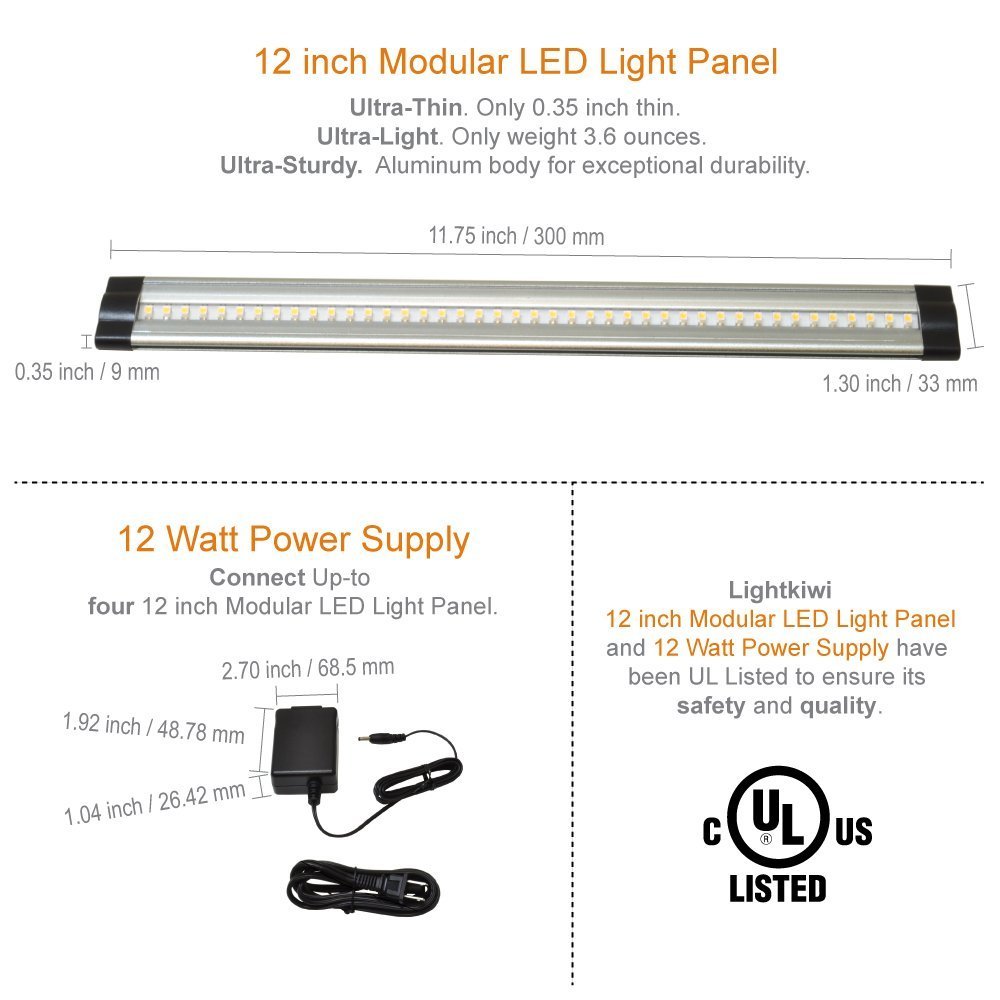
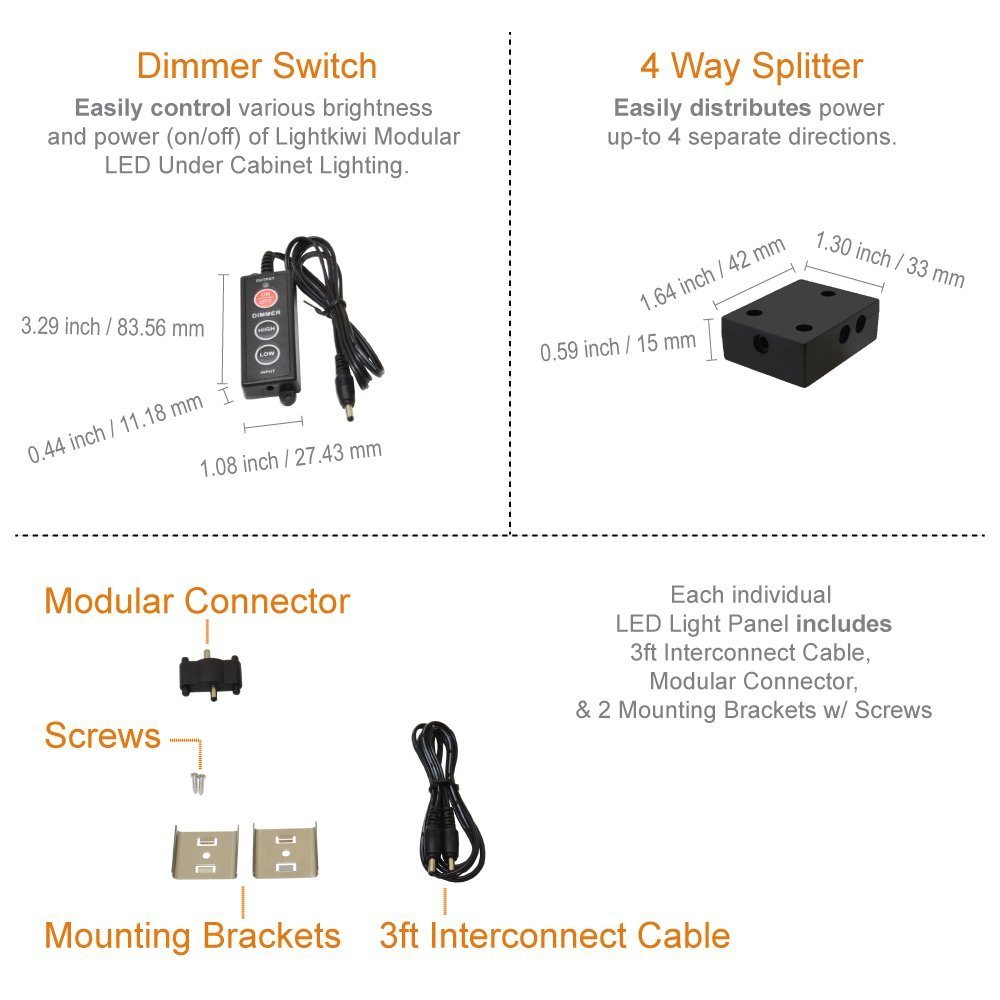
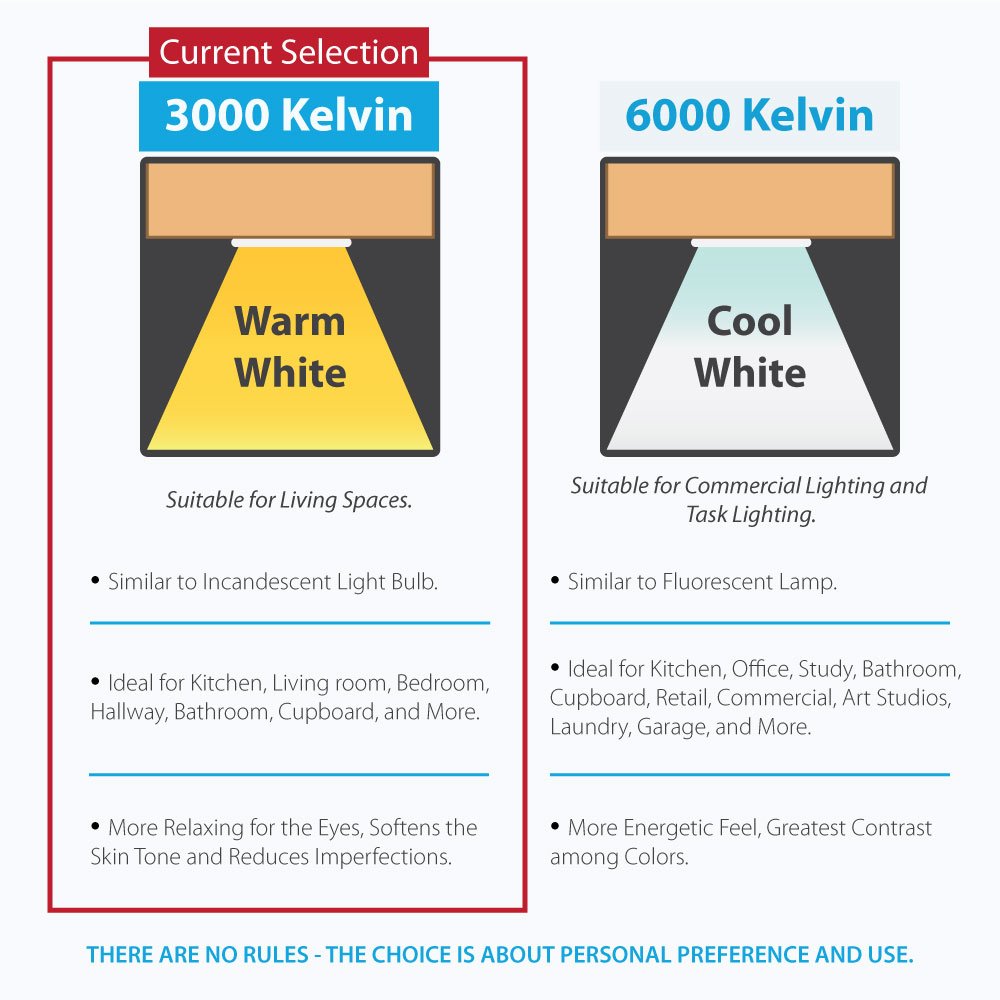
The E7574 Dimmable LED Under Cabinet Lighting Kit features four 12-inch panels that deliver warm white illumination (3000K) at just 12 watts. With a low-profile aluminum body and included dimmer switch, this UL-listed product ensures both aesthetic appeal and energy efficiency. Designed for easy installation and expandable configurations, it comes with a 3-year warranty and a lifespan of over 35,000 hours, making it a top choice for professionals and DIY enthusiasts alike.
J**O
Ab-so-lutely high-end fabulous - Lightkiwi scores with this easy-to-install set!
This is the neatest and most simple kit imaginable. I was up and running with under cabinet lighting in a little over an hour and it looks professionally done and is wonderful!!!For starters, I had an electrical socket inside the cabinet over my microwave which made this hidden installation completely possible. With that, and a few carefully placed 3/8" holes (to fit the ends of the cords through), I wired all the cabinets in my kitchen - even the lone cabinet on the other side of the window. While I was waiting for the kit to arrive, I thought through how I'd install - so it was a breeze when it arrived. The splitter made it possible to send the lights in two directions; very handy.The light to the right of the microwave is on its own cord. The lights to the left of the microwave are all strung together with the 3' cords. I bought a 12' cord additionally to string up through the cabinets on either side of the sink, and sent the cord over the window trim. The cords are very petite, and actually stuffed down between the wall and the trim for most of the length of the window. I can't see the wires, and it's awesome to have light all the way around my kitchen.Like another reviewer, I ran the cords down the front corner of the cabinet. I simply moved the shelves forward to secure the cords exactly how I wanted them and so I could keep them from drooping or sliding. You don't even know they are there. Again, they are super petite. And you don't see the holes I drilled, because they too are hidden by the framing of the cabinet and are in the front corner.When I turned the corner with the lights, I simply drilled a hole in the bottom frame of the cabinets so the wire wouldn't have to tuck underneath and be in view. I stuffed the extra wire up into the space between the cabinets and you wouldn't know it's there.The dimmer that came with the set is okay. It isn't the smoothest operation, but it does the job. The dimmer setting stays when you turn the lights on/off. I have it resting on top of my microwave. I covered the red power LED indicator light with electrical tape, because I don't want to see it shining up there. But I can reach up on top of the microwave and turn on/off or dim the lights. It's simple. I'll wait and see if I want to buy the remote control unit so I can hide everything in the cabinet above the microwave. I may just add a magnet to the back of this dimmer to secure it to the top of the microwave housing. We'll see. However, the remote is affordable, too - so I'll probably end up buying that eventually.I will say this about installation - it is easy to drill the holes, easy to run the wires, but putting the brackets up was my biggest challenge. You must have a strong set of tiny phillips screw drivers - the kind you use to fix your glasses. You will not be able to use a dollar store plastic set - you'll never get the screws into the wood - even with pre-drilling - without breaking your screwdrivers. So go get a metal set of tiny screwdrivers (thankful I had a set). Then, you will HAVE to pre-drill the holes... again, it's awkward screwing these tiny screws in with a tiny screwdriver. You don't have much tork, and they are tiny. You're destined to drop them a few times - and lucky if you don't lose them. Fortunately, they give you two extra screws with each light... so you can afford to lose some.When thinking about how the lights clip into the brackets, I felt it was important to out a small space between the front edge of the cabinet and the bracket - that way I could flex the bracket to get the light out should I need to. So, when I hung the brackets, I used a chip clip where I was going to install the bracket to give it about 1/4" space from the front of the cabinet. I set the bracket against the chip clip and predrilled a hole through the screw hole in the bracket. I put a piece of tape on my drill bit to the depth I needed to drill - so I wouldn't end up pre-drilling into a box of cereal above. This worked really well.Once pre-drilled, you can then fight to hold the bracket, tiny screw, and tiny screwdriver (tiny... it's all tiny) to put the brackets up (2 per light). You'll get the hang of it after the first couple and it'll be easy to finish the rest. I have a blister on my finger from gripping the tiny screwdriver so tightly - thankfully I wasn't doing a huge kitchen!!!And then there was light! I ordered "warm" - but these really aren't particularly warm. It looks more like natural light. However, the dimmer is a wonderful feature and they don't have to be super duper bright if you don't want them to be. I'll get used to it not being a super warm tone like the lights over my stove. And yes, if you stare at them, you will notice the super fast "LED flicker" - so just don't stare and you probably won't notice. And some people may not ever notice... it is NOT a deal breaker... and you get it with a lot of LED lights.Lightkiwi put together a super awesome set. Super easy to install with just a drill, two drill bits, some tape, and a tiny screwdriver (tiny). They plug together like a headphone set goes into an ipod. So easy!! If you've got a plug in an upper cabinet, you are all set. They are beautiful, I'm thrilled, and I'll be recommending these to everyone I know!
D**O
Excellent design and quality
Excellent design and quality; I would recommend these to anyone who wants under-cabinet lighting for kitchen counters.The lights themselves are an elegant, solid design housed in a substantial aluminum extrusion with sturdy plastic end caps and a clear plastic window. Though lightweight, they look and feel well made -- the perfectionist in me likes that, even though most likely no one will ever see the fixtures mounted under our kitchen cabinets.The mounting clips are simple and effective. Unlike other reviewers, I had no trouble with the tiny screws. I drilled generous pilot holes and rubbed a block of paraffin (the wax used for sealing jars of homemade jam) across the screw threads before screwing them in, leaving shavings of wax between the threads. A bar of soap or a candle would also work. I used a small Phillips screwdriver that I usually need for computer and other electronic hardware. The clips are designed to spring slightly as the screw tightens and have slightly protruding gripping tabs, so you don't have to honk down hard on the screws to seat the clips firmly.I mounted the lights 3/4" back from the lower rail of the cabinets' faceframe; any closer and the rail blocked some of the light, casting a noticeable sharp-edged shadow on the floor in front of the counter and blocking the light from reaching the upper part of objects standing on the counter near its front edge (or your hands, knife, etc. above the front edge of the counter). With the light fixture mounted slightly closer to the back of the cabinet, the fixture's own, more gradual light fall-off makes no noticeable pattern on the floor, and the light better illuminates things above the front bit of the counter surface. You will want to experiment with your own configuration, watching not only the countertop, but also the floor in front of it and an object standing on it near the front edge.The wiring is trivially simple and tool-free. Unlike the main competing product, the power supply for these lights is a very small "brick" with a separate cable to the wall plug, rather than a "wall wart" that protrudes directly from the wall socket. This makes it easier to use a plug located, for example, behind a refrigerator or other appliance. While I would prefer a sideways, flat-to-the-wall style plug, the standard in-line plug at the end of the power cable still does not protrude as much as a "wall wart" would.The provided connecting cables are longer than needed for most applications, but are thin, flexible, and lightweight, so they are easy to bundle and hide. The modular cabinets in our kitchen have a roughly 5/8" gap between the sides of each unit behind the faceframe. I just twist-tied the extra length of cable and stuffed it up between the cabinets; the cable does not weigh much, so friction holds it there. For my next installation, in which two cabinets are separated by a protrusion in the wall, I will be glad to have the long cable.The lights are plenty bright to illuminate our countertops well when spaced with one under each cabinet door, about 10" apart (12" light units with 10" gaps between them). In fact, we generally leave the dimmer setting turned down partway. I don't notice any irritating shadows or flickering. The "warm white" color is a good, bright, natural-seeming white, not the slightly yellow dingy color that that "warm" sometimes implies.My only (and minor) reservation is the on-off/dimmer switch unit. It is well-made for what it is, but it the three pushbuttons feel like they are probably membrane switches, and are covered by a single sheet of slightly flexible plastic. In my experience, this style of switch tends to wear our fairly quickly -- not a good choice for lights that will probably be turned on and off daily. On the other hand, the unit would be very simple to replace if that were ever necessary, provided that the company was still making the part and was around to sell me a replacement.I like that these lights were so easy to install, use very little power, generate virtually no heat, and won't need a replacement bulb in my lifetime. But the bottom line is that preparing food in our kitchen is much more pleasant with this under-cabinet lighting.
C**S
Hermosa y fácil
He instalado estos debajo de los gabinetes en la cocina para la luz de mostrador. Son geniales. Fácil de instalar sólo usando cinta adhesiva doble que viene con ellos. Incluyen un interruptor de atenuación. Muy buen producto.
Trustpilot
2 months ago
1 week ago