Some deliveries may take a little longer than usual due to regional shipping conditions.

DOWNLOAD THE APP


Customer Services
Copyright © 2025 Desertcart Holdings Limited
DOWNLOAD THE APP


Stay Secure, Stay Connected! 🔒
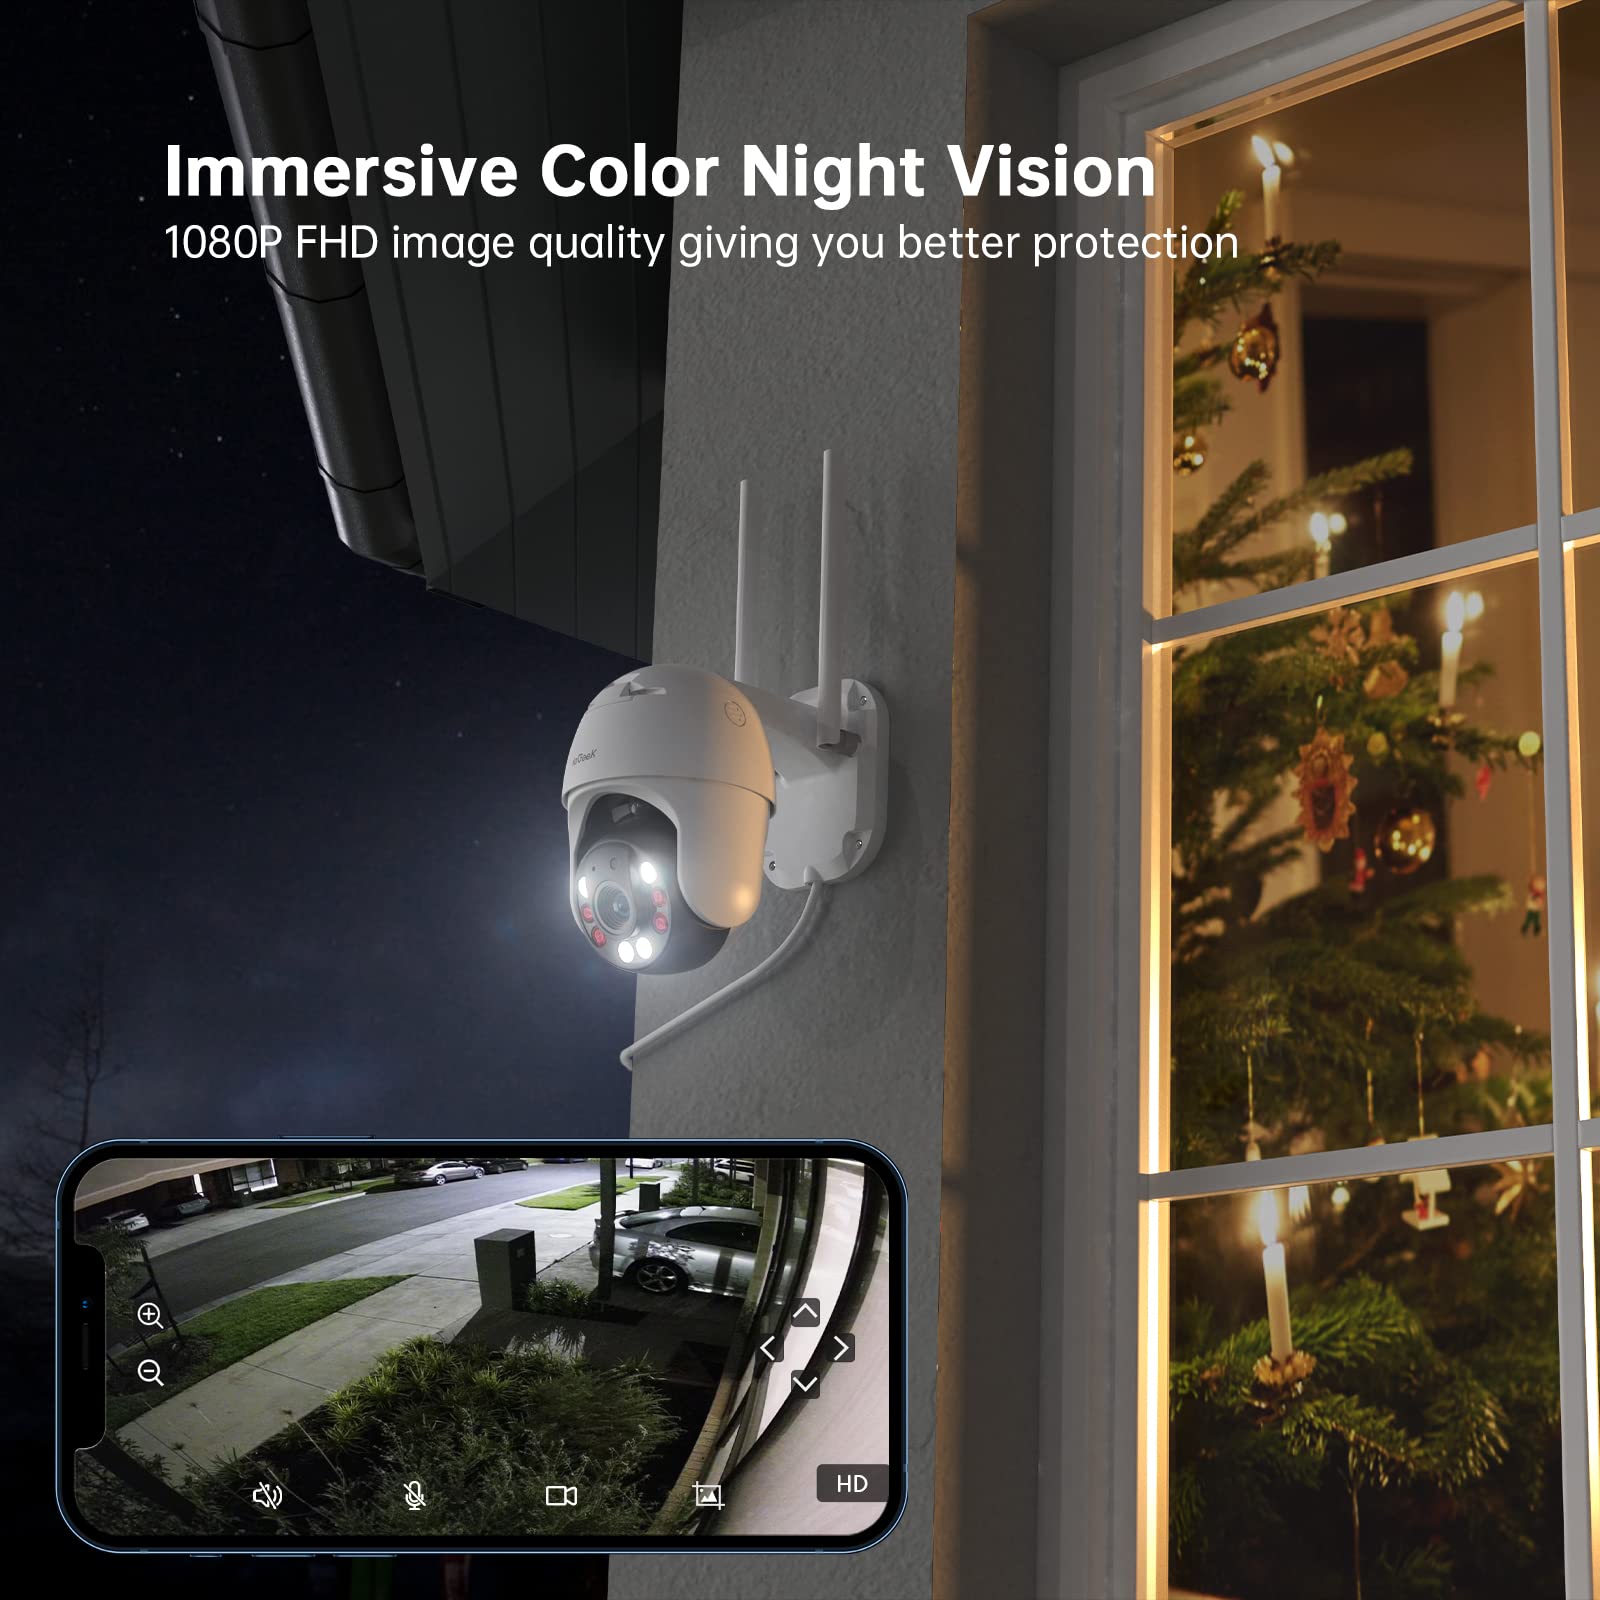
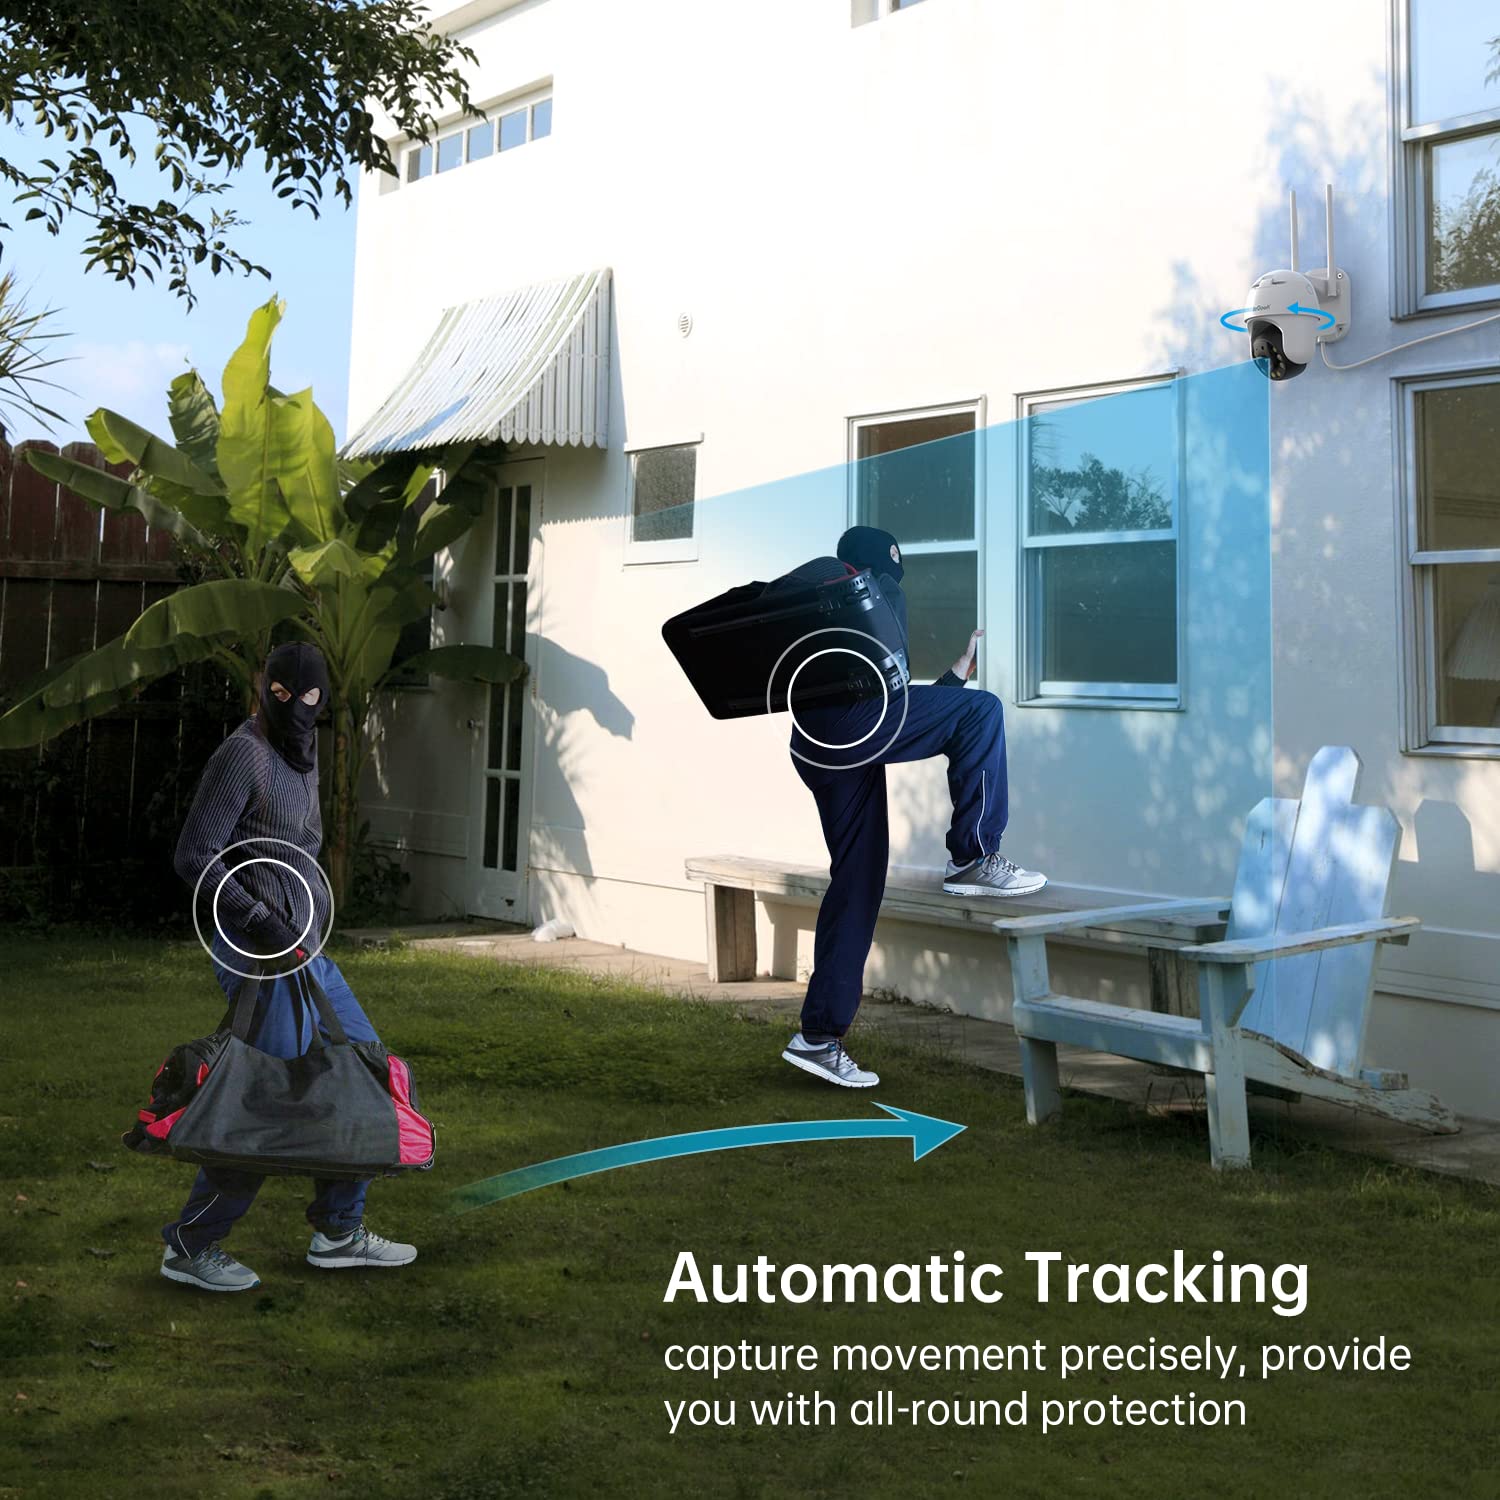
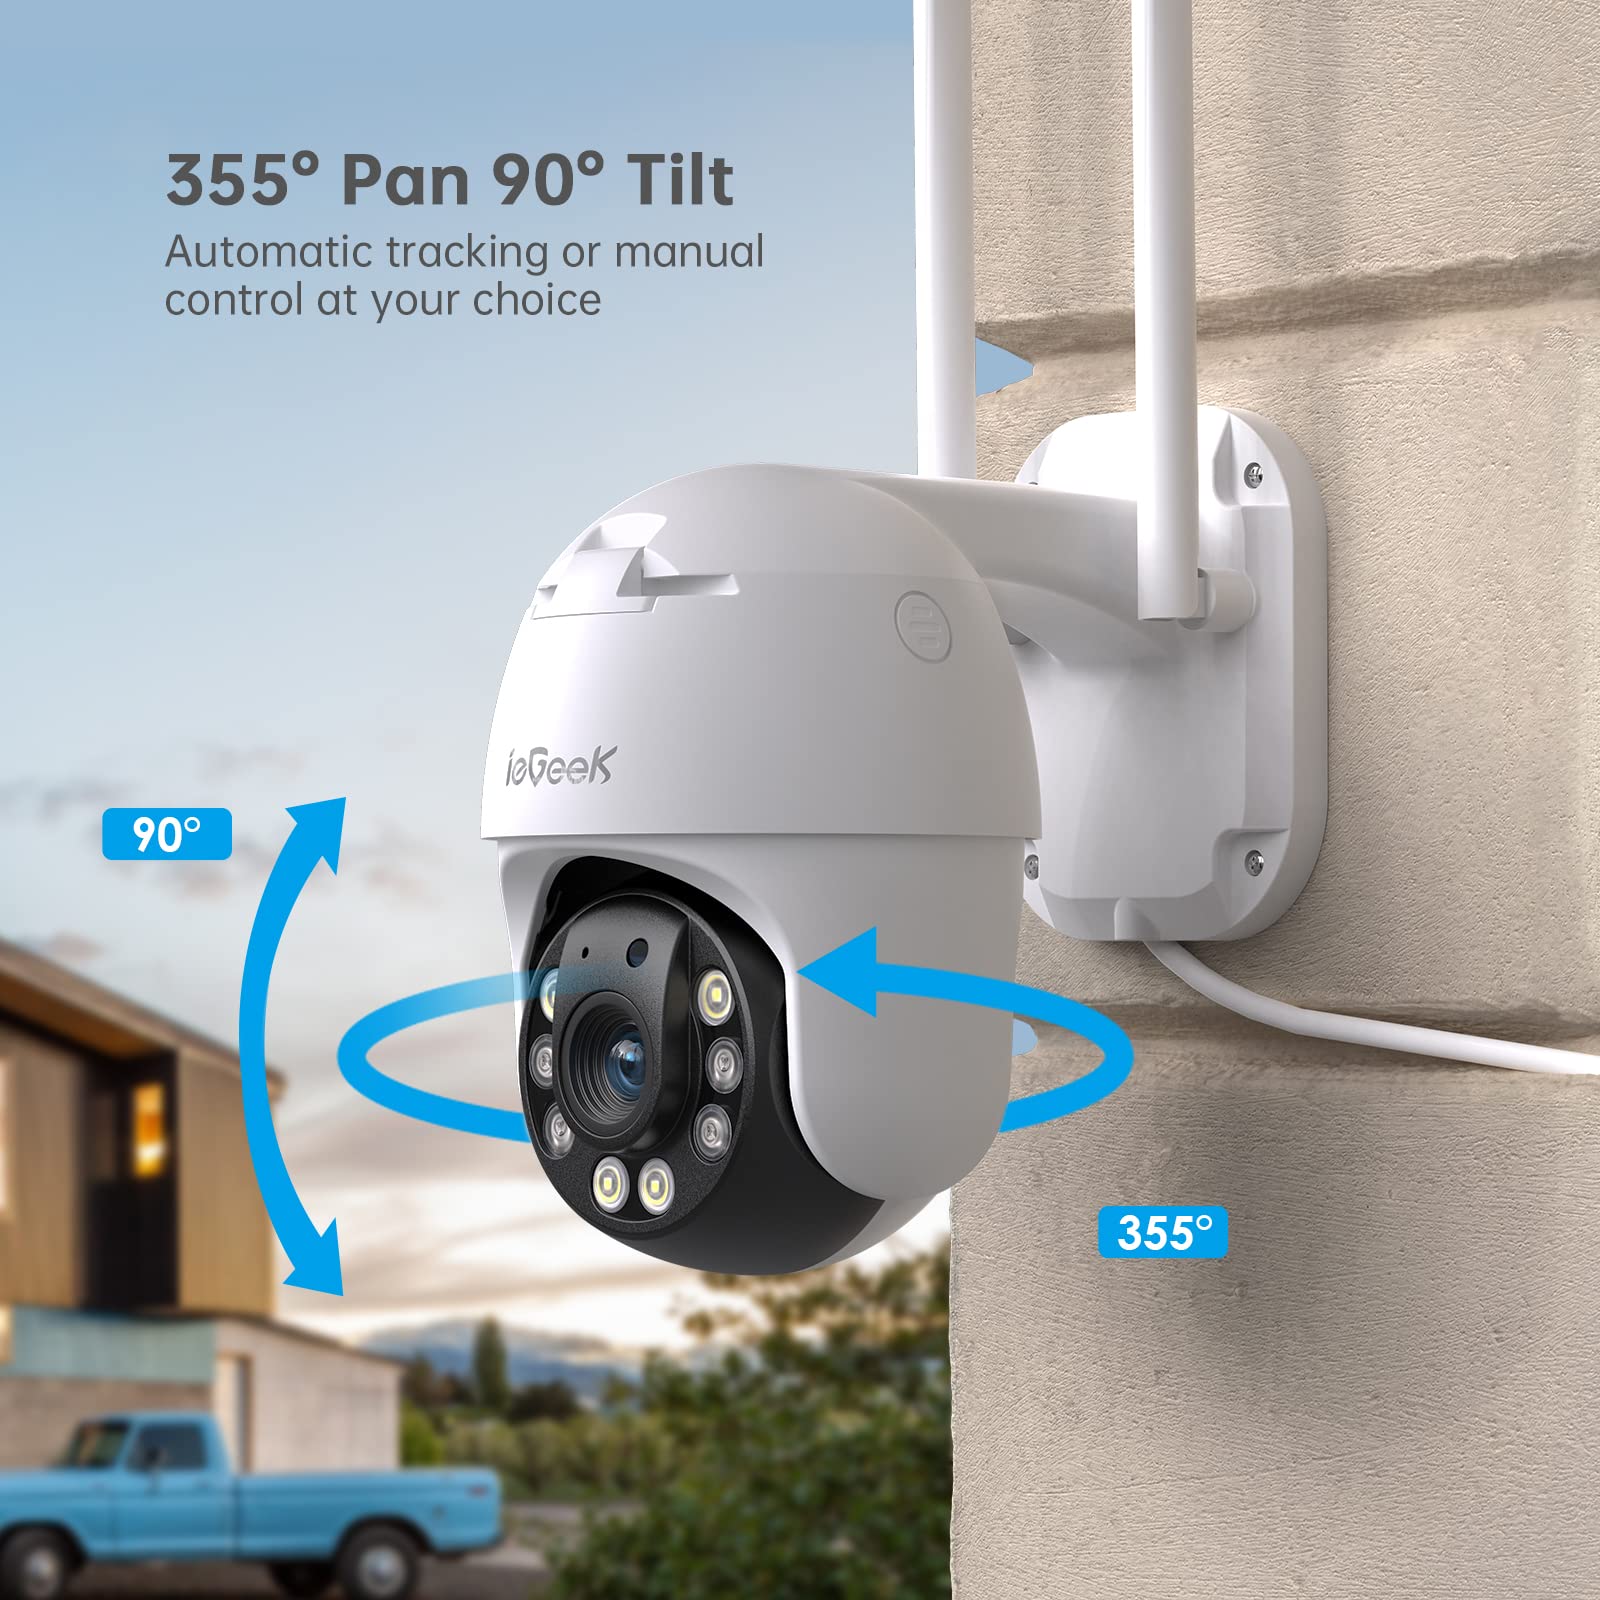
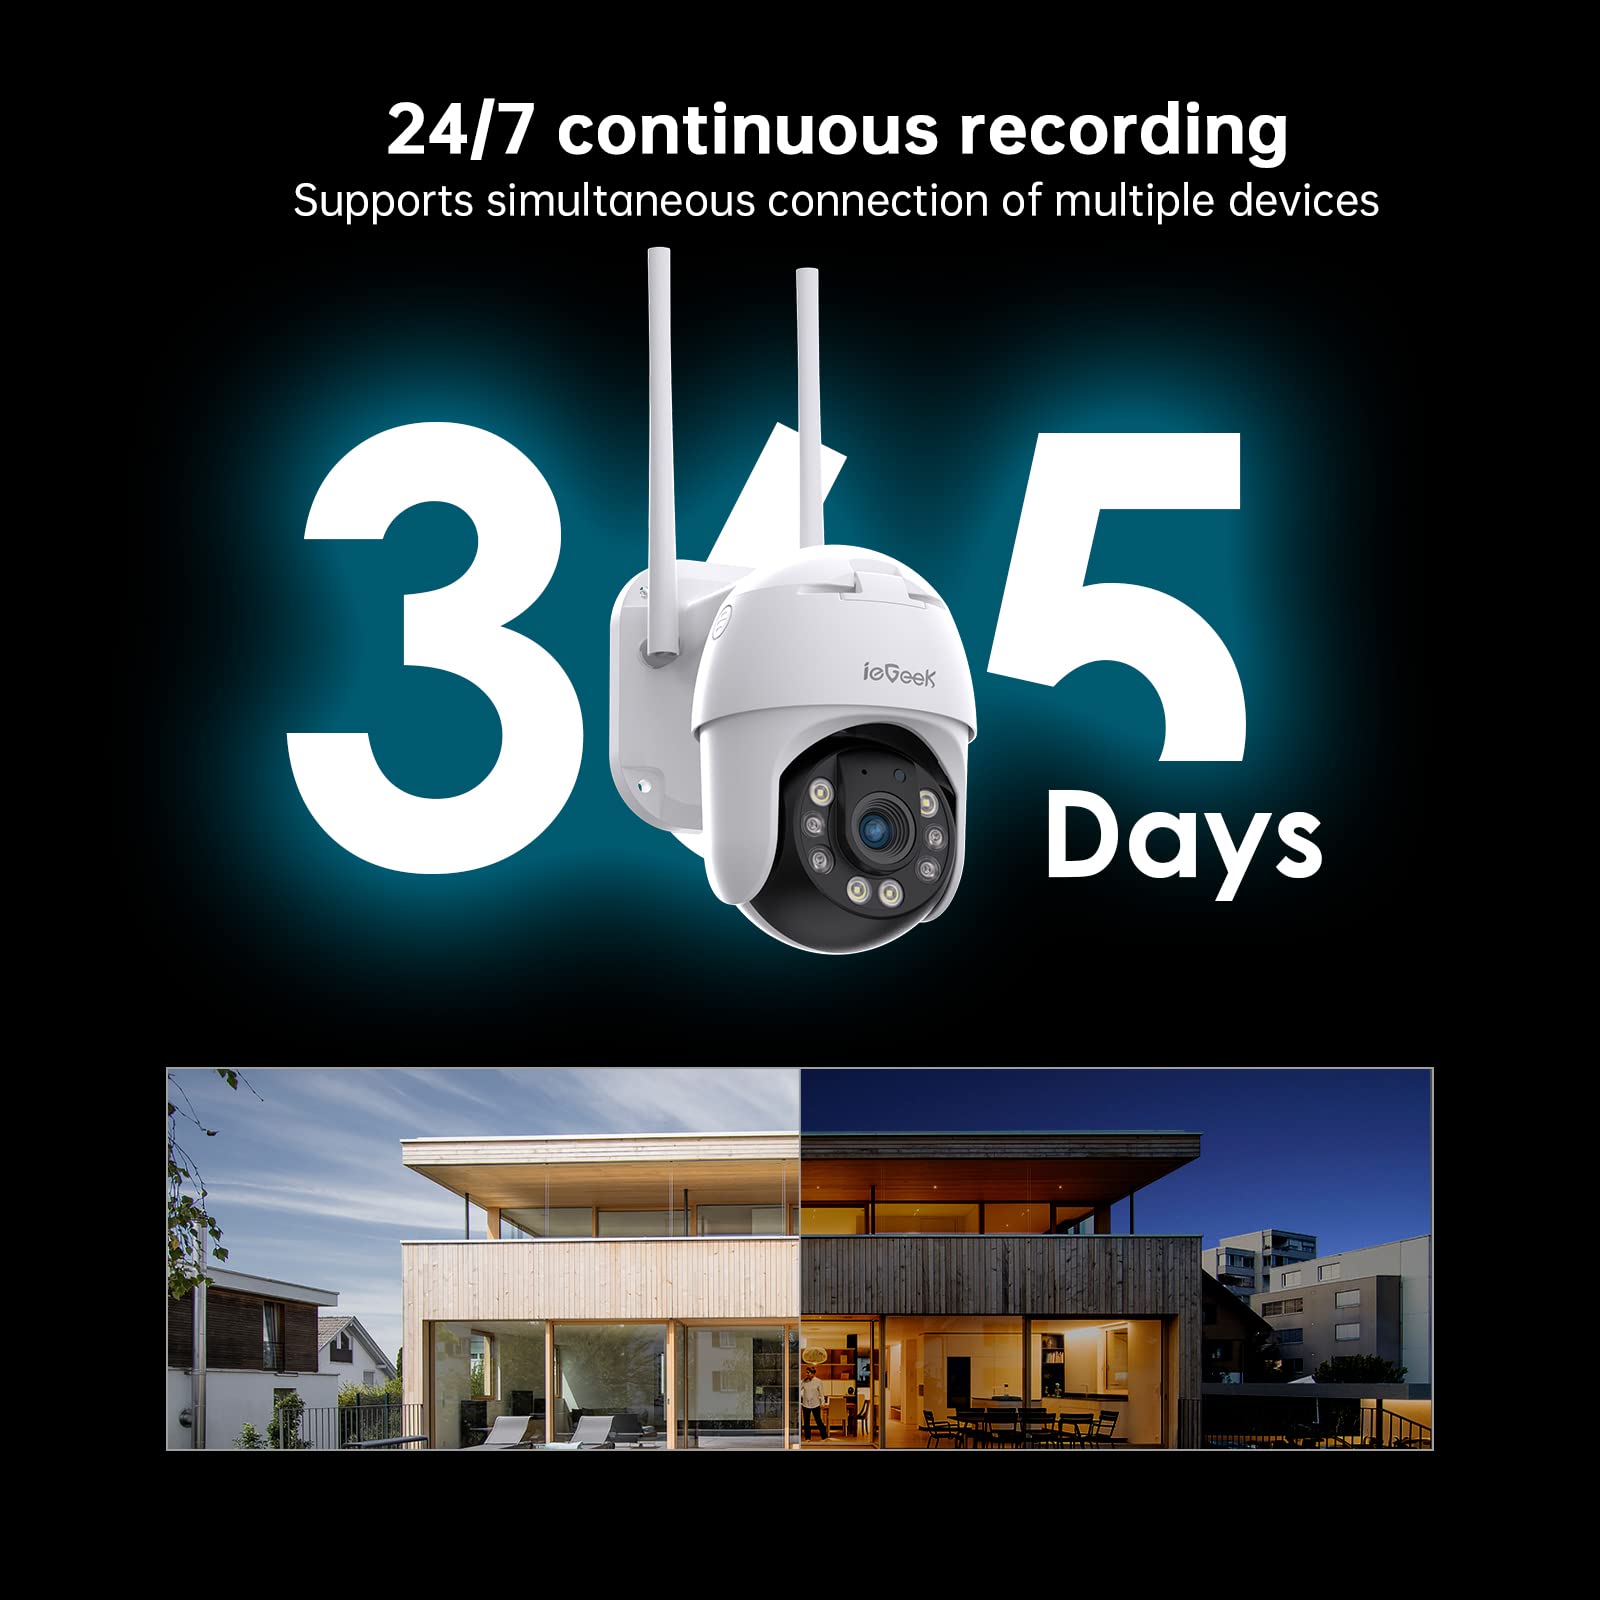
The ieGeek 360° CCTV Camera is a state-of-the-art outdoor security solution featuring advanced humanoid detection, 1080P HD color night vision, and robust two-way audio. With its auto-tracking capabilities and 24/7 recording, this camera ensures comprehensive surveillance and peace of mind, all accessible via a user-friendly app.
P**L
Great for capturing wildlife in high definition
The media could not be loaded. This camera is stunning - far better detail and higher definition than earlier iegeek 1080P cameras and far wider viewing angle.For the novice out of the box wanting wifi camera to work....If you follow basic instructions, download app to your phone (say Camhipro) use ethernet cable connected to router and set up wifi as instructed. (I have my cameras on wifi not ethernet, the reason being I don't want to drill 'big' holes in walls to feed ethernet cables through to router). I actually installed ABS boxes on exterior of house to contain all cables everything except 12V power cable.Firstly, the app...There's a few settings you might want to alter and use, alarm recording etc.You can alter 'Humanoid alarm' to 'frame human form' if you want see frame of AI in app recording and what has caused 'human' trigger. It's not infallible - the neighbours fat black cat sometimes triggers it at night...haha!You can also use this 'Humanoid alarm' function with 'motion detection' if desired and link the two together and define area trigger. I personally don't use this, and I'll explain why further down.I actually cranked the bit rate up to 6144 and frame rate to 25Fps in video settings. Because it is VBR (variable bit rate) and Fps is maximum frame rate, the camera decides what is best in firmware...i.e these are not fixed, so will vary regardless...some people think the camera is 'fixed' to this bitrate and Fps - not true...I also did this because video definition is higher and much clearer than default video settings..The video replay will 'stutter' on playback in app after trigger (if you look at little symbol of SD icon on 'Camera' you can access all triggers and view them). Consider this a 'preview' of what caused motion trigger...it seems that when camera triggers off movement, the frames 'freeze' on trigger and causes 'stuttering'. I see others complaining about this...however, if you 'download' triggered video to app, SD 'symbol' 'download' this puts video in app folder. Then return and go into app folder icon on main 'Camera screen'. Hit the blue 'download symbol' at right hand side of saved video in app...and then hit 'determine' - it means 'yes'...another Chinese term haha! This converts and puts video in your phone. Now, replay video that's in your phone memory...hey presto...no 'stuttering'... and a smooth video. I've tried this on my Samsung S9+ - I just look in 'gallery' and recent videos.I also set the camera up for email as an experiment...a bit fiddly, particularly as I use btemail...took me a while to find the server port and settings - SMTPs name - mail.btinternet.com, server port - 465, safe link - SSL, authentication on.I actually tried this on another hotmail address I have, these are the settings, SMTP name - smpt.live.com, server port - 587, safe link - STARTTLS, authentication on.Make sure you put the 'receive alarm push' on in settings 'alarm management and notification' setting - this will allow camera to transmit email trigger within seconds...This option sends 'snapshots' via email of what caused trigger. You can set how many pictures to be sent...'alarm management and notification' tab in app, right at bottom 'number of pictures taken' - you can set this between 1 and 3.It works pretty good...Now, there is another way of accessing more 'advanced settings' not available on app but with your own PC on same network in your house.This is how you do it...In the app, if you scroll down in 'camera settings' and 'Device information' it gives an 'IP address of camera'.Note this, and type the address in search web bar...(I use Chrome).This camera has a web interface...it should come up with login screen. The default is login name 'admin', password 'admin' (unless you've changed password previously - which I highly recommend...).You won't see any live stream off camera - the reason being (in my case), Microsoft/Chrome block flash player automatically as a security risk, and this uses flash player (if you re-enable it - you will see live feed from camera). You can also enter 'settings' tab, it'll possibly ask login name and password again. There's a plethora of settings...I actually changed the 'H265' default video setting to 'H264 High profile' (you cannot access this in app on phone). I'm not a fan of 'H265' encoded videos, although it might be great, a lot of older devices don't support 'H265' - it is a new compression method. I actually see no difference in video quality. I also saw some guy complaining that he could not upload 'H265' videos to youtube (they don't support it) on questions about this camera when I looked last night...There is another reason, I changed the video to 'H264 High profile' below...I've actually got these cameras working on 'Contacam' software - I have two, monitoring back garden and front garden. They use RTSP, so I can access them with IP address and RTSP port 554.I love this software on PC - purely my own preference. I can define in intrinsic detail area of what triggers cameras on motion detection...mask out tree branch movements etc.So, I use a standalone fanless PC in house triggering and recording separately at night time using Contacam.I primarily use the cameras to monitor wildlife in my front and back garden with PC and Contacam software.However, I found that Contacam drops camera feed if video setting is 'H265'. When cameras are set to 'H264 High profile' they work perfect. That's why I altered it.The HiP2P Client software they recommend, I ditched. It worked great on microsoft windows until I changed passwords on cameras. Then I couldn't login (even with new password I set on cameras)...couldn't be bothered investigating why...if I can't login with a secure password on P2P, I always think bin it.This is funny as well, the 5MP camera I installed in back garden...the wifi router signal would not reach it. So, I bought a relatively cheap extender from Amazon...https://www.amazon.co.uk/gp/product/B00NIUHAG6/ref=ppx_yo_dt_b_asin_title_o05_s00?ie=UTF8&psc=1I thought, no chance - it can't cope with data bandwidth (some people talk absolute rubbish on internet and condemned this when I looked), anyway after lots of fiddling about with where to put it, it works perfect!So, the pros...Excellent high definition footage (particularly on my Contacam software).Very good notification on app 'human' motion trigger - it triggers correctly - it's captured every dog walker that's walked past my house.Superb night footage and live high definition video 'feed' - possibly the best camera I've had for this...The cons...HiP2P client is not good enough - I never resolved the login stuff.Any video I've captured never runs greater than 12.5 Fps...which is OK for viewing? Why? I even accessed SD card thinking it was my network...nope! The same on recordings...on app saved footage and Contacam saved footage.Should give an option in video menu on app to change format of video recording from H265 to H264.The camera sometimes triggers in app on big fat neighbours black cat...it thinks it is a human...haha!The Camhipro app always 'stutters' on video replay...that needs looking at by iegeek...I shouldn't have to go through complex steps to prove footage is ok on phone on phone memory...So, my opinion? Yep, absolutely best wifi cameras I have installed. Great to look at wildlife in more detail than old 1080P cameras...me and partner laugh at some of what these cameras capture when we review in morning...I've attached a couple of videos (I used Contacam to record) and pics of installation ...enjoy, I'm no David Bailey, but at least you can see the box I put all 'redundant' cables in one pic of camera on front garden. I turned off 'OSD' settings for time and date in web interface, because I prefer the Contacam time and date settings on motion detection recordings on videos...Phil
M**K
Great upgrade to my old basic doorbell
I decided to upgrade my current push button doorbell with a camera version as I thought it would be useful if I was away from home to get notified of parcels being delivered, as sometimes they don't leave a card and hide the parcels out of sight and I only find them by chance.There's also been a few occasions where my milk delivery has been missing and I wasn't sure if they'd been pinched or just not delivered.I've also missed people at the door when I've been in the back garden or garage and not heard the doorbell which is a bit annoying.So I opted for the new ieGeek WiFi doorbell camera as I already have a few other cameras of this brand dotted around and I've found them good and reliable.The box comes with everything you need to install the doorbell either using existing powered doorbell wires if you have them, or there is a plug in power adapter included with a good long cable and spade connectors at the end for fitting to the back of the unit. It's important to note this is not a battery camera like some other brands, so it will need a power source, I think this is better as it removes the hassle of removing and refitting the doorbell and then having to charge it for hours.Also included are all the screws and wires you might need along with a screwdriver and security screwdriver which is great, so you don't need to go hunting for tools and stuff. The only things you might need are a drill and possibly an electric screwdriver.There's also an optional angled mount included which is useful if the doorbell will be mounted off to the side of the door as mine is.You'll also need a Micro SD card if you want to record and playback footage and a spare 5V USB mains plug or USB port for the separate ringer unit.The instructions for setting up the camera were very clear, and thanks to the included power adapter I was able to get all this done before mounting to make sure everything was working ok.The CloudEdge app is very easy to use and get the camera added, you just create an account then scan a QR code to add the camera, it all went very smoothly first time.You can then plug in the ringer unit and follow the easy steps to get it paired with the doorbell.Mounting the camera to the door frame was straightforward for anyone with basic DIY skills, just make sure you have switched off the power first if replacing an existing powered doorbell!There are some template stickers included in the box to help with drilling holes if needed and there are some short extension wires and joiners if you need a bit more cable to play with, which I did as mine had been cut so they just reached the old doorbell and they were a little bit short for the larger replacement.The last job is adding some jumper wires in the old mechanical bell unit to bypass it as this will not work anymore and to ensure all the power is going to the new doorbell, again these are included in the box so it was a very quick and easy job.Once that was all done, which probably all took 30 minutes, most of which was looking for my drill, the power was switched back on and after a few seconds of powering up and reconnecting to the WiFi the steady blue light came on to show it was working.It looks very neat once fitted and all the wires are hidden behind. I also like the light on the button which makes it obvious to visitors and easy to find in the dark.I plugged the ringer into a spare socket in the hallway so I can hear it throughout the house, you can also choose from several ringtones within the app.When someone presses the bell, my phone pops up with a screen that looks a bit like a phone call, the live video shows in the top half and you have the option to answer and speak to the visitor or hang up to ignore. You can also record a standard message to play to them.If you're not near your phone, the notification will be recorded so you can play back the footage easily later from the alert.Within the app you can also view live footage or go back and see previous events, there is also an option to record continuously.There an option to enable a motion detection feature which can alert and record if someone is nearby even if they don't press the bell, so it acts like a security camera as well. I had some issues with this initially as my door faces onto a main road and it was picking up the cars going past and pinging notifications every few minutes, but I was able to easily configure this to ignore movement in certain areas of the picture.The app also features a cloud storage option with a free trial so it can upload footage automatically, but you don't need to use this if you don't want and it will work fine with just the MicroSD card.The picture is clear and you can choose between SD, HD and FHD (Full HD). The automatic night vision feature also works well when it gets dark.This is a great upgrade to my old doorbell and I'm very happy with it.
Trustpilot
4 days ago
2 months ago