We remain fully operational. Our teams are working around the clock to ensure your deliveries continue safely.

DOWNLOAD THE APP


Customer Services
Copyright © 2025 Desertcart Holdings Limited
DOWNLOAD THE APP

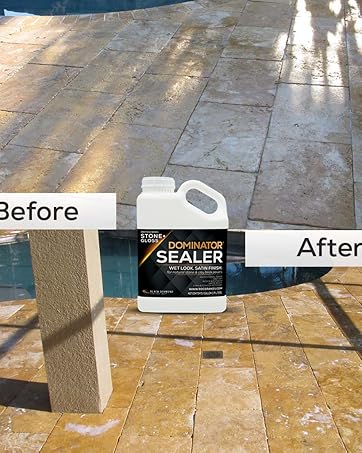
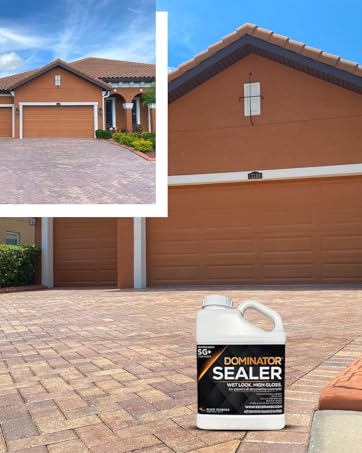
✨ Seal the deal with a glossy glow that lasts — don’t let your pavers miss out! 💎
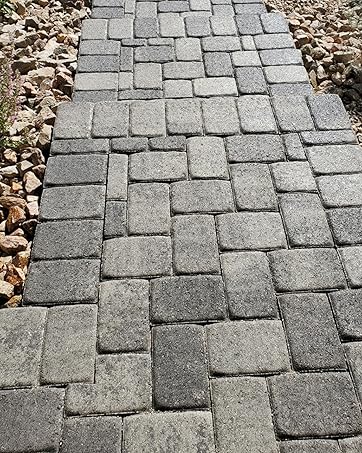
DOMINATOR SG+ is a professional-grade, water-based acrylic sealer designed for concrete pavers and decorative concrete. It provides a durable high gloss, wet-look finish that enhances color and protects surfaces from oil stains and weather damage for 2-4 years. With fast drying times and low VOCs, it offers an eco-friendly, easy-to-apply solution that covers up to 400 sq ft per gallon, making it ideal for millennial homeowners seeking a stylish, low-maintenance outdoor upgrade.


| ASIN | B01FWDL8KU |
| Best Sellers Rank | #182,178 in Tools & Home Improvement ( See Top 100 in Tools & Home Improvement ) #421 in Hardware Sealers |
| Brand | DOMINATOR |
| Color | White |
| Date First Available | March 20, 2012 |
| Global Trade Identification Number | 00852496006000 |
| Is Discontinued By Manufacturer | No |
| Item Form | Spray |
| Item Weight | 8.69 pounds |
| Item dimensions L x W x H | 7 x 3 x 10 inches |
| Manufacturer | Black Diamond Coatings, Inc. |
| Material | Acrylic |
| Number of Items | 1 |
| Product Dimensions | 7 x 3 x 10 inches |
| Style | 1 Gallon |
| Surface Recommendation | Concrete Pavers, Decorative Concrete |
| UPC | 852496006000 |
| Unit Count | 128 Fluid Ounces |
| Water Resistance Level | Water Resistant |
B**N
Unbelievably beautiful! But be prepared...
This product provided an unbelievably beautiful showroom "wet look" gloss to our pavers. I'm thrilled with the end result, and I have a new sense of pride in our back yard. That said, here are some caveats because the prep work - by no fault of the company - is *brutal* and painstaking: 1) Wait for a week's period when the temperature is between 70 and 85 degrees daily, with near zero humidity - even at night. Clean one spare paver with water and a scrub brush, or pick an existing paver in a more hidden section of your property and do the same. Order the 4oz tester, which comes in a spritz bottle. Once the paver has been dry for 48-72 hours, spritz the single paver until the surface is milky white, and wet - stop just before it gets wet enough to run. Do NOT sponge or surface roll; splatter or dots are fine. Once you've sprayed, you may notice milky spots, but DO NOTHING. It looks like you sprayed it with curdled milk, and you'll be thinking "This can't possibly be right!" It is. Leave it alone. 2) The next day, with temperatures between 70 and 85 degrees, and near zero humidity, spritz the paver again for a second coat. Remember, your goal is to slowly spritz enough liquid that it's covered, stopping just a bare second before it gets wet enough to run. Again, it will look like garbage. Now forget about it. Let it sit out in the sun for a week or so. No, really. Walk away and forget it exists. 3) Now, after a full week, go see what it looks and feels like. The surface should be rock hard, much smoother to the touch, and have a nice glossy finish with a touch of shimmer to it. If you followed my directions, and it doesn't look great, then this product will not work for you. If it looks and feels great, let's continue. This next part is agonizingly slow and painstakingly detailed, but it's all in the prep work. 1) Order sealer up to double the manufacturer's specifications. They state 400^2ft per gallon, but I needed one gallon per 200 square feet. However, everything plays into quantity and dry time: temperature, humidity, porosity, material, etc. 2) Order the Chapin International 61500 Backpack Sprayer for Fertilizer, and assemble it. Also order an extra-large wide mouth funnel. 3) Prepare the paver surface: 3a) Use weed killer to neutralize plant life on/in/around/between pavers. Wait 24-48 hours. 3b) With a jet nozzle hose attachment, use your garden hose to spray the crevices between your pavers in order to "dig out" sand and soil. Use a combination of the jet nozzle and a stiff-bristle shop brush to clean your pavers. If necessary, use a single dot of dishwashing liquid on oily spots but don't expect much. Consider it your stones' character, and the sealer will cover some of that. 3c) Allow 48 hours' dry time in full sun with low humidity. Just because you can't see surface water, doesn't mean all the water has evaporated from the paver and crevices! 3d) Feel the paver surface. If you feel surface grit, dust, or sand, repeat 3b and 3c and potentially use a leaf blower to assist you. 3e) Once the paver surface has been dry for 48 hours and is 100% free of grit, dust, and sand, it's time to sand between the pavers. I used "fine" grade playground sand. I would not use polymeric sand because the sealer is going to seal the sand in place anyway. Pour a 50-pound sack of sand onto the pavers, and use the shop brush to push the sand into the paver crevices. When you have sand roughly level with the paver surface, use the "mist" or "shower" setting on your garden hose nozzle and wet the pavers and sand. Your goal is to get the sand in the crevices sopping wet - and to stop just the second before it starts to run! Again, do not let the water run because it will carry away the sand with it. The hope is that the moisture will drag the sand further into the crevices. The proper depth for sand is 1/8" to 1/4" below the paver surface. 3f) Wait 24 hours and repeat 3e. Wait 24 hours to dry. 3g) Now for the fun part. Use a shop brush and a leaf blower to remove every microscopic grain of sand from the pavers' surfaces. It will feel impossible. Every time you use the brush or blower, you're carrying away sand from the crevices. It's awful. You'll question your life choices. Eventually it works, and you'll wipe a paver with your fingers and it will be free of dust and grit, and you'll believe that one day your life will return to normal. Now use 4" painter's tape around any vertical or horizontal surface that you don't want covered with sealer. 4) When you have a 4-day stretch of sunny weather with no humidity or wind and temperatures between 70 and 85 degrees, it's time. Ensure the lid of the 5-gallon sealer is tightly affixed, and begin shaking the sealer container vigorously. Turn it upside down and do the same. You want to vigorously shake for up to 5 minutes. 5) Pour 4 gallons of the sealer into the Chapin International 61500 Backpack Sprayer using the extra-large wide mouth funnel you ordered. Replace the lid on the sealer container. 6) Begin spraying, leaving yourself an exit strategy. Hold the wand close to the surface - inches, even - and make small circles. Your goal is to wet the material but stop JUST A NANOSECOND before it begins to run. Again, a dot, sprinkle, or splatter of material is fine, but a run is not, and a pool definitely isn't. It will look like the sand in the crevices isn't being covered, but it is so ignore the tendency to overspray. When you're done with one coat, clean the Backpack Sprayer per the manufacturer's instructions and wait. 7) In 24 hours, repeat Step 6 for a second coat. Spray just as heavily as you did the first time, but do NOT let this sealer pool or form rivers! You will notice this second coat appears to sit like milk for much longer than last time. Good. When you're done with this second coat, clean the Backpack Sprayer per the manufacturer's instructions and wait. 8) You will notice what looks like little tiny dots of milk sitting in the small cracks or indentations of pavers. Ignore these, as they will disappear as the sealer dries. 9) Hopefully, you timed the weather appropriately and you have a nice, long stretch of weather with very low humidity and sunny weather in the low 80s for about a week. In 48 hours you'll be able to walk on your pavers, and in a week or two you can drive on them. This seems like more work that it's worth, but it isn't. Again, the look of these pavers is just showroom quality and glossy and beautiful. I'm so glad I did this, but if you're not comfortable with timing the weather, and a huge amount of prep work, you may want to leave this to a professional.
K**N
Best sealer ever!
This is an update to a previous review.... I received the wrong product twice. LG not SG. For those who are confused, that's low gloss vs semi gloss. Amazon had told me that black diamond fulfilled my order. This was not true. After speaking with the companies customer service, I can't say enough about them. Not only did they make it right, they got it to me on time when Amazon could not. More companies should act like and treat their customers like BD coatings. Let me clarify some of the bad reviews you may be reading. This product is awesome! First, it goes on so easy with any power sprayer, i used one from home Depot for $15. It's best back rolled with a corregated foam roller. It has no odor, necessity for my pregnant wife. Second, it can take longer to dry IF the substrate you pressure washed takes longer to dry/not in the sun, BUT, it does dry and looks fantastic. For example, my screened patio (pic) in Florida that doesn't see sun took longer to dry than the pool patio. Still able to walk in it in a few hours, just tacky a few days where patio was not 1 day later. Next, the product goes on white and dries clear. I love this because you can see where you're going and how thick you laid it down. If it rains a few hours after you laid it down, it may get white again. Don't freak out, this is only temporary and dries clear. It won't do this every time it rains, just if it rains immediately after application. The rain did not effect the color or water beading on my bricks. Finally, know your bricks. This product doesn't "peel like a snake" as another reviewer wrote. He probably neglected to remove/didn't know he had a solvent based sealer on his stone. The benefit of using water based sealers are no odor, easy clean up and easy application. If you have previously used a solvent based sealer you must stick with that or remove it with a stripper. They say solvent based sealers get the stone darker, bead water better and have a better gloss, well that's BS, look at my pics. I got all that with water based SG+! I can't see why anyone would go through the hassle of solvent based sealers when this product works so much better.
S**A
Good Sealer — Easy to Apply, Slightly Less Glossy Than I Hoped
I used the 1 gal Dominator SG+ Clear Acrylic Sealer on my concrete pavers and overall I’m pleased with the results. The product goes on very smoothly and levels out nicely — I applied it with a roller and the finish came out even with minimal bubbling or streaks. It brought out the color of the pavers and gave them a “wet look” enhancement that looks clean and refreshed. Application was straightforward and not messy; cleanup was simple and it didn’t require complicated tools or technique. After it cured the surface feels durable and protected, and I’ve noticed less dust and staining on the treated areas. My only disappointment is the shine level: it does add gloss, but it wasn’t quite as high-gloss as I expected from the description. If you’re looking for a mirror-like, ultra-high gloss finish you might find it a touch underwhelming — however, for a long-lasting, protective wet-look finish that’s easy to apply, it’s a solid choice. Tip: test a small area first to confirm the level of sheen you’ll get on your particular pavers.
J**S
Outstanding Product
It was the product I was looking for. It goes on white but dries in the form of a wet look. It enhances the color of your stone and makes it pop. A five gallon covered about 400-500 sq ft depending on how thick you spray it on. So far we are pleased and it rained a few days later with no effect on the stone. Also your sprayer should be a good quality and you may get a better outcome. Long term to be determined. I will not spray any horizontal stones with this product as it has a better look for walkways. Not cheap but you get what you pay for!!
Trustpilot
1 month ago
1 month ago