🔍 Power Up Your Insights!
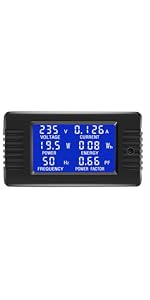
The bayiteDC 6.5-100V 0-100A LCD Display Digital Current Voltage Power Energy Meter is an essential tool for professionals seeking to monitor electrical parameters with precision. Featuring a user-friendly LCD display and a high current capacity of 100A, this multimeter is perfect for a variety of applications, ensuring you stay ahead in your energy management game.
H**A
Excelente
A tiempo y cumple su proposito
J**R
Identity parasitic current draw
No complaints. Invaluable to a novice to evaluate parasitic current draw.
A**H
Excellent for monitoring RV solar setups
I have been using these bayite meters for almost three years now, not only in my travel trailer, but in my shed solar setup. The CHARGE and DISCHARGE meters in my photos are my original meters purchased in April 2019 and the SOLAR and INVERTER meters are the newer models ordered in April 2022. The only differences I can discern is the button on the front. The older meters had a recessed button and you needed a pen or pin to press it, whereas the newer model has a low profile button but can easily be pressed with just a finger, no device needed.The picture attached is before I upgraded the system: 10A controller with 200W solar array (upgrading to a 30A and 300W next) and these pictures were taken under partial tree shade in the late afternoon sun. The TT is running a 2000W modified sine wave inverter off a 385AH flooded lead acid battery bank, which powers mostly a residential mini fridge in the TT outside kitchen, wired through a 120V manual transfer switch to the GFCI outlets. You can see that the INVERTER load from the fridge is about 6A, while the solar output is about 4A, which correlates to the almost 2A battery discharge (including other low current devices: RV fridge circuit board, USB outlets, display lights).This type of setup is great for monitoring and measuring the performance of your batteries and solar system and if you have enough solar available or if your inverter loads are too much. To see what your actual amp-hour draw is, divide the ENERGY output by 12 (or whatever voltage you are running) to get AH so you can size your battery bank appropriately. My setup needs about 186 AH max per day and I am adequate on capacity but really should add an additional 100AH (of course I should add an additional 100W of solar too, but really there isn’t a hard ceiling to the max specs, just mind your budget). I boondock occasionally, but consider myself more of a touring adventurer, meaning I drive long distances in between destinations and camp mainly overnight in the forest or dispersed. My tow vehicle provides charging power along with the solar panels to recharge my batteries and my last 24 hours yielded 166 AH used so I never get below 50% of my battery bank. The extra 100W will help with the charge too once complete.I 3D printed a couple of meter mounts in black ABS and mounted them outside of the RV’s control panel. I could have also flush mounted them for a lower profile look but I think they look pretty good the way they are now. I used some spare Cat 6 and some jacketed landscape wiring to run from the RV batteries to the control panel. I would recommend finding some type of stranded small gauge wire for ease of crimping onto ring terminals and heat shrink tubing to protect them from separating while attached. Using ring terminals is the most secure to attach to the shunts but you can use spades or bare wire too. A good option for mounting is directly attaching the shunt to the negative battery terminal or inverter post, just remember to attach ALL load negatives on the other side of the shunt to accurately capture all discharging loads on the meter. The diagram provided by bayite on this site in the manufacturer pictures show to connect the solar meter/shunt AFTER the controller, which is a correct installation if you want to know how much power the solar controller is sending to your batteries. Bayite also provides a link to a modified diagram where the solar meter/shunt (included in my review pictures) is connected BEFORE the solar controller, directly in line from the solar panels, which will provide the meter with information with how much power your solar panels are actually producing. Each wiring is correct but provides different information; the voltages will differ as connecting before the controller will show the solar panel voltage whereas connecting after will show the battery voltage.Your shunt may have cuts in them, which is completely normal as it’s how they’re calibrated. Other reviews here say they have cuts and that they are damaged, but that’s inaccurate. These meters are good displays especially for solar controllers that don’t have displays or don’t show enough information. Great product, great longevity, and great information displayed for nerd like me who like to watch the numbers go up and down as conditions change.
V**C
Very accurate and easy to wire
It does what is set to do: tells you the state of your battery bank. Very accurate and easy to wire. Recommended.
M**A
Excellent value for money, highly recommended
I am using 4 of these meters to monitor my solar battery system:- Battery in- Battery out- Inverter out and- Charge controller outInstallation: I found it them easy to use and install.Acuracy: I am very happy with it's performance and acuracy, I've tested it against other meters, charge controller displays and multimeters.Support: I had to contact their customer service as there was some confusion (created by me) and they were super helpful.Usage environment: I am using this with a 24V battery system (Voltax), a Epever 200W inverter and 1200W of Canadian Solar panels. You can see them in action on my EcoAmbitionsAustralia YouTube channel in more detail.
Trustpilot
5 days ago
2 months ago