Desert Online General Trading LLC
Dubai, United Arab Emirates
Desert Online General Trading LLC
Dubai, United Arab Emirates


🛠️ Elevate your glue-ups: clamp smarter, not harder!
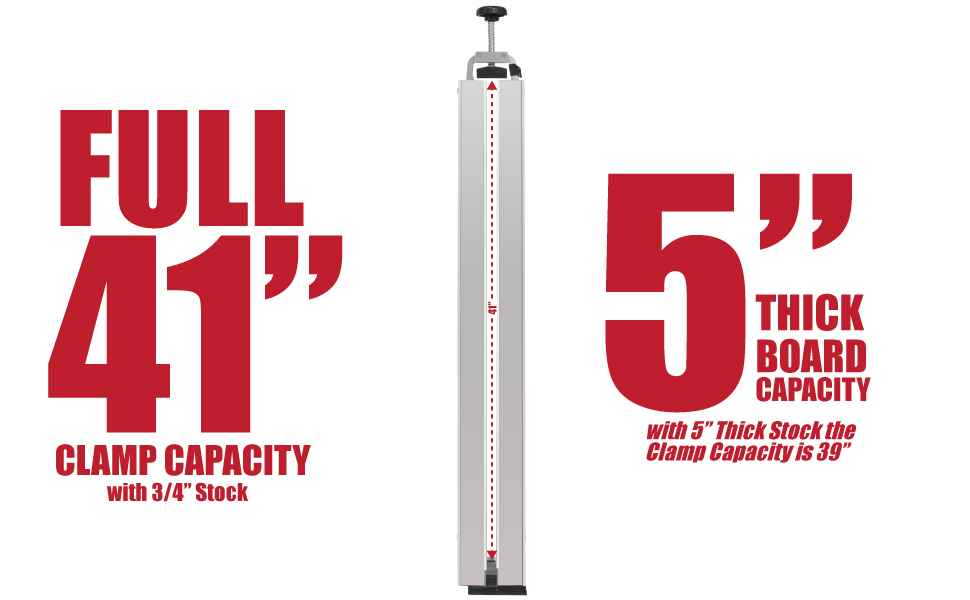
The Fulton Panel Max Glue Press System is a professional-grade, wall-mounted clamping solution designed for woodworkers and carpenters. Featuring heavy-duty anodized aluminum construction and a unique 4-way clamping mechanism, it applies even pressure on panels up to 41" wide and 5" thick, preventing warping and ensuring flawless glue joints. Its modular design allows expansion with additional rails, making it perfect for both small and large woodworking projects.


| Material | Aluminum |
| Brand | Fulton |
| Color | Aluminum |
| Style | Traditional |
| Tensile Strength | 1750 Pounds |
| UPC | 810948019893 |
| Manufacturer | Fulton Woodworking Tools and Accessories |
| Part Number | 2952 |
| Item Weight | 28.3 pounds |
| Package Dimensions | 48.7 x 7.4 x 7.2 inches |
| Item model number | 2952 |
| Finish | Anodized Aluminum |
| Pattern | Glue Press |
| Shape | Rectangular |
| Power Source | Manual |
| Installation Method | Manual |
| Item Package Quantity | 1 |
| Capacity Description | Maximum |
| Handle Material | Plastic Knobs |
| Mounting Type | Wall Mount |
| Special Features | Finally a glue up system that applies pressure from all fours sides! Say goodbye to those heavy pipe clamps and bar clamps and say goodbye to racked or twisted panels! |
| Usage | Glue up of large wooden panels up to 39" wide |
| Included Components | 1 each rail and 3 vertical glue press bar assemblies |
| Batteries Included? | No |
| Batteries Required? | No |
Trustpilot
2 weeks ago
3 days ago