Customer Services
Copyright © 2025 Desertcart Holdings Limited


⚡ Elevate your 3D printing game with precision, speed, and effortless assembly!
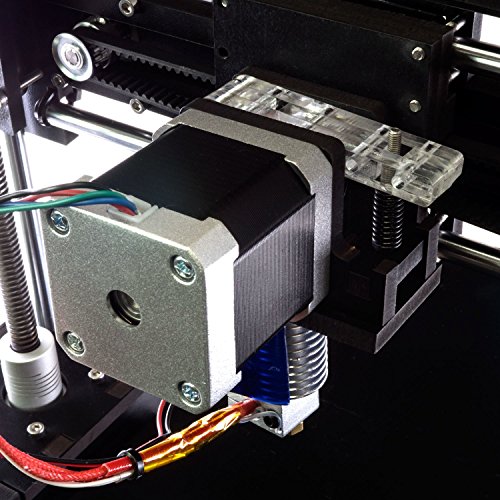
The Q3D OneUP 3D Printer Kit Version 2 is a high-performance DIY 3D printer designed for professionals and enthusiasts seeking superior print quality and speed. Featuring a 50 micron layer resolution, up to 100mm/s print speeds, and a robust metal hotend, it delivers detailed and reliable prints. Its premium linear motion system and CNC laser-cut frame provide exceptional rigidity, while the easy 2-6 hour assembly with no soldering makes it accessible for busy millennials eager to innovate. Compatible with a broad range of filaments, the OneUP is the ultimate entry-level kit that balances precision, speed, and versatility.
| ASIN | B00OK091OW |
| Date First Available | October 16, 2014 |
| Is Discontinued By Manufacturer | No |
| Item Weight | 9 pounds |
| Manufacturer | Q3D |
| Product Dimensions | 14.5 x 12 x 3 inches |
Y**D
I was looking for something fun to put together with the kids we could work ...
I got what I expected out of this purchase, I was looking for something fun to put together with the kids we could work on weekends and learn something in the process. This worked perfectly for me and fit the bill. it is a DIY kit though so be prepared for odds and ends here and there, for what you are paying it is a great value. I did get the oneup with no heated bed, we use the blue printer tape and it works great so far, I see no reason to upgrade for our purposes at least. I received one of the v2 versions of the system, we spent about 3 weekends putting it together, not because it takes that long but because we were distracted by other things and I wanted the kids to help put it together. I am guessing if I was focused it could be put together in 3-4 hours as they claim. We had no broken parts, but we did strip a screw resulting in a trip to the hardware store to buy nuts. Be careful screwing into the MDF it strips very easy! Once we got it together we have done quite a few prints, all in all it is a learning experience as we figure out settings to make a print work, we have had a few screws here and there come loose (worse one was the screw holding the x axis pulley in place) as well resulting in a few "what is that prints!". Once we figured out what came loose though the printer works quite well and we are pretty happy with it. The kids love printing out their own pokemon and other stuff and we are learning what works and does not in the process.
K**E
You're on your own when buying this.
Build instructions aren't hard, but aren't easy ether. No instructions on tuning/dialing in the printer. Support is an external forum that's in disarray. Ended up getting a more expensive, but better supported printer.
M**L
printer work fine went it work
printer work fine went it work,customer support is bad. cheap print board after a few weeks of use the print board went bad. a contact amazon and as always amazon did a awesome work by contacting me right away , and take care of my problem , few weeks later the board was malfunctioning bad the port for the steppermotor wasn't working first i thou was the stepper motor but after swaping motor i realize it was the board .this time i contact q3d Thur the website customer support after a few days i was toll to send the defective board wish i did right away , before i send it i did make the board with a little mark. so i will recognize it if i got back the same. i wait for weeks and send emails for week s to get an answer from costumer service saying that the replacement board was in its way and they apologias a bout the inconvenience , after a week i got the board . installed and surprise it didn't work. same problem . i check the board and i it was the same board that i send to them . i email them again is been almost 2 weeks and they haven answer . i would wait and buy print bot.
J**2
Good Printer to learn how 3D printing works
I had a rough start with this companies customer support but they did make it right. My kit arrived very quickly but had a couple missing and damaged parts. After several inquiries they finally did ship out replacement items and I now have a working printer, so I want to provide a fair but objective review. Pros: I wanted a DIY kit that I could build myself and really learn how 3D printers work. This kit was perfect for what I was looking for. Now that I have mine tuned in I must say I am very happy with the print quality, especially for a 200 dollar kit I built myself. It is a simple design but so far seems to work quite well. Cons and things to watch for: To echo what others have said, this is a kit that is definitely not plug and play(print). It is not for the non-technical person who just wants to print stuff. This is a model kit. It takes time to assemble, and requires some modification to produce a quality print. The instructions are decent for the mechanical assembly portion but the software and electronics guide leaves a few things unclear. Also there are NO instructions on tuning/dialing in the printer. You will need to do an internet search for that information. Official technical support is an external forum (fabric8r) that does not appear to be well managed and at the moment seems to be down or removed. Bottom line: This is a great price on a decent kit if you are wanting to build something yourself and willing to be resourceful.
Trustpilot
1 month ago
2 months ago