


🔥 Sear, Sauté, and Slay: The Pan That Means Business
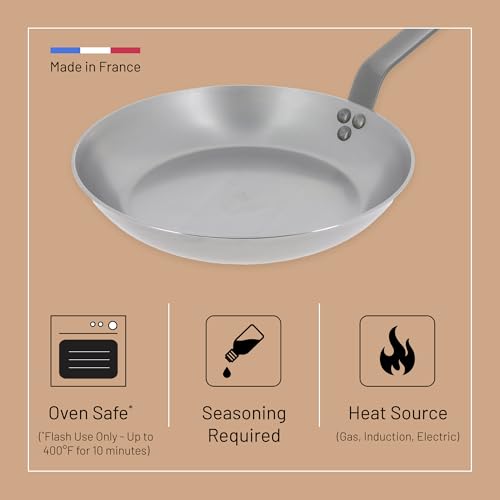
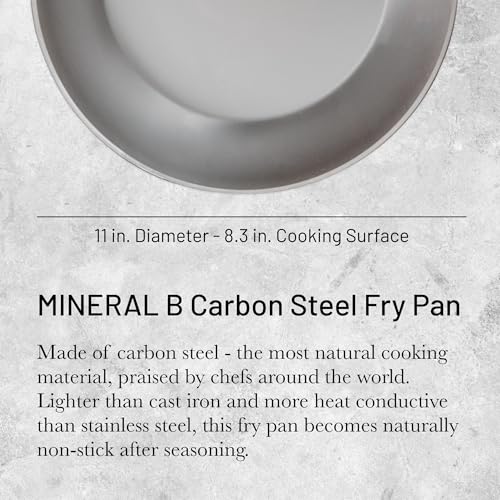
The de Buyer MINERAL B 11” Carbon Steel Fry Pan offers professional-grade heat responsiveness and durability, crafted in France since 1830. It features a naturally non-stick surface free from harmful chemicals, perfect for searing, sautéing, and reheating. Compatible with all stovetops including induction and oven safe up to 400°F, this pan combines timeless craftsmanship with modern kitchen versatility.


| ASIN | B00462QP16 |
| Best Sellers Rank | #116,771 in Kitchen & Dining ( See Top 100 in Kitchen & Dining ) #218 in Woks & Stir-Fry Pans |
| Brand | de Buyer |
| Capacity | 0.7 Liters |
| Color | Silver |
| Compatible Devices | Gas |
| Customer Reviews | 4.4 4.4 out of 5 stars (5,273) |
| Date First Available | August 9, 2012 |
| Global Trade Identification Number | 03011245610289 |
| Handle Material | Carbon Steel,Stainless Steel |
| Has Nonstick Coating | No |
| Is Discontinued By Manufacturer | No |
| Is Dishwasher Safe | No |
| Is Oven Safe | Yes |
| Item Weight | 4.4 pounds |
| Item model number | 5610.28 |
| Manufacturer | de Buyer |
| Material | Carbon Steel |
| Maximum Temperature | 200 Degrees Celsius |
| Model Name | 5610.28 |
| Product Care Instructions | Hand Wash Only |
| Product Dimensions | 18.74 x 14.33 x 5.28 inches |
| Recommended Uses For Product | Searing, Sautéing, Cooking Eggs/Omelets |
| Shape | Round |
| Special Feature | Electric Stovetop Compatible, Gas Stovetop Compatible, Induction Stovetop Compatible |
| Specific Uses For Product | Searing, Sautéing, Cooking Eggs |
| UPC | 643749926165 |
M**G
It’s a good skillet
I have carbon steel woks.Many. Dipped into carbon steel skillets with an inexpensive 8 inch Chinese manufactured Merton and Storck and it worked out fine. That made me want to get a larger skillet in carbon steel . Did some research and decided on Debuyer mineral b. Bought this skillet. To me it feels just a little lighter than my standard Lodge 10 inch cast iron skillet. My 10 inch tri-ply stainless is a feather compared to it. I can’t complain as I opted for the thicker gauge of the mineral b and was expecting it to have some weight. But it is heavier in hand than I had expected. So don’t expect substantially noticeable weight savings compared to similar size cast iron. It’s still somewhat heavy. Seasoned easily on gas stovetop. It’s a substantial pan and so far so good. 👍 Edit: Liked this skillet and contemplated buying another if it came on sale. Since this review I bought a mineral b pro 11 inch as it had dropped drastically in price. It was almost what I paid for the standard mineral b which also had been discounted when I purchased. My advice: If in your budget get the pro instead of the regular mineral b. Just the way it feels in hand, better balance. The stainless steel handle that stays cooler when stovetop cooking. The added versatility of using in the oven make it a better choice if you can afford it. BUT: The blue carbon Debuyer of the same size but with 2mm thickness is noticeably lighter, oven safe also and usually much lower priced. EDIT: caught the 9.5 inch on sale. It might now be my favorite. Found the 12 inch on sale also. Yeah I bought it too. Bottom line…I haven’t been disappointed in my Debuyer purchases.
M**A
Michael's
Double the stars, easy to clean (actually food doesn't stick if instructions are followed), good carbon steel; I expected a lighter weight item, but it is well made and rivals a cast iron in weight, for me it's the correct size for my stove and it heats up fast and evenly.
A**R
It takes some time to build up a coating, but this pan is worth the wait!
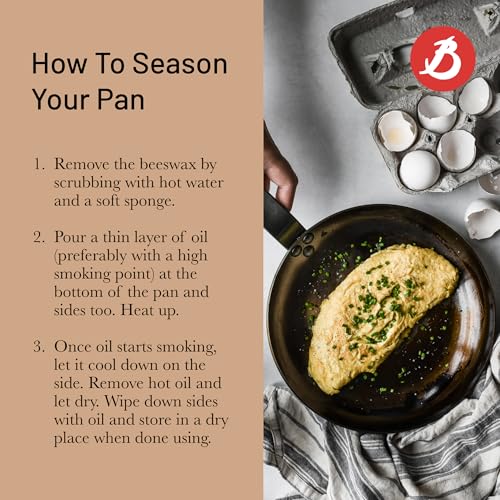
Update January 2023: this is still my favorite pan. The coating has built up so that I never need to season it. It's used so much that I just leave it on the stove top. I added a new photo to show how it looks after almost 3 years of constant use. Original review 2020: I have owned this pan for a few months. It took 3 tries to receive an undamaged item: the first 2 pans arrived with sizeable dings/scratches that would have affected performance, and they had to be returned. It looked like the pans arrived from France with these defects, not like the damage occurred during shipment from the Amazon warehouse to my home, so I included this information in my product review as a measure of initial product quality. These pans arrive from the manufacturer stapled inside a thick paper bag, so Amazon would not have been able to easily check for defects on arrival. It took at least 2 months for my pan to develop a good coating. Before use, I baked the pan a couple of times (if you're worried about the silicone piece melting--it can be popped out of the handle, btw--just wrap it with a piece of foil) for about 20 minutes at 400 degrees after coating it with a thin layer of linseed oil. Part of the coating sloughed off the pan, and the things I cooked stuck to it. I wasn't deterred: I decided to use a stovetop method instead, and the results were much better. The best way I found to develop a non-stick coating on a new Mineral B pan: 1. Use the pan for things that are less likely to leave a sticky mess until the coating has built up. Steak? Yes. Fried cornmeal mush? No. The very best food I found for building up a good coating in my pan was bacon. 2. Use a generous amount of oil in the pan, and be sure the oil is near its smoke point before you add food to the pan. Following this rule of thumb will help prevent sticking that may damage the new coating. 3. Leave the pan sitting after use until it feels warm to the touch (not burning hot, not cool). 4. Wash the pan with hot running water and a SILICONE scrubber. (Look for "silicone scrubber kitchen" or "silicone sponge;" it's not the same as a silicone scrubber meant for washing your face.) When I first started using my pan, I used a "non-scratch" sponge that didn't protect my new coating at all. Silicone is much gentler. Remember, never use soap on this pan! 5. Dry the pan with a paper towel (it will leave a residue on reusable towels). 6. Immediately coat the pan with a THIN layer of linseed oil. I usually take the paper towel I dried the pan with and apply the oil, then I gently rub the oil onto the inside of the pan. (Whenever I try to pour a little oil directly into the pan, I end up using too much.) It doesn't take much oil to properly coat the pan, probably only 1/4 tsp or so. 7. Heat the pan on the stovetop until the oil smokes. (You might want to turn on the vent fan.) When the oil is smoking, turn off the burner and leave the pan to sit until it is cool to the touch, and then store the pan for the next use. I know it seems like a lot of steps, but once the pan starts to build up a nonstick coating, it will be worth the hassle. This is a wonderful pan; it performs as well as the 90-year-old cast iron pan passed down to me from my grandmother. There is a plastic-type clear coating on the handle, which other reviewers have mentioned. I haven't had any problems with it. (If you're worried about it melting under a broiler, just wrap the handle in foil. Aluminum foil is a great insulator!) The handle stays cool on the stovetop, unlike my grandmother's cast iron pan, which was a pleasant surprise. Overall, I think this pan is an excellent value. I've paid almost this much for nonstick pans that lost their coating integrity in only a few months despite babying them in every possible way (using plastic implements only, never letting other pans touch the coating, etc). I'm very excited to have a pan that will hopefully last a lifetime with proper care. I've been thinking about buying another one. :)
P**R
What an AMAZING pan!
Season this well first. I did mine with refined avocado oil, VERY thin coat, two 30 minute cycles in the oven at about 480 degrees. Its pretty darn non-stick even with that. But then start cooking with it. I continued using avocado oil for about a week. WOW! Very good non-stick properties. Usually just the bamboo brush does the trick with hot water. Once in a while I'll also use the chainmail. It is heavy, though. Not quite as heavy as cast iron. My 12" Lodge cast iron pad is 6 lbs. This, at 11", is about 4 lbs. No mid-air one handed pancake flipping. But man, want to apply a braze to something? Turn the burner (flat range top here) all the way up for a couple minutes... searing done! And without sticking. Uncanny, the control this thing gives.
L**O
Many people like it, but it's not for me
Because of the overwhelming number of positive reviews I feel like I was the reason this pan didn't work out, and not the pan itself. First, I followed the instructions to make it non-stick, but had to repeat the process several times. Cleaning beeswax was a lot harder than I thought it would be (or than youtube videos lead to believe). Once all the initial steps were completed, I had reasonably good results making an omelet and steak. Then I cooked salmon and it partly stuck to the pan. Cleaning with the green sponge (without soap) effectively removed the non-stick coating., so I had to start the process from the beginning. One time I was making steaks on Mineral B and a cheap non-stick T-fal. And in the end honestly got virtually the same result, just have to work the temperature and timing differently. Overall I would say that it's very well made, very sturdy. The handle is comfortable and doesn't get hot. Looks very "professional". But definitely requires more maintenance than a regular non-stick or steel pan. Definitely try it. Way cheaper than other high end pans, so if you are a good chef or try to pretend to be (like me) - worth a try.
M**O
na początku potrzeba nauczyć się prawidłowego użytkowania i czyszczenia ,a potem można już smażyć kotlety schabowe mniam :]
A**A
La verdad es que estoy muy contento con esta sartén. La compré porque quiero abandonar las sartenes tóxicas con Teflon y también para aportarle más sabor a las comidas. Las sartenes con Teflon no son aptas para hacer una buena carne o un bacon crujiente. En estas sartenes la carne se cuece, no se fríe, la carne no se sella bien y suelta todo su jugo en la sartén. Con las sartenes de hierro al carbono no pasa esto. Os voy a contar mi experiencia con la sartén Mineral B de De Buyer: - El curado: hay muchos vídeos en internet y muchas opiniones diferentes sobre cómo realizar el curado de una sartén de acero al carbono. Si queréis que os salga bien os recomiendo que hagáis lo que he hecho yo: seguir solo las instrucciones del fabricante, porque cada fabricante tendrá su recomendación en función de su producto. Como podéis ver en las fotos, el curado ha salido muy bien. El vídeo lo encontráis en el canal de De Buyer. EL CURADO, breve resumen: 1. No uséis aceite de oliva para el curado ni otros aceites exóticos, ya que estos tienen su punto de quemado en 160 grados, lo que es muy poco. En cambio el fabricante recomienda aceite de canola(colsa) o de girasol. Yo he usado aceite de girasol y todo perfecto, tiene el punto de quemado en unos 240 grados. 2. Muy importante la temperatura: con una cocina de gas se recomienda fuego medio-alto. En cocina eléctrica NUNCA subáis la temperatura al máximo. Aun así, el curado saldrá mucho mejor en una cocina de gas. 3. Echar aceite en la sartén hasta que cubra todo el fondo, de 1 milímetro más o menos. 4. Dejar que el aceite haga su trabajo durante 10 minutos. Podéis remover de vez en cuando para distribuir el aceite caliente también por los laterales de la sartén. 5. Tras 10 minutos el aceite ya estará sacando humo y entonces podéis apagar el fuego. Dejar el aceite en la sartén hasta que se enfríe del todo y luego retirarlo. Limpiar la sartén con papel de cocina para retirar el exceso de aceite y ya está. COCINAR: 1. El aceite: de ni guns manera hay que utilizar aceite de oliva virgen extra para cocinar en estas sartenes, ya que este tipo de sartén trabaja con temperaturas altas y el aceite de oliva virgen extra solo se puede usar hasta 160 grados. Recomendable usar aceite de oliva virgen, de girasol, de cacahuete, de canola. Todos estos aceites aguantan temperaturas de 220-240 grados. Si queréis usar mantequilla para darle un poco de sabor a la carne, a una tortilla francesa o huevos fritos, añadir la mantequilla al final de la preparación. 2. La temperatura de la sartén, para sellar bien la carne y que conserve dentro todo su jugo: como podéis ver en mi vídeo la temperatura de una sartén de acero al carbono se puede comprobar igual que se hace en una de acero inoxidable. Se salpica con un poco de agua, si el agua se evapora la sartén no tiene la temperatura óptima, si el agua forma una bolitas que bailan por toda la sartén entonces ya se puede añadir el aceite, se deja unos segundos y ya se puede añadir la carne. 3. Se recomienda tener la carne unos 20-30 minutos a la temperatura ambiente antes de echarla a la sartén, para evitar que se pegue. Personalmente yo solo le echo pimienta y a la hora de sacarla le echo sal marina en escamas mientras la dejo que descanse un poco en el plato. 4. Muy importante no dar la vuelta a la carne al menos 1 minuto, ya que la carne estará pegada hasta que se produzca el sellado. Cuando esto ocurra, la carne se despegará con mucha facilidad de la sartén y se le puede dar la vuelta. En mi caso, los entrecots que me han tocado eran muy finos para mi gusto pero al final han salido bien. Lo suyo es practicar hasta que le encuentres el punto a la carne, tal como te gusta. 5. La prueba del huevo frito: el fabricante nos dice que la capa antiadherente se realiza con el tiempo, cuanto más cocines, menos se pegará la comida. Para preparar huevos nos dice que esto sería posible después de contar al menos 10 veces proteína, carne roja sobre todo. Yo hice la prueba el día siguiente, en el segundo uso y la verdad es que no se han pegado. Primero he preparado el bacon, muy importante, ponerlo con la sartén fría y sin nada de aceite, así se calentará a la vez con la sartén y soltará su grasa, lo que le ayudará a freírse y no pegarse. Después de retirar el bacon, en la misma grasa que este ha soldado , he añadido un poco de mantequilla y he freído los huevos. El resultado final, divino, me ha recordado a mi infancia, cuando mi abuela nos preparaba el desayuno, salchichas o pancetta con huevos fritos en manteca, en su sartén de hierro fundido. 6. Muy importante: en las sartenes de hierro fundido y hierro al carbono no se recomienda cocinar alimentos ácidos: tomates, limón, vino, vinagre…Los alimentos ácidos afectan a la capa antiadherente y puede darle un sabor metálico a la comida. LIMPIEZA: 1. Nunca uséis jabón, lavavajillas o cualquier otro detergente con este tipo de sartenes. Tampoco hay que dejarla en remojo o meter a en el lavavajillas. Se limpia a mano con agua caliente y un estropajo. 2. Cuando has derribado de cocinar, recomiendo dejar la sartén a que se enfríe un poco antes de limpiarla con agua muy caliente. Nunca echéis agua fría sobre la sartén caliente porque vais a deformar la sartén. Este tipo de material es sensible a los cambios bruscos de temperatura. Si quedan restos muy pegados y no se quitan con agua caliente y con el estropajo, podéis echar agua y ponerla sobre el fuego hasta que empiece a hervir y luego rascando con una estatura de madera se quitará todo. Otro método de retirar comida pegada, esto puede ocurre cuando los restos de comida se deja mucho tiempo en la sartén o cuando se ha quemado la comida por haberla dejado más tiempo de lo necesarios y se ha superado la temperatura recomendada, es usando sal gruesa. Echáis la sal en la sartén y con papel de cocina empezáis a frotar. Luego se eliminará todo con agua caliente y un estropajo. 3. Después de limpiarla hay que secarla bien con un paño o papel de cocina. También es recomendable ponerla unos segundos sobre el fuego para así eliminar todo el agua de los poros. 4. Antes de guardarla, y aquí es donde mucha gente comete el error de no seguir estos pasos: con la sartén fría, hay que aplicarle una capa fina de aceite por toda la superficie(menos en mango) para así evitar que esta oxide. Echar unas gotas de aceite sobre un papel de cocina y frotar bien la sartén. Es muy importante que la sartén esté fría, si no, el aceite se convertirá en una capa muy pegajosa. Si vas a usar la sartén por ejemplo por la maña y luego otra vez por la tarde, entonces no tiene ningún sentido aplicar esa capa de aceite, la sartén no va a oxidar en unas horas. CONCLUSIÓN FINAL: Sin duda alguna la compra de esta sartén ha sido un acierto total. Es verdad que es pesada, personalmente la pongo sobre el fuego y no la muevo mientras cocino con ella. Es verdad que necesita más cuidados que una sartén convencional de aluminio con Teflon pero para mi vale la pena. Para mi es mucho más importante mi salud y la de mi familia. Es una sartén segura, libre de cualquier tóxico y si la cuidas bien es una sartén para toda la vida. Para cocinar guisos y alimentos ácidos vamos a comprar unas cacerolas de hierro fundido esmaltado.
I**O
Magnifique poêle ! J’ai racheté une deuxième la même après ma séparation car je n’ai jamais trouvé mieux. Je me réjouis de retrouver cette poêle et ce goût bien particulier de la nourriture cuite dedans 🥰
A**U
Carbon steel has far better heat-retention compared to stainless steel, and since then cooking has become far more fun This pan sears far better and transfers heat in a way that my old stainless steel pan cannot. As a result, I can finally get my pan hot enough Also, cleanup is a breeze. Before, I needed to let my pan soak in water, and scrub the gunk off the stainless steel. For this pan, I have to do is wipe it down with a paper towel. It makes meal prep SO much more bearable. 1st pic: before cooking 2nd pic: while cooking (I didn’t add any oil to the pan, but the salmon didn’t stick at all) 3rd pic: wiping down using a paper towel The only thing to watch out for is to never cook anything too acidic as it will damage the patina you build up and always dry it after getting water on it to prevent rust
N**R
Ich benutze die Pfanne seit circa 10 Monaten, entweder mit einem Gasherd oder mit einem Cerankochfeld. Ich wollte eine Pfanne mit folgenden Eigenschaften: -richtig heiß werden -nicht Antihaftbeschichtet, dennoch sollte nichts anhaften -Säure sollte ebenfalls kein Problem sein Dieses schließt folgende Pfannen aus: -Alle Pfannen mit Antihaftbeschichtung -Edelstahlpfannen, da dort alles anhaftet außerdem werden diese nicht richtig heiß -Gusseisenpfannen, diese halten leider keine Säuren aus -Keramikpfannen, diese haben meist einen Aluminiumkern und werden daher nicht wirklich heiß Nach dem Ausschlussprinzip bleiben noch: -Schmiedeeisenpfannen -diverse Pfannen aus der TV Werbung Ich halte nichts von hochgeschraubten Werbeversprechen, deswegen schieden die TV Pfannen für mich aus. Es blieb also nur die Schmiedeeisenpfanne. -!Auspacken!- Ich bin mir bis heute nicht sicher, ob die Pfanne beschädigt wurde oder nicht. Das hat folgenden Grund: Es waren sehr merkwürdige Kratzer auf der Pfanne. Deswegen ging die erste auch zurück. Bei der Ersatzlieferung aber ebenfalls. Auch die Mitarbeiter von Amazon waren sich bezüglich dieser Kratzer nicht sicher. Diese Pfanne habe ich dann trotz Kratzer die fast aussahen wie Reifenspuren behalten. -!Vor der Benutzung!- Ich habe die Pfanne eingebrannt wie es in der Anleitung steht. Es raucht und riecht ziemlich extrem. Nach dem Einbrennen ist es auch mit der glänzenden Optik erledigt. Pfannen dieser Bauart haben das aber so an sich, daher ist das für mich nichts Negatives. -!Der erste Einsatz!- Gasherd: Es ist sofort aufgefallen, wie wunderbar die Pfanne die Hitze transportiert. Diese Pfanne wird wirklich heiß und das innerhalb kürzester Zeit. Die Bratergebnisse waren top. Cerankochfeld: Die Pfanne wird ebenfalls richtig heiß, allerdings dauert es ziemlich lange bis sie die richtige Temperatur erreicht hat. Dennoch sind die Bratergebnisse nicht zu beanstanden. -!Im Dauereinsatz!- Positiv: Auf beiden Herdarten erzielt die Pfanne super Ergebnisse, insbesondere bei allen was hohe Temperaturen braucht will ich sie nicht mehr missen. Fleisch und Fisch im Ganzen wird super. Es ist zudem möglich auch Soßen mit säurehaltigen Lebensmitteln direkt beim oder nach dem Braten in der Pfanne zu zaubern. Die Pfanne kann einiges ab und auch die Einbrennung ist sehr robust geworden. Die Reinigung ist simpel mit heißen Wasser und Küchenpapier durchzuführen, nahezu alle Speisereste kann man so entfernen. Neutral: Nach der Zubereitung von markanten Lebensmitteln sollte man (wie es in der Anleitung steht) die Pfanne mit groben Salz und Öl erhitzen, damit sich diese Aromen lösen. Notfalls hält die Pfanne aber auch mal eine Reinigung mit Geschirrspülmittel aus, das entfernt ebenfalls ungewollte Geschmäcke. Danach sollte man die Pfanne aber definitiv mit Öl auswischen. Öl ist bei dieser Pfanne bei jedem Bratvorgang erforderlich um die Hitzeverteilung und die Antihaftwirkung zu optimieren. Negativ: Die Pfanne ist leider nicht für alles geeignet. Spiegelei und andere Dinge die von Natur aus leicht anhaften sind in der Pfanne nicht zu empfehlen. Die Einbrennung verhindert zwar das anhaften zum großen Teil, aber dennoch ist es keine vollwertige Antihaftbeschichtung. So muss man bei der Zubereitung eines Spiegeleis am besten eine große Menge Öl verwenden um diesen Nachteil zu kompensieren oder damit Leben wenn es beim Rausholen zerstückelt wird. Auch Lebensmittel die sich bei hohen Temperaturen nicht wohlfühlen (paniertes und viele Sorten Fisch) sind in einer anderen Pfanne besser aufgehoben. Die extreme Temperatur der Pfanne ist auch ihre Schwäche. Denn ist die Pfanne einmal auf Temperatur so hält sie diese auch lange. Auf dem Cerankochfeld wird dieses natürlich noch verstärkt. Insgesamt: Im Dauereinsatz erfüllt die Pfanne alles was ich mir erhofft habe. Sie wird heiß, der Antihafteffekt funktioniert und sie ist säurebeständig. -!Fazit! Diese Pfanne ist ein tolles Produkt und scheint für die Ewigkeit gemacht. Die genannten Nachteile sind typisch für diese Bauart und sollten jedem vor dem Erwerb klar sein. Es bleibt der Appell an alle, dass es keine perfekten Pfannen gibt, dafür sind die Einsatzgebiete viel zu verschieden. Wer eine Pfanne haben will die, -richtig heiß wird -in der einige Lebensmittel einfach perfekt werden -die vermutlich für die Ewigkeit gemacht ist der ist hier goldrichtig. Wer eine Pfanne haben will die, -einige Jahre gut ist -in der fast alles gut zuzubereiten ist, der ist mit einer hochwertigen Keramikpfanne besser beraten.
Trustpilot
1 month ago
1 month ago


