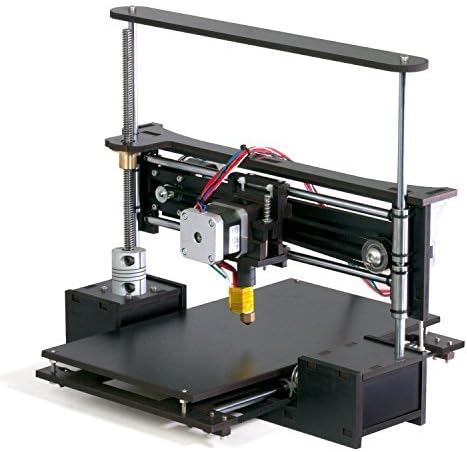
TwoUp v3 3D Printer Kit with Heated Bed 7" x 7" x 5" Build Dimensions 50 Micron 1.75mm PLA ABS Nylon Filament
Product ID: 9939508
***THIS IS THE HEATED BED VERSION*** TwoUp Version 3 This is the 3rd generation of the famous TwoUp printers. With over 7,000 units out in the wild, the TwoUp is the standard for entry level 3D printer kits. The 3rd generation comes with revised instructions to make assembly and printing easier than ever. Many of our customers report build times of under 2 hours til their first print! The TwoUp sets itself apart from other 3D printers in its class by using the finest linear motion components, including chromed, induction hardened linear shafts, dual precision ACME screws (for the Z axis) and LM8LUU linear bearings for double the rigidity over the LM8UU bearings used in most printer kits. Each of the linear motion components is tied together with a CNC laser cut melamine frame (Made in the USA) which provides not only rigidity but light weight for high speed printing. The printing area of the TwoUp for both the heated bed and standard version is increased to 175mm x 175mm x 130mm. While most printers max out at 100 micron layer heights, the TwoUp can print consistenly at 50 microns, double the resolution of its competitors. With improved print speeds up to 100mm/s due to the lighter weight extruder and hotend, print time is almost cut in half! The brand new auto-adjusting extruder puts the exact amount of tension required on the filament and allows quick loading and unloading. Due to its open design you can visually see the feeding of filament into the hotend for easy maintenance and setup. The all new metal hotend improves print speeds and reliability and looks AWESOME! Additional improvements include a much more robust mounting system for the linear bearings and belts as well. The printer is compatible with all filaments that have melting temperatures below 250C including, PLA , ABS , Nylon , Laywoo , Bronze fill , Ninja Flex , PVA , HIPS and many more!
X**Y
QU BD has very quickly become my favorite 3D printer manufacturer
If you are brand new to 3D printers and want something that prints right out of the box, this is not the printer for you. If you are a tinkerer and want to learn all about 3D printers by building your own then using it to upgrade itself, this is the one for you!QU BD has very quickly become my favorite 3D printer manufacturer. They have built this kit to be as cheap as possible, with the intention of having the end user polish and personalize the product.CONS: Once assembled, these printers can do some OK quality prints, however they do have known issues. They have a gantry sag on one side and a y axis wobble. You can visit thingiverse and download printable pieces to fix both of these issues for free.PROS: These printers are fantastic for learning about 3D printing! Also, every piece is interchangeable with most universal 3D printing hardware out there. I have upgraded my hot end to an E3D V6 and print board to a Smoothieboard. So now I have a printer with top of the line parts that is fully configurable and will last many years!Other thoughts: If you are curious about this printer look for a series of videos on youtube from user 3DPrintedlife. He has documented the building and upgrading process of his Two Up.
J**E
Great 3D Printer with a couple small caveats that are NOT by any means dealbreakers.
While it is one of the lowest cost 3D printers available, it is still great! It has some minor issues at first, such as the gantry sags on the right hand side. However, you can account for that by making the platform align to the printhead path instead of being level to the ground. Which, honestly, you shouldbe doing with any 3D printer, even without the gantry sag. Once you have done that, you can print up a simple pulley system that eliminates the sag. At this point, you can print all sorts of upgrades that make this printer VERY competitive with MUCH more expensive printers. Especially when considering the minimum layer height at .05mm is half of the minimum layer height on most printers even going over $1000 models!When I received my kit, the thermistor for the printhead was missing and one of the motors was dead However, I just contacted them via Amazon's "contact seller" option and they had me the missing and replacement parts within a couple days.Another thing to be aware of, is that in some of the early reviews, this printer had many more issues than it does today. The people who make this kit listened to the various issues that people had and addressed many of them with slight design changes and various upgraded parts. This is true of many issues you can find enumerated on the kit manufacturer's forums as well. Also on their forums you can find many suggested upgrades and links to many STL files to print the upgrades too!So, if you are mechanically inclined and enjoy tinkering with things, then you can get a better printer overall purchasing this than if you spend several times more! And you typically still have to assemble those as well! All in all, I couldn't be happier with this printer and have been finding great enjoyment from using it.
K**Z
Great product for the price--but be prepared to spend at least 8 hours assembling and 2 weeks optimizing.
I agree with the other reviewers. on pretty much everything, but here are some additional thoughts:I built my first computer in 1994, a 486--66 running DOS 6.22 & Win 3.11. Taught myself everything about autoexec.bat & config.sys files, and the pain of drivers. If you wanted plug & play ready to go your only options was Apple Macs. This is kinda the same, but more extreme. This printer isn't for someone who wants an "it just works solution" like the Mac.Even if you have a PHD in IKEA assembly--this thing will still take you a while. I realize it says "DIY" but it's more like "Hey here's (most) of the parts you need to make a 3d priinter--good luck!" I don't mean this as a criticism--you just need to be prepared for what you're in for. It has over 200 parts. If it was just a matter of following instructions, it would just be a long slow process. The challenge though--is that Q3D is regularly making updates to the printer. So one of the parts you receive looks different than in the manual. The changed part may be mentioned on the company's website as part of the updated instructions, but there isn't an easy way to figure out. You pretty much have to read everything they have and figure out which one applies to your package.A good example of this is the circuit board I received is the most current (and probably most stable/best quality). There is a 4 pin socket for connecting it to the power source. The instructions point out which leads are positive which are negative. There is another photo that shows the power source, and which inputs are positive, negative and incoming vs. outgoing power. The photos don't directly correspond and there are no explicit instructions (that I could find so far). So you have to know enough to problem solve and connect the positive and negative leads from the socket to the corresponding connections on the power source (which are screwed in).Also, this surprised me--there isn't really a case/cover for the circuit board and power supply. It's not a horrible thing, but I didn't realize I'd have an open circuit board with wires popping out of it sitting there on my desk. If you want everything to look polished, you'll want to design your own platform to hold everything (like a spool to hold your printing filament). Of course, you have a 3d printer to help you build all of that.Youtube is your friend. There are dozens of videos explaining each part, and why and how to upgrade it. I started this project with next to zero knowledge of 3d printing and I've absorbed a lot of information (which is one of the reasons I went with this printer rather than a ready to go printer).It's a lot of work, but you can't beat it's price and the amount of knowledge you gain from figuring all of this out. It's 1/5th the price of the first 3d printer I ever looked into.
Trustpilot
1 day ago
2 months ago