Slice, Shred, and Shine! ✨
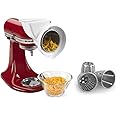
The KitchenAid Slicer & Shredder Attachment is a versatile kitchen tool designed to enhance your cooking experience. Engineered to fit all household KitchenAid stand mixers, it includes two shredding cones (fine and coarse) and two slicing cones (thin and thick), allowing you to effortlessly prepare ingredients like cheese and vegetables. With a convenient front pocket for storage and an instruction book filled with recipes, this attachment is a must-have for any culinary enthusiast.
| Is the item dishwasher safe? | No |
| Item Weight | 16 ounces |
| Style Name | Slicer/Shredder |
| Color | Slicer/Shredder |
D**M
Great item to have
Great product for kitchen
I**E
Instructions for Assembly/Disassembly
I bought this attachment to shred cheese, and it performs this function beautifully. I have not yet used the attachment for anything else so I can't comment on shredding/slicing vegetables, but if you want to shred cheese, you can shred an entire block in less than a minute.I was worried because so many people were having trouble getting the unit back off the kitchen aid. The first time I used this product, that was absolutely the case. I was so frustrated. I re-read the instructions and read some reviews, and now I can get the whole thing together and apart in a matter of seconds. In fact, it takes me less than 6 minutes TOTAL to shred an entire block of cheese when you count (1) getting the unit out (2) assembling unit (3) shredding cheese (4) washing unit (5) drying unit and (6) putting it away.If it is useful, I might create a quick how-to video for set up and disassembly, but for now, here are someTo set up your unit:(1) Attach white base to the kitchen aid. Screw it in tightly and check to ensure it is level and does not wiggle.(2) There is a square hole in the white base. Place the square end of the long metal attachment into it. Fit the bottom of the desired cone to the top of the long metal attachment. Turn gently until it locks.(3) Insert cone (with long metal attachment sticking off the end) into the white base. Give it a gentle turn, then ensure it is locked. Attachment is now ready to use.To disassemble your unit:(1) Lift up little metal lever, located where the white base attaches to the kitchen aid. Pull cone out of the attachment head while lifting that lever. IMPORTANT: Do not try to remove the attachment from the cone, this will not work! Instead, pull the entire cone out with the metal attachment still intact.(2) Insert the long metal attachment into the square hole on the white base. Give it a gentle turn, and the attachment will be removed from the cone.(3) Remove attachment base from kitchen aid (make sure to unscrew where it attaches to mixer first. Sometimes a gentle rock back and forth will be needed to loosen it)It really is that easy. If you don't follow the instructions exactly then you will wind up quite frustrated. Once you figure it out, it really is super easy and super fast.LOVE this attachment!
M**R
Indispensable
This set is amazingly helpful when making a large batch of something. For small amounts it may be more trouble/clean-up then it's worth.But it's amazing for big jobs! This is excellent when our family makes 4 batches of meatballs at a time.A family favorite my mother made all her life ~ vegetarian meat balls. She kept the recipe a secret till she FINALLY shared it in 1982.Four batches (for family gatherings) requires 4 lb 'Kraft County Line Colby Cheese' shredded. And 4 cups pecans (or walnuts) chopped.All of which can be ready with the large shredder blade in less than 5 minutes. - PhotosThe large cutting blade does well for fried potatoes ~ potatoes for scalloped potatoes, etc.During use, the cone gets firmly stuck on the arbor which attaches to the mixer.We've learned to hold the end of the arbor with pliers while separating.Recently purchased another kit for a gift for our daughter.-----------------------------------------------------------A lot of prep work, but Kitchen Aid attachments greatly help.Vegetarian Meat BallsIn large pan or mixing bowl (one batch) --- (We use an very large antique enamelware dish pan for 4)1. 5 or 6 eggs2. 1 cup pecans or walnuts (which ever you prefer)3. One bulb fresh garlic (the entire bulb) finely chopped/minced4. One pound Kraft County Line Colby Cheese (shredded) other cheese don't taste the same.5. Two medium size onions or one large one6. Nabisco original premium saltine crackers ~ one tube crushed.> Stir all together. Make meat balls approx 1 1/2" diameter.> Fry ~ turning all around until browned all over. Sit to the side while frying all the recipe.> Put browned meat balls in large clean frying pan ~ and add till there covered ~ your choice of ~tomatoes / crushed tomatoes / diced tomatoes or tomato juice. (or combination like we do)> Simmer till all is warm. Stir gently ~ careful as to not break meatballs apart.It's a messy job to form balls, but turn out good when browned.(Although some may end up flat -ish rather then round)The 4 batches pictured made 200 meatballs.If you try it ~ hope you enjoy!
J**D
Good attachment, but needs practice and sharpening
I bought this after seeing a similar looking hand cranking device at the Phila. Home Show for 250 dollars. After watching the salesperson crank out an entire salad in under 2 minutes, I wanted it. I went home and bought this one for 50 dollars. It's absolutely amazing on cheese. Utilizing the power of the mixer is ingenious. The Kitchenaid isn't quite as nice to use as the home show device - I have 2 points to make:The thick and thin straight slicer blades come dull - I don't mean semi-sharp, I mean completely dull(KitchenAid doesn't like lawsuits). The power of the mixer bites through the vegetable, it doesn't slice through like it should, which explains people complaining in the reviews about it not working on all foods. This was easily remedied by spending about 15 minutes on a 1" bandsander loaded with 220 grit and putting an edge on each "blade". That was a MASSIVE improvement, now the slicers really slices effortlessly through everything.The angle that the veggies go in is diagonal to the blade, meaning you can't cut the vegetable straight on, like you would with a knife and a cutting board. With practice, I've improved, but the cuts still look a little funky, especially when you start approaching the nub of the vegetable. Kitchenaid should engineer the chute into a straight-on angle with the cutting knives.Overall, it's a really well made unit, and it chops FAST - on low speed it will thick slice an entire cucumber in under 2 seconds. It is extremely fun to use, and cleanup is pretty easy. If you have a kitchenaid mixer, you should definitely buy this attachment. -J
Trustpilot
2 months ago
2 days ago