


❄️ Chill out in style with Daikin's mini-split magic!
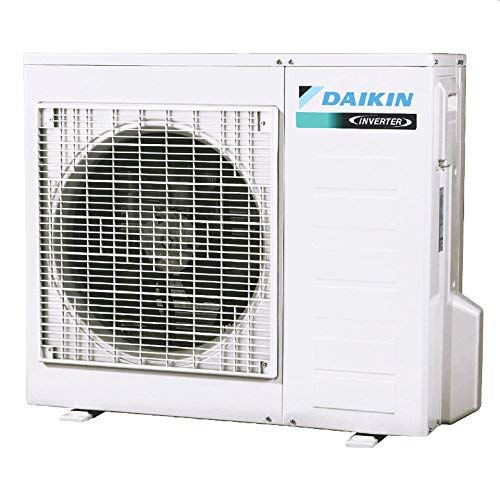
The DAIKIN 9,000 BTU 17 SEER Wall-Mounted Ductless Mini-Split Inverter Air Conditioner Heat Pump System is designed for efficient climate control in spaces up to 400 sq. ft. It includes an indoor fan coil, outdoor condensing unit, remote control, and a 15 ft. installation kit, ensuring a seamless setup. With a 10-year limited warranty, this system promises durability and peace of mind.
T**S
Solid unit, comes with a lot of what you need to install
Not a DIY. Either you need a refrigerant technician to do the final hookup, or you need about $1000 worth of tools and a EPA 608 Type 2 certification ($44k fine for opening the service valve to let the R410 out otherwise). Oh, and there is a $10k finders fee if someone reports you!I ordered two Daiken 9k units from UR Supply DirectThe good:1. Comes with quality iCool linesets and TC-ER communications cable, which meets code in most states to hook the units together (following 2017 NEC).2. Robust mounting bracket. Don't rely on the the built in bubble level, because it doesn't work. The bracket results in the unit leaning slightly away from the building even thought the vertical braces are plumb.3.Daikin unit is whisper quiet.What's not in the kit: outdoor disconnect box to mount by the compressor (required by code) and a surge suppressor to mount on it. Liquidtight cable whip. Lineset covers.Surprises: The 5/16" service valve is inset such that you can not get a valve core removal tool on it. No choice but evacuate this with the valve stem installed.What tools you need if you don't hire a HVAC technican. This stuff adds up real fast.1. Manifold. Digital Micron Pressure Gauge. 5/16"-1/4" offset flair adaptor. Several vacuum rated ball valves.2. Quality ratcheting flare tool, tubing cutter and deburrer.3. Tube bender (ratcheting type or the RectorSeal EZBend; Check it out!).4. Nitrogen bottle and high pressure regulator and hoses (your welding equipment wont work).5. Vacuum pump and hoses.6. Torque wrench. Digital is preferred, not a clicker. And don't use offset crowfoot on your torque wrench, they suck.Why you hire a technician to finish installation?1. Make up good flare fittings (the tube should extend about 0.020" from the mandrel before starting).2. Attach adaptor, pressure gauge, ball valve, hose to N2 tank and regulator: Pressurize to 515 lbs and isolate with ball valve, hold a minimum of 1 hour (overnight is better). Check all connections for leaks.3. Release all but a few psi of N2, draw a vacuum. This is the first step to drying the system. Attach your $200 digital micron gauge (the manifold low side doesn't measure accurately enough). Get pressure below 200 microns, isolate pump with ball valve. Watch vacuum decay. Is it a leak? Or is it moisture? Wait 30 minutes to find out.4. Break the vacuum with N2, pressure to 20 psi.5. Draw a vacuum to get the N2 out. Get to 200 microns. Watch it decay.6. Break the vacuum with N2, pressure to 20 psi.7. Draw a vacuum to get the N2 out. Let the pump run to as low as it will go (Mine ended up at 70 microns). Isolate, wait 30 minutes, if it goes above 500 microns, you have problems. Mine decayed to 110 microns. Good to go.8. Isolate your micron gauge. Crack open the high side valve slightly. The idea is you want a slight R410 pressure in the lineset when you remove your equipment from the service valve. Taking your equipment off under a vacuum results in unacceptable amount of air being introduced into your lineset.The cycling three times from N2->vacuum gets all the moisture out of the lineset. Vacuum testing does not provide an adequate leak test; this thing operates between 200-515 psi all the time; verifying stuff won't leak in isn't the problem. You need to verify it doesn't leak out.The bad:One of my units shipped UPS; pristine. The second one shipped FEDEX, arrived lying on its side, box all beat up, a few minor dents in the sheet metal.
C**
Very quiet and an easy install
I'm a former HVAC tech and have installed scores of mini splits. I wanted a unit to cool my master bedroom at night without running the 5-ton central system for no other reason. The 9K BTU unit will easily handle the 17 x 21 room, and it should pay for itself in electricity savings within two years. With that said, this Daikin is not the best looking unit I've seen, and it lacks some features offered by other brands. I chose it for the Daikin name which is among the top 3 mini split manufacturers worldwide, and it's approved for sale in the U.S.; beware of other brands which are "bootlegged" stateside and whose warranties will not be honored. It arrived in SW Florida in two days since it originated in Miami and was packaged well. I noted a small area of dented fins on the condenser coil, maybe a square inch, but nothing else. The lineset was bagged and did not have capped ends which are typical of ACR tubing. The capped ends of the evaporator coil did not release any pressure when removed. This does not necessarily indicate a leak within, but it is not very encouraging. My first impression of the equipment was that (A) it's ugly, (B) the backplate seems a bit flimsy, and (C) it's ugly. There was no template included for mounting the backplate and making the wall penetration, so I made one out of cardboard and cut the hole. 5 sheetrock anchors secured the backplate and it easily supported the very light evaporator section. Still leery of the thin-gauge metal plate, I tweaked the corners with a needle nose pliers to ensure no vibration. The included lineset was a bit long for my needs so I nipped off 3 feet of tubing and re-flared. Wiring was a breeze; I simply replaced the disconnect for my pool heatpump with a subpanel and wired it up. It held a 100-psi nitrogen charge for an hour, so I pulled a vacuum, opened the service valves, and away it went. Very quiet, excellent temperature split, and (hopefully) excellent quality components. You can get more features and a cooler appearance at this price point, but the Daikin name is worth paying extra for.Pro Tips:As mentioned, make a cardboard template for the backing plate and give yourself several inches above and to either side.Water does NOT flow uphill. Make absolutely sure the indoor unit is level and make your hole through the wall on a downward angle to enhance drainage.Pre-wire the wall unit before hanging it, then feed the wiring outside with the piping.Use duct tape to seal the ends of the tubing while you're working. Even a few seconds of exposure to the elements can allow a random insect to get in, spelling disaster.Use a cover kit to conceal the outdoor piping. Well worth the $40.Don't coil up excess piping; cut it and make new flares. You can buy the tool for under $50 and practice on the scrap you cut off.The manual suggests you can place the outdoor unit one-inch from a wall. Nonsense. Give it at least 10" so you can clean out debris once in a while.Don't even attempt to install it yourself unless you own or have access to a vacuum pump. Moisture is deadly to refrigeration equipment, hence the need to cap lines. The small amount of moisture (humidity) in the air is enough to create acids within the system and destroy it. The most important thing you can do is pull a hard vacuum on the system before opening it.Worth noting is I went on the Daikin website and registered the products for warranty purposes. Interestingly, the indoor unit was manufactured only a few months ago, but the outdoor unit was made over a year ago. I suppose they move more indoor units as multi-head packages, but it's still unusual to see a volume manufacturer with year-old stock sitting around. Either way, I hope to never need the 10-year parts warranty.
H**N
Excellent buy. Shipped well. Great seller.
I purchased the 9k Daikin package from Heatandcool. I bought the listing that was NOT Prime.I needed a 25' line set. I contacted Heatandcool and they were very easy to work with to make the update on my order. It is worth reaching out to them prior to ordering to see what the process is to make that update.Heatandcool shipped this via a half pallet through an LTL. That means all the component boxes came on a pallet, neatly shrink wrapped, in excellent condition. Heatandcool requested an appt delivery- meaning the LTL needed to call me and schedule delivery, but the LTL did not honor it (R&L was the company). They just showed up. These deliveries require a signature so you can check for damage. I was home anyway, so no big deal. If you need an exact delivery, you should reach out to Heatandcool and obtain the tracking information then reach out to the LTL company directly and work the delivery. If you miss your delivery, they will have to redeliver.The installation was straight forward. There are plenty of videos out there that explain what needs to happen and how. The hardest part for me was running the 220v line to the unit, so consider hiring an electrician for that before attempting installation. The flare nuts on the line set provided looked identical to the OEM ones and flares looked correct, so I did not cut and make new flares. I did use nylog and used a torque wrench to spec. In the end, the system was leak-free.The unit is very quiet. I would buy again 100%.
Trustpilot
2 months ago
3 days ago