
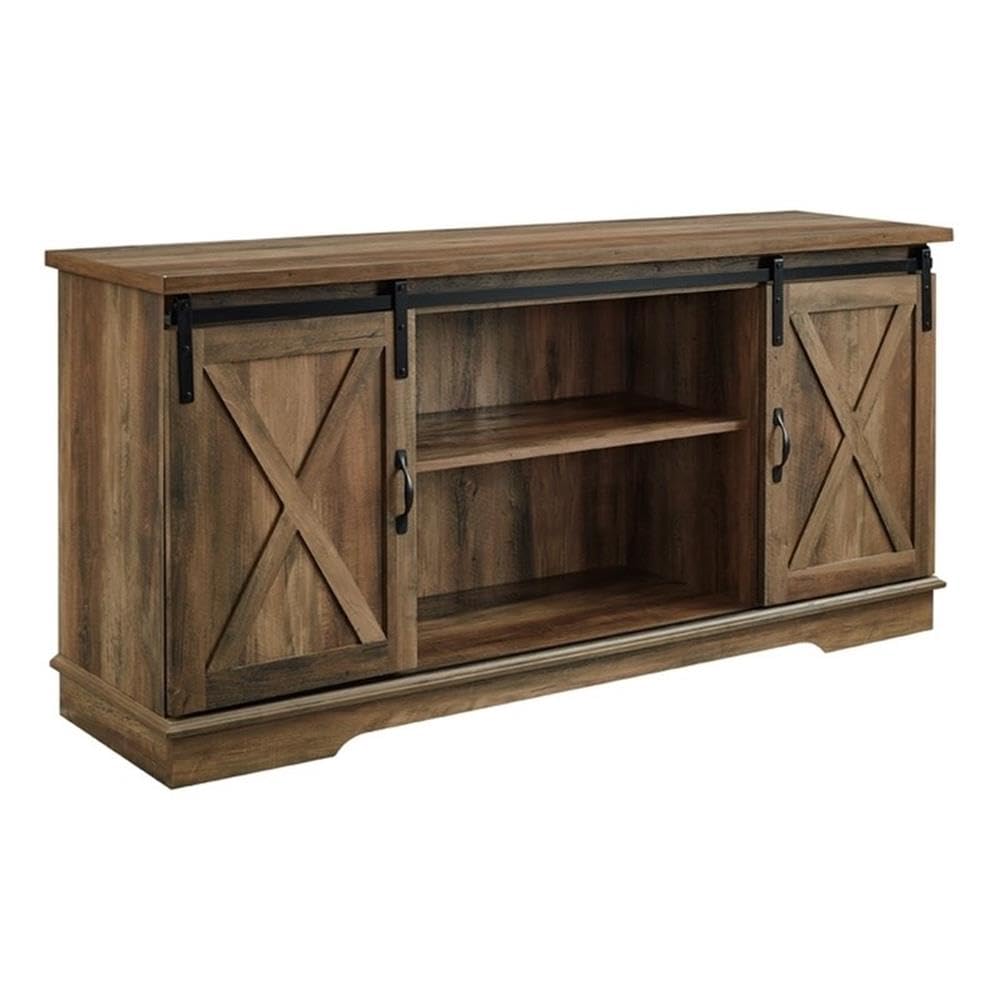


🏡 Farmhouse Flair Meets Modern Functionality!
The Walker Edison Richmond Modern Farmhouse Sliding Barn Door Stand is designed for TVs up to 65 inches, featuring a rustic oak finish that adds charm to any room. With dimensions of 28” H x 15.75” D x 58” L, it includes three adjustable shelves, six cord management ports, and a sturdy top surface that supports up to 150 lbs. This stylish stand ships ready-to-assemble, making it a perfect blend of form and function for the modern home.
| Item Depth | 15.75 inches |
| Item Dimensions | 16 x 58 x 28 inches |
| Item Weight | 87 Pounds |
| Size | Without Fireplace |
| Style Name | Modern Farmhouse |
| Shape | Rectangular |
| Color | Rustic Oak |
| Required Assembly | Yes |
| Material Type | Wood, Metal |
| Product Care Instructions | Wipe with Dry Cloth |
A**S
Penultimate Review - READ BEFORE ASSEMBLY
I was apprehensive with this purchase solely based on the reviews detailing a super lengthy build & difficult instructions. With limited building experience, I took a chance and am happy that I did. I was determined that this would test my sanity, but I was actually able to complete this build in less than an hour! I think my lack of experience building actually led me to some “hacks” that sped this process up TREMENDOUSLY. Be sure to read the review in full as I’ll detail everything exactly as I did it.First thing to know - you will benefit greatly with placing parts into piles before beginning. This will allow you to focus on the actual assembly instead of searching for parts etc. toss the furniture stickers as well as there is no need once the doors are on.Set piece 1 by itself ( #1 was not labeled but it was easy to figure out which one it was) this is the top of the tv stand and will go on towards the very endGroup together pieces 3,4,5,6 with pieces 7,8,9,10. These are the vertical panels that support the structure.Group together pieces 2,17,18,19 and 20. These are the bottom edge and legs of the tv stand.Group pieces 21 & 22. These are the doorsGroup pieces 11,12,11 these are your shelvesGroup pieces 13,14,13 these are the back panels of the stand.Second thing to know - you do NOT need to glue each dowel in place for it to hold together. I found this by accident as I was ready to glue the parts based on other reviews, but the only mention of what to glue appears in P.2 part V of the instructions but the actual building doesn’t begin until P.10 of the instructions. Once you’ve installed all the cam screws it holds the piece together and there are no gaps in the final assembly. One thing I will note: the cam screws in pieces 7&10 on mine were loose because the manufacturer made the holes too big. By step 13 of installing the top it fixed this completely.Third thing to know - this is super important especially if you’re building solo. I credit this as making the whole install a lot faster than expected. DO STEP 10 BEFORE 9. Installing piece 2 into the bottom of the vertical panels 3,4,5,6 made it MUCH easier to install part 15 into 7,8,9,10. I tried following it As-Is but after the fourth time of the panels falling down this made the most sense. It was a breeze after this. Again, after the top is installed on step 13 it made everything fit snug so don’t worry if the panels feel loose after these steps in whichever way you end up doing it.Fourth thing to know - STEP 14 is so terribly awful and unnecessary it’s laughable. SKIP IT. There is absolutely zero point to it at all. It serves nothing, there are no holes already so you’re left to manually screw it into the thin panels which could risk cracking them completely. At first I thought it was to mount it to the wall BUT NO. I’ve added a photo of this step. Do yourself a favor and go straight from step 13 to 15 and toss these plastic wedges into the trash!! Seriously, I wasted a good 10 minutes trying to figure out what the heck they were for.Fifth thing to know - you will need Phillips #0,1 and 2. Just for example on step 18, the pulleys (part N) need Phillips #1 to screw in, but the plates (part L) need Phillips #0. I found myself switching the bit multiple times through the build. Have your tools ready.If you heed my advice, you will have no reason to fear building this. It was a breeze and I would definitely buy this again if needed. The versatility of this piece as a tv stand, nook, entry way, etc is great and I love the color and finish of this piece. Although it is not hardwood it does look fantastic for the price. The reason it was priced lower is due to the labor being on us, and if this were sold at a furniture store I see it selling for no less than 4-500 easily.I hope this helps any onlookers considering this piece but concerned about the build. You’ve got this!
B**E
This is fun to put together!!
Assembly POV[Not sarcasm I promise] I had a blast putting this barn-door wood-stand together:1.) It comes delivered to your door in one large box - nuts/bolts/screws, parts, instructions, and panels are all in the same box, nicely puzzle-stacked.2.) All parts are labeled well - I took the time to run A - Z through all parts as a first step, nicely done.3.) Instructions are detailed enough for understanding yet concise enough for intuition - drawings make sense and all parts/components match up.4.) All tools except for a screwdriver are provided (phillips, allen, and some dowels/glue are the main fasteners).Notes on Assembly:1.) This set takes time to put together. Block out at least 4 hours worth of time, double that time for a leisurely pace. There are multiple components, some components take adjusting, and gluing is involved.2.) The package altogether is heavy, and parts get cumbersome without additional hands. I would recommend two people carrying this inside together and having a lot of open space available during assembly (maybe the kids can be out that day). Try not to fight over who gets to do what.3.) The components and parts are alphabetically labeled. However, due to puzzle-stack packaging, the components come in a hodge-podge, out-of-alphabetical order from the box. I would suggest alphabetizing them prior to assembly. The action brings ease to confirming all parts were shipped and makes finding parts when needed extremely easy (pictographs are in the instructions too).4.) Using an electric power drill/screw gun gets the job done faster and with more ease. (Disclaimer - I went against better judgement. The instructions say not to use power tools, but I kept my drill on a low torque setting. So shush, I like my power tools.) Have both phillips and allen screw bits ready if using power drills - this really saved me time and saved me from getting overwhelmed by the amount of 'screwing' (fastening screws?) that is required.5.) The gluing is not "optional." Read all of the directions prior to assembly. The kit comes with glue, and I (quite mistakenly) thought it was optional for strengthening joints that look weak. So I had 75% of the stand put together (none of it glued up), and I realized all the little dowels are supposed to have glue on them, end-to-end. I back-tracked and got all the gluing done. (From writing this part, I am coming to a realization that my assembly-time estimation from note 1 might be 30-45 minutes generous).5.) Have fun with this - the structure is beautiful at the end, the sliding barn-door's really do slide, and slide surprisingly smoothly, and the stand is more than worth the price. Good feelings at the end. (And the family can now at least gawk at a nice structure whilst consuming digital media).
T**.
Good looking TV stand
If you're looking for a rustic TV stand, this one should be on your list. It's particle board materials, not hardwood. So, for the price it's perfect. Very sturdy and nice looking with barn doors. Does take a little time to put together, and instructions are clear. Would recommend for this price range.
R**N
Better quality than I was expecting
I bought this as a mother's day gift for my mom. I wanted to get one that was already assembled. But all the ones in the store were over $450 up to over $800. And they were not the style she wanted. This one is not real wood... but neither were the expensive ones. This one was a good price and the style she wanted...so I gambled and ordered it. I was afraid I was going to have trouble putting it together. I was afraid after I put it together that it would be flimsy and wobbly and would fall apart during the loading and delivery to her house in a neighboring state.But to my surprise it was fairly easy to assemble. ( for those who refuse to read directions it would be very hard). It probably took me 3 to 5 hours to put it together but I wasn't in a hurry.I really Ike that the doors could be closed into the center with the open shelves on the outside. Or u can push the doors to the outside and have the open shelves in the middle.It is very sturdy and is very good quality for the price. The doors slide good too. I was afraid they would be hard to slide too...Sooo.....long story short....this is a great TV stand for the money!!! Very sturdy...easy to assemble...and has a very nice look to it!! I would highly recommend...
B**8
Beautiful
Beautiful piece of furniture. love it. Very sturdy. The directions to put it together weren't the best.
J**E
Nice looking stand
Beautiful beautiful stand. Easy to assemble. My boyfriend decided to try to move it by pushing it on the carpet, the leg snapped very easily. We had to go out and get different parts to fix it. Other than that, it will work well for our basement.
K**F
Lovely upscale furniture
A**R
Good value
It was easy to build, one person can do in 2hrs. My stuff was in perfect condition and packaged properly. I particularly liked the fact they send some extra hardware just in case. No complaints, all the pieces match perfectly, fun little build.
R**A
Good value! Looks great!
sturdy and does not look cheap. good door sliders. looks quite sharp in my home office
J**T
Beautiful
Found a video on YouTube with step by step instructions. It was easy to put together!
Trustpilot
4 days ago
3 weeks ago