
DOWNLOAD THE APP


Customer Services
Copyright © 2025 Desertcart Holdings Limited
DOWNLOAD THE APP


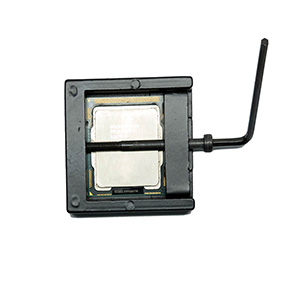
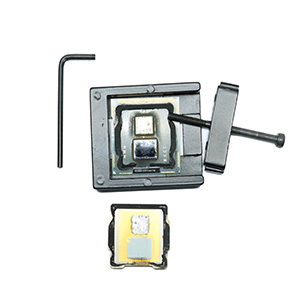
Full description not available


J**.
Worked perfectly on my 8600K!
Why pay more for a delidding tool? Never built a pc before and never delidded, but I stuck my brand-new 8600k in the frame, turned the screw until it felt like my processor was going to break, and the thermal heat shield popped right off. I then used a razor blade to carefully scrape most of the glue off the chip/pcb itself, and used the same technique and rubbing alcohol to get all the glue off the THS. I then used a cotton swab to spread a pin head-sized/tiny amount of liquid metal on the processor and a little more than that on the underside of the THS (do the THS first so you get an idea of how they liquid metal spreads out, since it acts really weird). I then put the THS back on top of the chip and placed it into the motherboard socket (Aorus z390 ultra). No need to glue the THS back on - it stays in place just fine. I then put a rice grain-sized amount of thermal paste on the EVGA cooler connection (after using 91% rubbing alcohol to remove the paste the factory put on it). I dont know how my temps were before since it's a new build, but with a evga clc 280mm air to water cooler and a pair of noctua 140mm ipp/industrial 2000 rpm fans and a 5.1 overclock at 1.34 volts my temps never went above 76 C after 12 hours of prime 95 (w/ -2 avx offset, so 4.9 ghz effective clock for avx). I then ran Real Bench for 8 hours and temps stayed mostly in the 60s. About 30 C at idle. I tried 5.2 ghz, but not stable even at 1.4v. I'm very happy with this tool and how everything worked out and would recommend it even for a novice. Why pay twice as much for a nicer looking tool when this one works great?
D**N
Great price same easy to use tool.
Delidded 8700k. Placed a coffee filter inside the deid tool as I did not want CPU to tool contact. The rest is self explanatory, screw in screw until the IHS slides off. Use 91% alcohol to wipe the old Intel thermal paste. Apply a tiny bit of nail polish or liquid eectrical tape to the 4 pins. Wait for NP/LET to dry. Apply scotch tape around the rectangular shiny piece of the CPU then apply liquid metal. I chose no to glue the IHS back on, my IHS is held in place by the processor bracket in the motherboard. Process took 15 mins. IA SUITE 3 overclocked my 8700k to 5.4 GHZ temp 64 *C max. Running stable at 5.1Ghz with temps at mid 50’s *C. I was amazed how much deliddig helped. Please let me know and I’ll post screenshots if need be.
A**M
It worked to delid a 8700k but it felt janky
I used this to delid my 8700k.I had to use a fair amount of force. I almost felt the allen key bend a little, but eventually I heard the "pop" letting me know the IHS was free. This could just have been my CPU with a lot of sealant.There's no indicator on which way to place your CPU but I placed it both ways, and I wasn't afraid of breaking anything. It's very simple to use and you honestly don't need any instructions to figure it out.Save your money and buy this if it is a one time use. The $40 delid tools might be worth it if you plan on doing this often.Of course, use with caution.
A**R
Don't buy the 50$ ones
When I first heard about delidding like 3 years, I thought it sounded horrifying. As the years went on it started to seem more and more like a normal thing. Now, it seems like anyone can and will do it. I bought this for my 8600k because it was going well over 80c at 5.1 with a 1.36 core voltage on an h100i v2. I thought this if something went wrong during delidding, it would take place during the actual process of removing the ihs, but I hardly see how that can happen even with a cheaper tool like this. I was so surprised as how easily it came off. Obviously each CPU will vary, I have seen videos of people having to put a tremendous amount if strength in order to get the "snap" to finally occur. Anyways, I'm just trying to make people feel more comfortable about delidding. Relative to the product, it's perfect, and idk how there are 50$+ delidding tools when this cheapo one works so perfectly. If you are hesitant about buying a cheap delidding tool such as this one, don't be, just buy this, it was a very smooth and safe experience.
K**Y
Broke immediately on first use - don't buy.
Absolutely terrible quality. Save the money and buy a better tool. I attempted to de-lid my 7700k with this, but it broke immediately upon the first use. The threads of the screw slipped and actually cut through the delidding tool, not only causing it to be defunct, but also causing a bunch of metal powder to rain all over my CPU. Thankfully after some careful cleaning, my CPU is fine, but next time I'd rather not skimp on the cost and go for a more expensive alternative.
K**.
Well, it worked on an 8700K.
I put my CPU's gold arrow in like the picture shows--down and left, so the wing was pressed up against the 'pusher'--while tightening, i heard a very loud pop, but the IHS was still in place. The 'pusher' popped up over the 'wing' on the CPU cooler and a sliver of the 'pusher' got torn off as it hopped over the wing on the IHS. Great........... So, I loosened it back up and rotated the CPU 90 degrees and that seemed to work a lot better.Now, on to the rest of the story.... Cleaning the old glue off the cpu was a pain, because I had nothing to hold the CPU while I worked on it--the walls of this delidder are to tall to allow you to work while it's still inside. I didnt want to just put it on the table because of the SMDs on the bottom of the CPU. Then, after getting my liquid metal on the IHS and die, It was time to put the heat spreader back on--this was also a pain because the walls of the delidder are so tall.In hindsight, I should have just got the Rockit kit--it has a centering jig to get the IHS centered while you're putting it back on. It also holds the cpu in a nice position, after you pop the IHS, to allow easy access to scrape the glue and apply the liquid metal.Oh well, you live and you learn, and it was only 12 bucks, so, can't really complain.
Trustpilot
1 month ago
3 weeks ago