We remain fully operational. Our teams are working around the clock to ensure your deliveries continue safely.

DOWNLOAD THE APP


Customer Services
Copyright © 2025 Desertcart Holdings Limited
DOWNLOAD THE APP

🔒 Secure Your Space, Anytime, Anywhere!
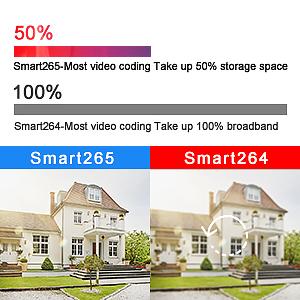
The Auto Tracking PTZ POE Camera is a state-of-the-art outdoor security solution featuring 5MP resolution, 200FT night vision, and two-way audio. With advanced motion detection and auto tracking capabilities, this camera ensures comprehensive surveillance while being robust enough to handle any weather conditions.


| Night Vision | Night Color |
| Number of IR LEDs | 10 |
| Video Encoding | MP4 |
| Video Capture Format | MP4 |
| Number of Channels | 1 |
| Connectivity Protocol | Ethernet, RTSP, ONVIF |
| Wireless Technology | Ehernet, RTSP, ONVIF |
| Connectivity Technology | Ethernet |
| Unit Count | 1.0 Count |
| Item Dimensions | 8.8 x 7.6 x 4.5 inches |
| Field Of View | 360 Degrees |
| Zoom | Optical Zoom |
| Zoom Ratio | 5 |
| Photo Sensor Technology | CMOS |
| Focus Type | Auto Focus |
| Viewing Angle | 96 Degrees |
| Optical Zoom | 5 x |
| Wattage | 6 watts |
| Battery Power | 200 Milliampere Hour (mAh) |
| Are Batteries Required | No |
| Voltage | 12 Volts |
| Power Source | Corded Electric |
| Effective Video Resolution | 5 MP |
| Frame Rate | 15fps |
| Video Capture Resolution | 5MP |
| Material Type | Aluminum |
| Water Resistance Level | Waterproof |
| Shape | Dome |
| Alert Type | Motion Only |
| Waterproof Rating | IP66 |
| Photo Sensor Resolution | 5 MP |
| Control Method | App, Remote |
| Room Type | Office, Garage, Store Room, Hallway |
| Light Source Type | LED and IR |
| Effective Still Resolution | 5 MP |
| Color | 5MP-G |
| Form Factor | Dome |
| Installation Method | Wall-Mounted |
| Additional Features | PTZ Technology, Power over Ethernet, Auto Tracking, All Metal Housing, PTZ Preset Positions |
| Indoor Outdoor Usage | Outdoor, Indoor |
| Compatible Devices | ONVIF Protocol |
| Controller Type | ispy, Blue iris, Android, ios, iris, vlc, Camhipro APP |
| Mounting Type | Wall Mount |
D**.
Feature rich ptz camera
The media could not be loaded. Review of SV3C Model SD10POE-5MP PTZ camera:Mounting: This series of camera uses a small mounting plate that the camera arm hooks onto at the top and is secured at the bottom with a set screw. I attached the camera mounting plate to a small corner bracket that was ordered separately so the camera could be mounted on the house corner allowing it to pan 270 degrees covering the front and right side of the house. This camera has a harness about a foot or so long with an ethernet jack, 12v power jack, and a reset button, all of which needs to be protected from the weather, so a single gang electrical weather box was installed next to the camera.Network setup: The easiest way to connect to your network is to utilize the app CamHiPro to find the camera using P2P once it is plugged into a POE switch. The app will display the router assigned ip address so you can then log into the camera web interface and change the ip address and set it to static if desired and add a port forward address if needed. I use Robert Chou's IP Cam Viewer app on a regular basis and it had no problem scanning for the proper driver to connect and control the camera. The camera was also able to connect to my Amcrest NVR using the available ONVIF connectivity.Video Quality: The first SV3C fixed camera that I tried over a year ago displayed video that was impressive when compared to other cameras I was using at the time, so I was eager to see if their ptz cameras performed as well. I was not disappointed. This camera gives impressive sharp video during daylight hours and in my opinion excellent video using IR at night, as you can see from the included video of the deer near my house. Now the night video can switch to color using the white spotlight option.Audio: I had issues at first getting the audio to work properly when trying to communicate with anyone near the camera. The sound levels were too low to work well outdoors until I increased the speaker and microphone volume levels using the app. Once that was done it performed well. It is also possible to increase the volume too much, causing distortion on the camera side.Features: This is a feature rich camera, with pan, tilt, position presets,, 5x optical zoom, night color, human detection, motion detection, siren, audio, IP66 waterproof, auto-tracking, SD card memory for event recording and saved movie clips and stills. While there are other features that would desirable, it is only fair to judge the camera on the features that it does support and how well they are implemented.To that end, this camera performs well, is ruggedly built, is very compact for such a camera, and is supported by a very responsive sales and tech support group. I eagerly await to experience their future products as they become available.
C**F
GREAT POE PTZ Camera
The media could not be loaded. I don't post too many reviews, but this camera rocks! Highly recommended. Compared to the old 0.3MP PTZ I've been using a my front door for many years it was time to upgrade and WOW what a difference.The camera itself:*It's solid - made of all metal and heavy duty. It will surely withstand the elements.*It's a little larger than I'm used to. I've attached a picture at my front door, which doesn't show how big it really seems, but it looks (large, but) great.*I often get the amazon package or 3 left at my front door, but with the old camera I was only able to see that there was a package ... now with the 5X zoom and the clear video, I can basically read the to/from address on the label, which is awesome. I've attached a (BlueIris mobile app) video capture from my phone, which shows the few presets I have setup and the zoom level. Presets are nice can be set up via the web interface of the camera and the zoom is great!*The video is very clear and the night vision seems just about as clear as it is during the day time.*The mini SD card slot inside the camera is a little small and awkward to get to, but the vendor provides tweezers if that gives any peace. You open a cover on the camera and inside the hole is a slot connected to the circuitry. If you were to lose the SD card inside the camera hole while trying to insert it (like I did), it will be tough to fetch. This should be done before you hang your camera. Once installed though, you can access the footage via a browser and download the stored videos.BlueIris:Works with BlueIris just fine. I have 6 other cameras around the house all connected thru BlueIris -- this one now included. All the features I need for this camera work perfectly through BlueIris (PTZ+zoom+preset calls); however the only thing I haven't got working yet is determining which settings are needed to allow for 2-way audio (I have it working for another camera, so it surely will work for this one too). I also don't think there's a way to use some of the other extra features of the camera thru BlueIris (such as night vision modes or human/intelligent tracking), but I'm not interested in those for my situation. On a side note: I was able to get those to work and play with them via the CamHi app that was suggested in the documentation (the 2-way audio works there too -- it's clear, but not overly loud) and also through the cameras built-in web app; I suppose if you were monitoring a large area, the human tracking would be cool and it does work, but not needed for my situation. The "Intelligent" 'Night Vision mode' is also a cool feature that enables a spotlight when motion is detected at night and it is SUPER BRIGHT -- enough to deter anyone (from looking at it, haha).This camera works perfectly for me and I would definitely recommend it!
A**R
It Might OR Might NOT work with your PoE Switch
SV3C SD10POE-5MP-HX(UPDATE AFTER SEVERAL MONTHS OF USE:)Camera still works well.TIP: Before trying to change or set the PTZ Preset Positions with either the CamHiPro App or the PC Blue Iris Program, use the CamHiPro App and turn OFF the MOTION DETECTION ALARM (SETTINGS, ALARM MANAGEMENT AND NOTIFICATION, MOTION DETECTION ALARM=OFF). If Motion Detection Alarm is ON, the camera will immediately go back to preset position #1 every time you try to change the PTZ position with the up/down/left/right controls.(Original Review Notes):I discovered one serious issue when testing this camera, however I don’t know if the problem is with the camera or my PoE switch. This camera (SD10POE-5MP-HX), and another camera from SV3C (SD8POE-5MP-HX) both go into a continuous reboot cycle when you attempt to move the camera with the PTZ controls AT NIGHT when the IR LEDs are ON. This happens on two different PoE switches I have (NetGear GS108PP). These switches have 30 watt ports and I’m not exceeding the total power budget of the switch. I then purchased a MokerLink POE-G083GS (PoE) switch and it works normally.There are two possibilities: (1) The SV3C cameras exceed the maximum current rating of 600mA (as specified by the Type 2 PoE+ specification) when the IR LEDs are ON and the motor is activated, or (2) The NetGear GS108PP switches do not supply the power and current that the Type 2 POE+ specification calls for.Since I don’t know which of these two possibilities are the cause of the problem, I will not blame it on the camera. But, some POE switches may not work with this camera. Be sure your PoE switch has 30 watt ports. This is commonly known as a PoE+. Do Not attempt to use it with a very common Type 1 (15 watt) switch. Note that I have found only one Type 3 (PoE++) switch on the market and it is expensive.Note: There are four types of PoE as follows:Type 1 (PoE): 15.4 watts (12.95 watts available). Maximum Current: 350mA.Type 2 (PoE+): 30 watts (25.5 watts available). Maximum Current: 600mA.Type 3 (PoE++): 60 watts (51 watts available). Maximum Current: 600mA per wire pair.Type 4 (PoE++): 100 watts (71.3 watts available). Maximum Current: 960mA per wire pair (4-pair mandatory).Also note that I’m using good quality Cat 6 cables of about 20 feet in length.The Camera is well packaged and made of metal. Picture quality is good and night vision is good. I like that the camera has the ability to turn on white lights when motion is detected. It also has an alarm that can be activated (or disabled).A very small label on the camera has small text indicating the default User Name and Password are both “admin”. That did not work for me until I pressed the reset button at the end of the cable coming out of the camera. This resets the camera to factory defaults. NOTE: You need to press and hold the button for about ten seconds, and then it takes about a minute before you can access the camera.The camera supports a micro SD card up to 128GB. DO NOT try to insert the memory card after the camera is installed. It is somewhat difficult. You need to remove the cover/access plate at the bottom of the camera. Use a flashlight to see where the card needs to go. It is at the bottom of the circuit board along the edge. The metal contacts on the SD card needs to go towards the circuit board. You will need to use the supplied tweezers to place it where it needs to go. Be careful not to lose the small rubber gasket or small screws.I was surprised at how hot the camera got in a dark room with the IR LEDs on. I measured 136 degrees F with a room temperature of 74 degrees F.I had some initial problems getting a video stream on Blue Iris. At one point I walked away and when I came back the change took effect. I suspect that some setting changes requires many seconds or even a minute to take effect (like I saw when pushing the factory reset button). So, be patient when making setup changes.The camera comes with a plastic housing that goes over the connection between the Ethernet Cable and the camera. The purpose is to keep water out of the connection. This works well IF your Ethernet cable DOES NOT have the typical rubber boot over the tab (anti-snag boot). Every time I use these, I have to cut the rubber boot off to make it fit through the end of this plastic device.The box that the camera came in has room for a much larger Quick Start Guide. Even with my reading glasses, I had to use a magnifying glass.The Quick Start Guide is fairly well written. The PC based Settings screens have some poorly translated names. A few are confusing as to what they do. It would be great if more information is supplied on the 100+ setup parameters that I counted. In addition to the Quick Start Guide shipped with the camera, you can download other documents from the SV3C website (download.sv3c.com). There are many documents available, and it can be confusing as to which ones apply to your situation. For this camera be sure you go to the HX POE list and not the HX Wireless.For Humanoid Detection and tracking, I have been able to get yellow rectangles around detected humans, and the yellow rectangles follow the subject moving across the screen. But, I have not figured out how to get the camera to move when the subject moves out of view (with the PTZ controls).Overall, I have been using this camera for a few weeks now. It has a good picture and is quite versatile with the many ways to use it and the extensive list of parameters that can be set.User Notes:There are multiple ways to use this camera. I will go into more detail later. Some of the options are:1. Using an App on your phone.2. Using a Web Browser (such as Chrome or Edge) on a PC.3. Using a media player on a PC (such as VLC Media Player).4. Using a PC program so you can view many cameras simultaneously (such as Blue Iris or ISPY). These programs allow you to record either when motion is detected or continuously and save to your hard disk drive. For 24/7 continuous recording, this is probably the best way.4a. SV3C has a program on their download website (download.sv3c.com) that appears to be similar to Blue Iris and Ispy. Under the HX POE Series you will find (1) Installation Instructions, (2) PC Software, (3) Video. There is a PDF called “PC Software (P2P client)- User Manual.pdf”. This contains brief instructions and the top part is confusing where they refer you to “PC software- LAN Client User Manual (LAN). I couldn’t find it.4b. Under the PC Software tab is a program “HiP2P Client_Setup_H265.zip”. After installing this program I did not find a shortcut on the desktop or an icon on the task bar. I had to manually find the program and I added it to the taskbar. The name displayed at the top left of the user interface is “P2P Client-v6.5.2.4”. The names are not consistent and confusing.4c. Near the top right is a question mark (“?”). There is additional help and instructions not provided in the PDF file.If you are using this camera indoors and there is a nearby power outlet you can power the camera with the supplied wall adapter. If using it outdoors it will be best to use Power Over Ethernet (PoE). There are many ethernet switches available that will supply power over your Cat5 or Cat6 cable (I prefer to look for ones that use 24 AWG wire instead of the smaller 26 AWG). Note that there are different power levels that Ethernet switches can supply. For a PTZ Camera you should look for a switch capable of supplying 30 watts to the camera. Also note that PoE Switches are rated for a total power budget. Just because a switch might have eight ports and each is capable of supplying 30 watts, there might be a total limit much lower than the (8 times 30) that you would expect. Many are rated at only 90 or 125 watts total.More details on ways to use this camera:1. Using an App on your phone. 1a. This is probably the quickest and easiest way to get started. 1b. For an Android Phone, go to the Google Play store and download (and install) CamHiPro. 1c. For an Apple IPhone go to the App Store and download (and install) CamHiPro. 1d. The process is fairly easy and the instructions in the Quick Start Guide are good. The App has more features and capabilities than using a PC Web Browser to view video, however a PC Web Browser is much better to access the many setup parameters available.2. Using a Web Browser on a PC. 2a. The first step is to determine what IP address your router supplied to the camera (It comes with a default DHCP setting that can be changed to a static IP address). Many routers will allow you to access its settings and view connected devices using a web browser on your PC. A common IP address for a router might be 192.168.1.1. If you have Google Fiber you must use the Google Home App on a phone to get into the router. Another option is to use a PC program such as Advanced IP Scanner (also a free program). 2b. You then put this IP Address into your browser. The camera will supply a screen indicating two options, (1) PC View, and (2) Setup Software. I selected “PC View” and everything worked. Option 2 wanted to install a program called “ClientPlus_Setup.exe. This program is only needed if you use the obsolete Internet Explorer. 2c. After you select “PC View”, you get a login screen where you input the user name and password. You can then view the live video, and get into the configuration settings. I counted over a hundred settings that can be changed. More on that later. 2d. This method allows you to get into the camera and make setting changes. It allows you to view the live video. It has Pan, Tilt, and Zoom controls. It is not obvious, but you can right-click on the video to capture a still image. I do not see a way to manually start and stop recording video.3. Using a media player on a PC. 3a. I prefer to use the free (and Open Source) VLC Media Player. You need to first find the IP Address supplied by the router as I described above. 3b. In the VLC Media Player, select Media near the top left, select Open Network Stream, and then for the network URL enter the IP Address you found with “rtsp://” before the IP Address and “”:554/11” at the end. Example: rtsp//192.168.1.125:554/11. 3c. Note that you DO NOT have access to the PTZ Controls or the setup parameters from the VLC Media Player. You will not be able to do manual recordings or save snapshots.4. Use a PC with a Security Camera program. 4a. I recently discovered the P2P Client program. It appears to be a decent program and worth investigating further. 4b. I like to use Blue Iris. You need to purchase this program but it allows you to view up to 64 camera simultaneously. You can also set up motion detection, recording schedules, and other things. It serves as a web server and helps to isolate your many cameras from the internet. There is a much longer learning hill to climb with this program so I would do the other methods first (unless you are already using this program).Suggestions to SV3C1. The camera has 25 screens with over a hundred configuration parameters that can be changed (PC Setup View). This is good, and most parameters are obvious as to what they do. But, there are some settings that might need a description or explanation as to what they do. The setting screens (on a PC) has a large area not being used. It would be great if these screens had more details on what the setting does (instead of just the parameter name). Explain it to a new user that has never used one of these cameras before! Some parameter names use a poor translation and not what I would use.2. When setting the configuration parameters (using a web browser), you have options Apply, Cancel, and Default. When pressing the Apply button the screen briefly flashes. There is no confirmation that the save was successful. A “Save Successful” message would be useful.3. Consider using Full Size SD memory cards instead of micro-SD. It is difficult to insert the micro-sd card.4. Consider using a larger waterproof plastic housing over the cable connection to the camera. The ones supplied do not work with ethernet cables having the typical anti-snag rubber boot. Outdoor Cat6 cables have a larger diameter than indoor cables, and might make the situation even worse.5. Ship a larger Quick Start Guide with the camera. The box has plenty of room for a larger booklet. It is hard to read small print.6. The App CamHiPro, (and possibly P2P Client PC program) is the only way I see to access snapshots and recordings stored on the SD card. (Note: I’m still investigating the PC program P2P Client so it is possible it has these functions). I suggest adding extra features to the camera webserver that is accessed by a PC (PC View using a web browser). Add the ability to view what is on the SD Card, and to play back recordings. Add the ability to do manual recording start and stop, and to take snapshots. Setting and recalling PTZ Preset positions from this page would also be useful. (I understand that right-clicking the mouse on the image will take a snapshot but that is not obvious).7. Remove the option “Setup software (first time must connect to internet). This screen is immediately after logging into the camera from PC web browser. It wants to install a program ClientPlus_Setup.exe. This is only needed if Internet Explorer is used. That is an obsolete program. Either remove the option or explain what it does.8. On the SV3C download web page, have two additional documents: (1) Detailed User Instructions for CamHiPro APP, and (2) detailed Setup Parameters (PC View) with explanations for every parameter (When do you use it and what does it do).9. I suggest SV3C measure the current when the IR LEDs are ON, and the PTZ motor starts. It might be exceeding the 600mA rating for PoE+ switches.
R**X
PTZ with 2way audio and POE All in one
The media could not be loaded. This is an awesome camera, I have been looking for a good PTZ POE camera at an affordable price range and this one fits the bill. It is very well built, metal body, built to withstand outdoor weather. The panning and tilting on this camera is very smooth no disruption of video, looks like its has a wide angle lens, captures more area compared to my other cameras. the picture quality is very sharp and clear, I love its human tracking feature, I like the fact that it will not detect other animals or objects like other cameras do, so no chance of getting a false alarm. Here you can see me surveying my dead and wrecked back yard garden after the winter storm :) it detects me but not my dog. love its two way talk feature, it has a very good mic and speaker. I have it setup on blue iris works great no issues. Love it
R**R
Usable but not perfect
Overall, this is a decent but not great camera. Quality of construction is good and setup is easy. I have it mounted outdoors and daytime picture quality is very good. Night time picture quality is OK but nothing special. Humanoid detection works quite well but auto tracking is jerky. File playback also has some stuttering even on H265 setting. I have a similar, but different brand, camera that also uses the CamHiPro app and the app needs more functionality. Detection zone masking is rudimentary – you can drag a rectangle to exclude an alarm area, but this is worthless if you want to exclude an irregular area. Most programs use a grid and you can exclude individual boxes within the grid. Nighttime light control is also lacking. You have 2 choices – IR light that changes to white on alarm or white light on all the time. I have enough ambient lighting that I can shoot color at night so I would like to disable both IR and white light, but this is not possible.
Trustpilot
2 days ago
1 month ago