Desertcart purchases this item on your behalf and handles shipping, customs, and support to Australia.
๐ง Stop wasting water, start saving smart with APECโs Auto Shut-Off Valve!
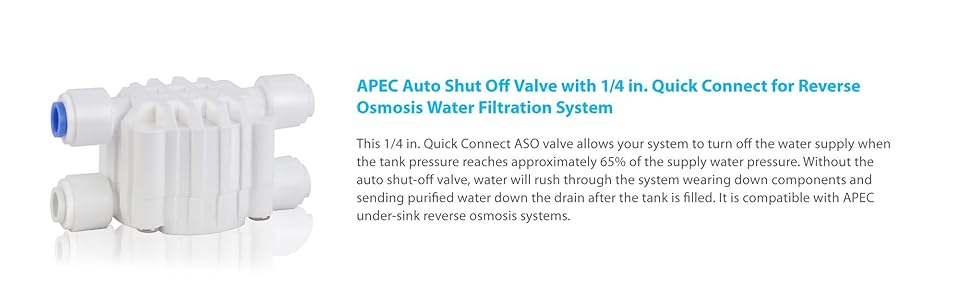
The APEC Water ASO Auto Shut Off Valve is a 0.25 inch quick connect valve designed for APEC reverse osmosis systems. It automatically halts water flow when tank pressure hits 65% of supply pressure, preventing water waste and system wear. Lightweight and easy to install, it supports pressures up to 85 PSI and is compatible with multiple APEC RO models, making it an essential upgrade for efficient, eco-conscious water filtration.


| ASIN | B01IE3591Y |
| Brand | APEC WATER |
| Brand Name | APEC WATER |
| Connector Type | Compression |
| Country of Publication | USA |
| Customer Reviews | 4.5 out of 5 stars 885 Reviews |
| Exterior Finish | Plastic |
| Included Components | ASO |
| Inlet Connection Size | 0.25 Inches |
| Inlet Connection Type | Compression |
| Item Dimensions | 15.5 x 8 x 4.6 Centimeters |
| Item Highlight | Automatic Shut Off for APEC RO Systems, 1 Unit, Quick Connect, Lightweight, Easy Installation |
| Item Type Name | Auto Shut-Off Valve |
| Item Weight | 50 g |
| Item dimensions L x W x H | 15.5 x 8 x 4.6 Centimeters |
| Manufacturer | APEC Water Systems |
| Manufacturer Part Number | ASO |
| Material | Plastic |
| Material Type | Plastic |
| Maximum Pressure | 85 Pound per Square Inch |
| Model Number | ASO |
| Number of Items | 1 |
| Number of Packs | 1 |
| Number of Pieces | 1 |
| Number of Ports | 2 |
| Outlet Connection Size | 0.25 Inches |
| Outlet Connection Type | Quick Connect |
| Size | 0.25 Inch |
| Specification Met | NEMA |
| Thread Size | 1/4 inch |
| Thread Type | NPT |
| UPC | 851001007402 |
| Unit Count | 1.0 Count |
| Valve Type | shut off valve |
R**Z
Relatively Quick Fix to an Annoying RO System Problem
So far so good. I have a GE Smartwater RO system and after changing the filters and membrane, noticed that the water pressure coming out of the RO faucet would come out strong for the first few 5 seconds, then diminish quickly and continue to diminish until barely coming out. Then, after I turned the faucet back off, you could hear the drain line run for 20-30 minutes afterwards. After some initial research, I took off the check valve and could blow air (by mouth), both directions which is an indication that it is no longer working as it is only supposed to allow passage one way. So I ordered and replaced that part but the problem was still there. So, I bought this ASO valve and replaced my old one. My old one had threaded male parts but I'm a big fan of these quick connects. Was a little difficult to get to the old ASO valve as a couple of the tubes connected to it were very short. I had to undo one of them in order to move the old ASO valve down so I could get to it. If you have easy access to your ASO valve, the change should probably be less than 5 minutes. Anyway, I matched up the "IN" and "OUT" with the old one and switched them out. Put everything back, turned the water back on and tested for leaks...No leaks! Phase 1 complete! Now to test the water pressure out of the RO faucet...Strong and continued pressure!! AND, no water going down the drain tube afterwards. Success. Poured myself a tall glass of water to celebrate. OK, not really. Poured myself a bourbon but if i WANTED to, I could've poured a tall glass of water. :)
L**E
Great
Works as expected
A**R
Easy part to change, saving water now.
RO system, Thank you thank you thank you!!!!! This stopped a small trickle of water through my water meter which was the answer to the puzzle I have been seeking for a year and 1/2. I thought it was a couple of other leaks I had found and fixed, but still the meter registered as moving. I never dreamed it was the water system. This part was original and 24 yr.s old. In turning off the water under the sink to change the last filter, I noticed the meter stopped. So I was thrilled to finally solve the on going problem and mystery, It costs a lot of money to hire a leak detecting company, so I figured I would eventually figure it out, and bingo this was it. So happy Amazon had the right part. It has been a process of elemination to accidentally run across this last piece of the puzzle since I did not know what this part did on the unit, but water was not going through the system after changing all the filters one by one, it came down to the shut off valve, the part I dreaded most on changing since it looked ominice and scary, but now I know all about the dreaded chore of changing everything on the unit and what they all do. I always wanted to ignore and out of sight out of mind when it came to this hard to get to and hard to undo to redo everything on this complex system. It takes alot of muscle as well as patience. I can now breath a sigh of relief, and feel a sense of accomplishment. This part which was the scariest ended up being the easiest of all the parts to change and now my 24 yr. old unit is like new again. I hope this helps someone else with the same problem, you live and learn. I will now be changing the filters more often since this experiance. Thanks again for having the parts I needed.
K**G
Actually seems to hold up!
I've had several of these that look the same but usually fail in a few months. This one has been in use for over a year and still works perfectly.
R**N
Working so on Watts Pure H20 RO System
Rating 4 stars for now because it's low cost and appears to be functioning as intended, though I just installed it yesterday. My Watts Pure H20 system has been running non-stop for several months and I noticed a big increase in my water bill. Turns out the automatic shutoff valve that got cracked during installation is a critical component of the system (I had been running without one). The installation instructions that came with this valve are worthless. After extensive searching on the internet I think I figured out how to install on my system. There is a high pressure side of on the top of the unit that is marked with "in" and "out" indications. The opposite side with screws is the low pressure side. Plug the green water supply line into the "in" port of the high pressure side, while the green line to the RO unit goes to the "out" port of this side. Then plug the blue water storage tank line into the "out" port of the low pressure side while the blue line going from the tank to the RO unit goes to the "in" port. This configuration appears to be working as the gurgling sound has stopped after the tank pressurized.
Trustpilot
2 months ago
2 weeks ago