


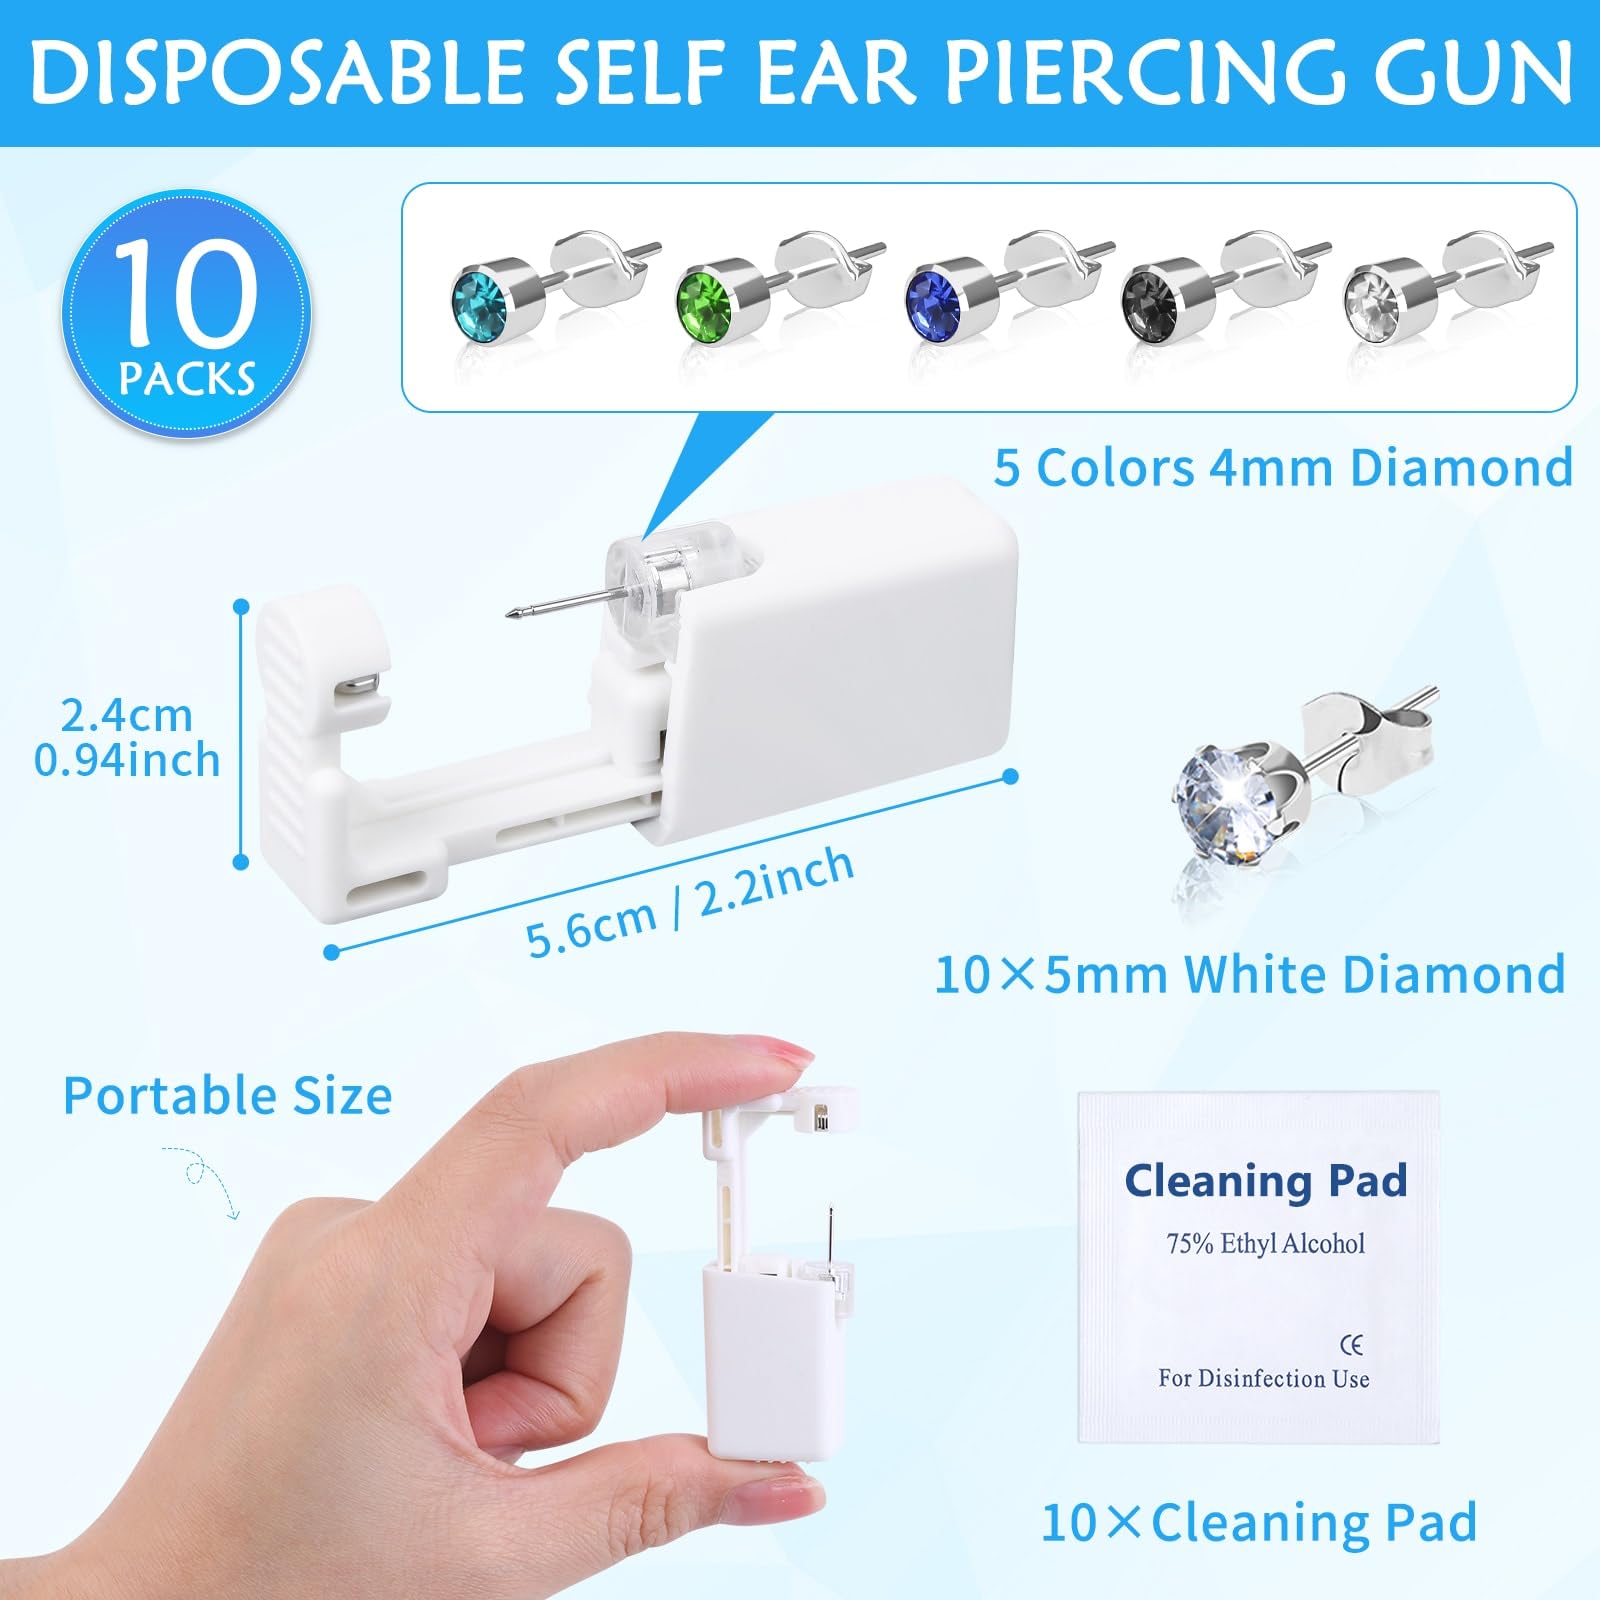
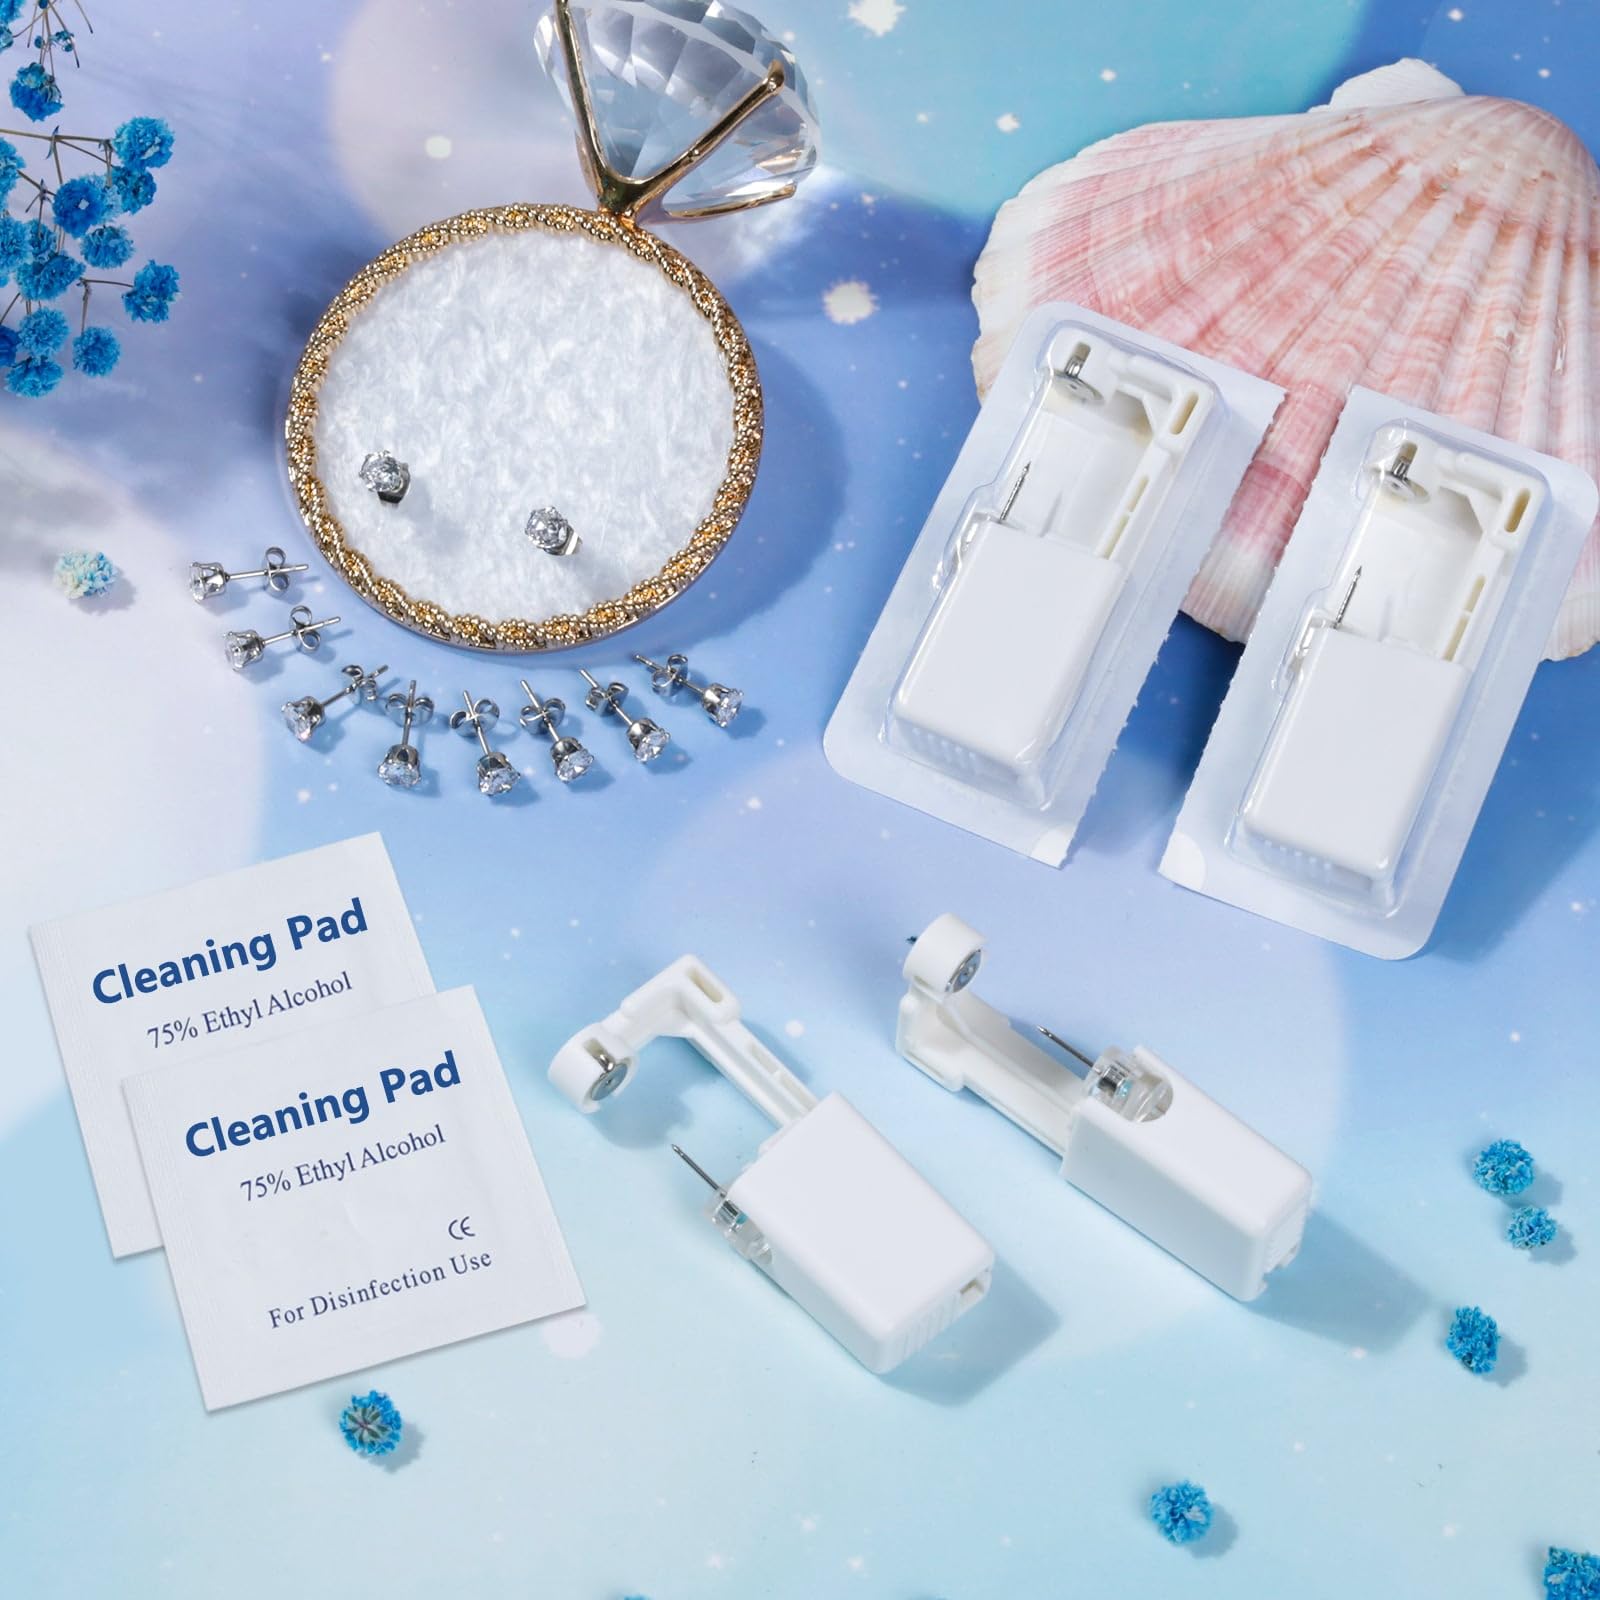


Evatage 10 Packs Self Ear Piercing Kit, Home Piercing Kit Disposable Ear Piercing Gun Kit with Stainless Steel Earring Studs for Pierce Your Own Ears
L**R
Important Directions and Information For You!🎉
Hi Everyone! I learned so much through this piercing process! Here is the info for you:1. Directions and photos of how to use these ear piercing guns are on the description photos - it’s the 4th photo down from the top.2. After you pierce your ears, after I read every article I could find, the most reliable aftercare product is .09% Saline Chloride for Wound Care. That should be the only ingredient. Amazon sells a couple different brands of it. Also, they say never to use contact lens saline solution, nasal spray, or any other kind of saline solution because they have other ingredients that are not good for healing. Even the antibacterial ingredients in those other products don’t aid healing. They warn against making your own saline solution because it can be too strong and/or not hygienic enough. Also, don’t use any kind of neosporum or any other oily things like that because the oils in them attract and hold onto bacteria that cause infections.3. Always wash your hands first before touching your ears. Try to only touch them when cleaning if you you have a bit of infection.4. If or when there is any crusty buildup on your piercings, (this would be the only time to touch your piercings) use gauze or cotton balls or cotton swabs to remove it and do so very gently. Don’t use cloth towels because they tend to snag on our earrings.5. Use the saline solution 3 times a day on your piercings. The newest info says don’t rotate your jewelry during cleaning because they have found that this makes it take longer to heal.6. Clean your hair brush. It harbors lots of bacteria and since it is so close to your hair that bacteria can easily go to your new piercings.7. While showering, don’t get soap, shampoo, or conditioner on your piercings until they are completely healed. To clean off oil buildup from sweat, etc… from behind your ears, put just a tiny bit of sudsy water on your finger and wipe carefully a couple of times until it’s not slippery from oil anymore. After you complete washing your hair so that it’s clean, and washing behind your ears, they say it’s okay to let the water run over your newly pierced ears. And when you complete a shower, it’s a good time to do a saline wash of your ears.8. Don’t get hair spray or other care products on your new piercings. Just cup your clean hand over your ear to protect it from spray and then spray your hair. For people that are doing just lobe piercings and so may be able to sleep on the side of the piercings, try to refrain from using hair care products anywhere near your ears because as you sleep at night the products can get on your pillow and travel to your ears as you move around.9. For the first 3 months or until your ears are healed (and they may appear completely healed but the inside of the piercing always takes longer than the outside to heal), put a clean t-shirt over your bed pillow. Rotate the pillow each night so that you have a clean area to lay on 4 times. Then, switch to using another freshly washed pillowcase on your pillow and repeat and repeat until your ears are healed.10. Try as much as you can to reduce or refrain from using creams or oils on your face during the healing time. They have a tendency to end up on your ears and can trap germs, bacteria and cause infection.11. Don’t switch out the jewelry in your ears. This not only delays the healing process but when people try to do this, often they can’t get the new earring into their ear. I was shocked to read in several places that sterling silver is not okay for newly pierced ears because it is mixed with other metals that are not good for healing. You need to wait until your ears are completely healed to wear sterling silver.The best metal for healing is surgical steel or titanium. If you are allergic to metals, try to wait as long as you can and then switch out to an acrylic or silicone pair of earrings.12. People assume that they hurt when I was doing these piercings and I am typically pretty sensitive to pain. However, it was basically nothing (even for the cartilage piercings - know that the gauge needle we are using here is far smaller than the typical one that they use for piercing cartilage which means that the bling that they sell for cartilage will not fit our piercings). Each time after I pressed the trigger, I thought, did it do anything? I really only felt the slightest pain of the pressure of squeezing the piercing gun - maybe 1 out of 10 ranking of pain if that or close to zero pain. About 5 minutes afterward I did feel a bit of a burning sensation. So, after doing the 4 piercings, I iced my ear for 20 minutes and I haven’t felt anything since then.13. On all 4 of my piercings, one side or both sides (depending on which piercing) the clear, plastic part of the earring gun that is supposed to fall off stayed on my ear after piercing it. Please don’t worry. I found out that is no big deal. Just gently pull outward on the plastic and it comes off pretty easily.14. If this is too much detail for you, the bottom line to remember is just: Keep Your Ears Clean and use just Saline Solution to clean them 3x a day for 3 months to 9 months depending on how well your ears are healing.🥰CARTILAGE PIERCING info in Addition to Above - Very Important!!!1. If you are doing cartilage piercing, do not sleep on your fresh piercings. Cartilage is VERY easily damaged and can cause scarring. The info on the net said not to do cartilage self piercing with a gun because it often shatters cartilage which causes permanent scarring on the ears. They say that if you do decide to do a cartilage piercing, always use a hollow needle because this gives less of a chance of cartilage shattering. As for me, after lots of investigation, most sources say that the least risk area is the outer conch area which includes the helix (it’s basically the outer rim of the ear) so that is where I did the 2 upper piercings in my ear. I was looking forward to doing this for so long that I decided to take the risk. Also, as I said earlier, the needle we are using here is far smaller than the one they typically use for cartilage piercing so there is less risk of bad damage to the cartilage if you don’t squeeze the trigger too hard (or too soft because it needs to go through the cartilage). Just take a breath and use quick and moderate pressure as if you’re pressing an easy to use, good working little stapler. You could even pretend that you’re just using a little stapler if that helps you mentally get the job done for this great low price.🎉2. In places where they do cartilage piercing, they are told to convince the customer to get multiple piercings in only one ear at a time especially if the person is a side sleeper because the chances of damaging your new piercings is far too risky trying to sleep on them. And it’s easier to focus on not bumping one ear in your daily routine than being careful with 2 ears.3. Be very, very careful when brushing hair especially not to let hair and other things snag your new piercings.4. Cartilage piercings typically take between 3 months and 1 year to heal.My 4 new piercings are doing beautifully in the 4 days that I have had them. There is no pain, no oozing, no blood, and no swelling whatsoever. Interestingly enough, I feel just a bit of tenderness on the 3rd lower piercing if I happen to accidentally touch it. That’s it.I hope that this helps you and I wish you all the Best!🎉
M**.
So easy!
I pierced two of my kids' ears with these. It was so easy and saved so much money. It's truly so simple, I'm very surprised that anyone had trouble using them, to be honest. The part that took the longest was deciding exactly where I wanted the dots. I suggest checking how the dots look from the front before piercing, rather than centering them on the lobe from the side. That way you can see the earrings when looking at them straight on. :) I wouldn't say it was painless, after all you are poking a hole in your ear, but it was quick and over in an instant! And because of the design that both pierces and secures the fastener, there's no extra steps of pulling jewelry through or attaching the back so just a pinch and you're done! Made it very easy to use on kids. No issues with the jewelry as they healed, either. My son has big ear lobes so I switched to the included second stage earrings after a week or so because they are longer, and he's had no issues with those either. My daughter's earring got ripped out when she was rough housing so I had to let it heal and re-pierce, so it's awesome that the kit came with so many sets. I even still have a set left to do my younger daughter's ears when she's ready. I'm very happy with this purchase! Cannot recommend enough. The kids are very happy with their new jewelry. The colors are fun too!
C**N
So easy and nice jewelry
Love this kit ! Not painful nor do you bleed like when u do a single piercing needle like at my tattoo shop or a refillable piercing gun ! The plastic piece when u are done just twists off ! The jewelry is so pretty nice colors very generous with e CZ clear in the kit, nice sparkle looks real !I’ll definitely be ordering again ! Highly recommend especially if u are a beginner !
N**E
No allergic reaction and super easy
I got this for my daughter and myself. I used it to pierce my helix, mid helix, lower helix, second lobe, and first lobe. I thought it did a great job with zero damage. We had zero issues with the gun getting stuck like it did at another place. We also had zero allergic reaction to the material the earrings are made of. My daughter and I have very sensitive skin to nickel and other metals.
T**.
These work great
I bought these through my husband's account to pierce my ears a few more times than just my basic piercing they work good The only issue is my ears are very sensitive and I can't wear the earrings that they came with unfortunately
A**R
Deff recommended
Did my daughters ears and mines this is a great purchase saved me money
P**Y
Good product
Exactly what was wanted
A**E
HOLEY
GOOD FOR QUICK PIERCES
H**Y
Works amazing !
Used on my sister and turned out amazing. Quick and simple
E**A
Painless, easy and safe
Wow, I took a gamble on these because of the positive reviews and it was so worth it. The initial piercing was practically painless, I’m sitting here writing this minutes after doing it and it hurts about as much as a normal piercing would but I am sooo impressed with how easy this was. Everything is sterile and one use and comes with alcohol prep pads. Can’t wait to do some more!
M**A
Awesome product! Definitely recommend!
I was very skeptical at first. I read so many reviews and reviews of ear piercings done at local stores/boutiques and the latter was not very promising. So after much thought, I decided to go with this product based on so many positive reviews and YouTube videos. And I have no regrets! I'm soooo happy that I purchased these! They are super easy to use. And came so well packaged with alcohol pads and extra earrings. The entire thing wax in a neat thin box. Yeah, there were no instructions that came with it, but just watch the YouTube video. It's really super easy to use and my daughter did not even feel a thing! I have been telling all my friends and family about this product! And best part is that it is way cheaper than going to the mall to get the piercings done! Highly recommend!
K**N
Works great
It works good, sometimes the backing gets stuck so you have to push it manually but that's not a big deal. From my personal experience I have a very slight infection in one ear but I don't think that's from an unsterile earring.
A**R
I loved it
I really liked it; it’s very easy to use and very hygienic. You don’t need anyone’s help—you can do it yourself because it’s very small and easy to handle.
Trustpilot
3 weeks ago
2 months ago