


Tool Kit - Small Precision Screwdriver & Tools Set For Home, Electronics, iPhone, Computers, Macbook, PC, Laptop, Phone, PS4, Household Repair - Magnetic Bits & Basic Case
Product ID: 36616561
🔧Precision Tools
🧰Compact Design
⚙️Magnetic Bits
🔧 Fix it like a pro, anywhere you go!
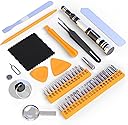
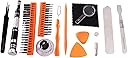
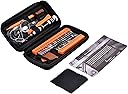
Premium Small & Compact Precision Screwdriver Kit for iPhone, Smartphone, Computer and Electronic Device Repairs We at ScandiTech have put together a practical screwdriver and tool kit for all your household and electronic repair needs. With our years of experience in the mobile and electronics repair field, we know exactly what tools are needed to successfully repair cell phones, iPhone, MacBook, laptops, computers and similar electronic devices. The bits are made of high quality 6150 CR-V (chromium-vanadium) steel and will endure even the toughest jobs. Repair: - (All) iPhone 4 to XS Max - (All) iPad 1 to Pro - MacBook, Macbook Pro, Macbook Air & iMac - Apple Watch - Samsung Galaxy, Note, Active - Laptops & Computers - Printers & copiers - Xbox, Nintendo & gaming consoles ... and many more appliances with this kit! Bit list (35 bits): Pentalobe: 0.8mm/P2, 1.2mm/P5, 1.5mm/P6 Phillips: PH#000, #00, #0, #1, #2 Slot/Flat: 1mm, 1.5mm, 2mm, 3mm, 4mm Torx: 3, 4, 5, 6, 7 Torx Security: 8, 9, 10, 15, 20 Tri-point: Y000, Y0, Y1 Hex socket driver: 2.5mm, 3mm, 4mm Nut driver: 3mm, 3.5mm, 4mm, 5mm, 6mm Triangle: 2.0 Tool list: 1x Metal Bits Handle with a 5" extension 1x Nylon Spudger 1x Nylon Opening tool 1x Magnifying glass (small) 1x Magnet (small) 2x Plectrum opening tools 1x Metal tweezers 1x Metal spudger (small) 1x Metal spudger (large) 1x 1/4" to 4mm bit adapter (use the bits in this kit with your handheld power tool with this adapter) 1x Microfiber cleaning cloth (2.3 x 2.3") 1x Suction cup 1x SIM card needle & 1x Warranty info & manual brochure All of this fitted in a sleek case that you can put in your pocket. Lifetime ScandiTech Warranty. Add to Cart and repair your devices today!
| Manufacturer | Royalsell |
| Part Number | star night light |
| Item Weight | 9.6 ounces |
| Package Dimensions | 6.1 x 3.5 x 1.7 inches |
| Item model number | star night light |
| Is Discontinued By Manufacturer | No |
| Color | Silver, Yellow, Black |
| Material | Stainless Steel |
| Item Package Quantity | 1 |
| Head Style | Hex, Tri-Point, Torx |
| Compatible Fastener Range | 0.25 inches |
| Included Components | 1 |
| Batteries Included? | No |
| Batteries Required? | No |
J**S
If you have to change your iPhone battery, use this kit!
Bottom line: this is a great battery kit and it works like a charm. This is not for anyone who is all thumbs and not willing to work with tiny screws or delicate iPhones, but if you can take your time you can change the battery in about an hour to an hour and a half. My advice is to carefully read all the information provided in a very handy booklet included in the kit, but don't just stop there. Go to your computer and to the link provided in the booklet to see a short video -- there is actually quite a bit of information you will absolutely need which isn't in the booklet.Some highlights I think helped me greatly. You are warned that some of the screws you will remove from a plate that covers 3 connectors you will need to take off are of different sizes and must go back exactly where they came from. I drew a rough large outline of the cover on a piece of paper and marked the corners where the 4 screws are located. I then put some double backed scotch tape over the four screw markings. As I removed each screw I put it on the drawing/tape representing the respective hole so when I remounted the cover I didn't have to worry about which screw was which.And boy those screws are TINY! Little, itty bitty screws! Thank goodness the Phillips screwdriver in the kit is magnetized and you will have a pair of tweezers as well. It was easier to pick up the screw with the tweezer, put it on the screwdriver and then guide it in the hole.Note you have the option to not remove the top of the phone and thus avoid removing the aforementioned cover and screws. If you choose this option you will have to hold the phone in one hand and try to remove the battery with the other hand. But you really need two hands to remove the battery as it's really glued in there (see below). I agree with their recommendation that you disconnect the front of the phone even though you'll have to futz with the tiny screws and the three connectors underneath.Now about the battery removal. The video recommends using a hairdryer to heat the back of the phone case until its good and warm (not hot to the touch) and then pull the sticky tape out from under the battery. Easier said than done. I was able to pry the battery up a little and edge the tape out but it snapped in spite of heating the case. Solution to this problem is easy: take your time! Just pry the battery up a little on the side as they recommend and hold it for a minute, then move on and pry a little further along. You'll gradually weaken the tape glue to the battery and you can actually hear the glue breaking away. Once you have half of the battery unglued you can do the same thing for the other side, but be careful as you are warned never to apply any pressure to the circuit board next to the battery. It worked... just took about 5 minutes.Putting the new battery in is easy and reseating the connectors you had removed is easy also. You can actually hear the connectors snapping in place, but take your time and be careful; these connectors are also TINY and you need to line them up properly before applying pressure.Once you have everything back together you'll find that it really wasn't that difficult after all.And, by the way, in addition to the Amazon shipping notification I also received a notification from the seller to confirm shipment and another notification from the seller with links to follow in case the kit wasn't delivered or went missing . Everything was as advertised and I am completely satisfied with the product as well as the seller. Highly recommended.Update: fixed silly spelling mistake!
J**O
Excellent tools and battery, Instructions in need of Improvement
The tools that were included with the battery were excellent for the job. I especially liked the large yellow broad pry tool that made it easy to get the old battery out. The tweezers were exactly the right dimensions to remove the home button protective cover and enable re-assembly. My battery check app "Battery Life" says that the battery has zero wear and is perfect condition. (It previously told me my old battery had over 28% wear and was falling quickly). The instructions in the box were helpful and successfully helped me avoid tearing cables and connectors. However, the instructions should be improved for those that aren't an engineer like I am. I've provided these suggested instruction improvements below.INSTRUCTION NOTESStep 3: A powerful flashlight is recommended if you are doing this step and the later steps alone. I used a 500+ lumen flashlight. It's amazing how much better human eyes work in seeing extra small detail when the lighting is extra bright. Reading glasses might also be needed for extra magnification.Step 5: Removing the metal cover with your fingers is not possible (I have strong and dexterous fingers). Using the tweezers works, but it is very easy to bend one of the two small springed metal tabs on the left side (viewed with the home button side facing to the right). The pictures in the instructions are far too small and grainy to see the necessary detail. Before re-assembly in Step 9, these two metal tabs must be in their original, full down position. So if you accidentally bend one up, gently bend it back into place. (don't wiggle it)Step 7 with the adhesive removal is sadly in its own step. So you follow Step 6 and fully remove the battery and then Step 7 says "when the bottom left part of the battery is slightly elevated from the back assembly..." Clearly, Step 7 is impossible because the battery is fully out. You still have to remove the adhesive strips. If your iPhone 5s is like mine, this adhesive is old and simply won't come out easily even if you tried what Step 7 says. Instead, just tear off the black plasticy end on the Home button side and use your fingernails like you would scotch tape that's stuck to the roll. When you get enough of it balled up, pinch it between your fingers and slowly pull it close to the bottom of the iPhone towards the non-Home button side. It's stretchy and may tear once, but it was relatively fast to re-ball up more and go from them.Step 8: Don't touch the back of the battery before applying the new adhesive. Your finger sweat and oils will cause the adhesive to behave poorly.Step 9: To get the home button cable back in place, the cable must be set carefully over it's mating connector. There is no snapping force to get it in and there's nothing mechanical to hold it in either. It'll pop right back out very easily, so you place it and hold everything super still while tweezering the metal cover into position. Hold the metal tab with the tweezers in exactly the same way you got it out in Step 5, by sandwiching the metal plate of the tab between the two tweezer ends. Then tilt it slightly so that the left side is pushed in first. The right side is the side that has the mechanical holding spring/bend that keeps it in place. So after the left side is resting nicely and flush, remove the tweezers and then use the tweezers not as tweezers but instead like a flat metal bar to push down on the right side of the tab. It may take several times to get it in. This tab is extra jumpy so be patient and persistent.
J**R
Brilliant little kit, brilliant price.
This is a fantastic little toolkit for the price. I dropped my iPhone 6s in water and – following a simple tutorial online – this kit allowed me to open it up, get the moisture out and ultimately resurrect the phone. The magnetic tips are fantastic for keeping hold of the tiny screws after they've been taken out, and I used the lid on the box it comes in to hold the screws and phone during the "operation". It seems well made and no doubt will come in handy again.
D**N
No adhesive strips despite pictures
The pictures show replacement adhesive strips which are required to do a safe, easy battery replacement. They were not included with my shipment.
J**R
Todo tipo de herramientas
Perfecto
G**R
Schnelle Lieferung, gute Ware. Alles bestens.
Schnelle Lieferung, gute Ware. Alles bestens.
R**V
Cheap chineese battery
Do not buy
Trustpilot
2 months ago
1 month ago