Desertcart purchases this item on your behalf and handles shipping, customs, and support to Australia.
🔥 Elevate your Switch game with style and precision!
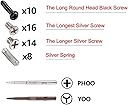
The eXtremeRate Blue Flame Soft Touch Joycon Housing is a premium DIY replacement shell designed for Nintendo Switch and Switch OLED Joy-Cons. Featuring an ergonomic D-pad for improved gameplay, a silky soft-touch anti-slip finish, and a striking blue flame pattern, this kit includes all necessary tools and spare parts for a professional-grade installation. Ideal for gamers seeking to personalize their console with a bold look and enhanced control.


| Additional Features | Unique Design, Ergonomic D-pad, Anti-Slip, Sweat-Free Grip |
| Asin | B07X1JB26J |
| Best Sellers Rank | #9,938 in Video Games (See Top 100 in Video Games) #122 in Nintendo Switch Faceplates, Protectors & Skins |
| Brand | eXtremeRate |
| Color | Blue Flame |
| Compatible Devices | Nintendo Switch Joycons, Nintendo Switch OLED Joycons |
| Compatible Phone Models | Nintendo Switch |
| Customer Reviews | 4.4 4.4 out of 5 stars (2,033) 4.4 out of 5 stars |
| Enclosure Material | Plastic Acrylonitrile Butadiene Styrene (ABS) |
| Form Factor | Case |
| Item Dimensions | 3.94 x 2.76 x 0.59 inches |
| Item Weight | 30 g |
| Manufacturer | Extremerate |
| Mfr Part Number | JZT101 |
| Model Number | JZT101 |
| Number Of Packs | 1 |
| Shell Type | Hard |
| Unit Count | 1 Count |
User
Best joycon shell replacement kit out there.
I've wanted to do a joycon shell replacement for a while, and since I needed to ooen up a pair to replace their thumb sticks anyway, I decided to give thus kit a try. The shell design is very nice, and the 'soft touch' finish makes it feels like a first party product. Most of the necessary tools are included, but you'll also want a small plastic pry tool and a good pair of thin nose tweezers. Extra springs and screws are included, which is great because the shoulder button springs get lost easily and the official joycon screws are pretty soft. The buttons come on a plastic sprue & will need to be clipped off and cleaned up with a small file or hobby knife. The actual shell replacement process is a bit finnicky, especially on the right joycon, and you have to be very careful not to damage the fragile ribbon cabled. Definitely only try this on a pair of joycons that you'd be willing to lose if it goes wrong. That said, after watching a few youtube demonstrations, I was able to successfully change out the shell without too much trouble. Everything works great (better than before, since I replaced the drifting thumbsticks), feels great, and looks amazing.One thing to note is that the D-pad is just a plus shaped piece of plastic layed over the normal internal parts of the left joycon's four directional buttons. It's very clicky, and it doesn't have the pivot point in the middle that real d-pads have to prevent you from pressing opposite directions at once. If you press the middle, or press anywhere with too much force, then it will read all four directions at once. It's still better than the normal directional buttons, but if you're just looking for a good d-pad for playing 2d games in handheld mode, then get the Hori left d-pad controller instead. It has a proper d-pad, and you don't have to risk breaking a joycon conttol to use it.But if you want a fancy set of full featured joycons that can't be bought in stores, and you're willing to put some work and a bit of risk into them, then this kit is great.
User
So Awesome!
Omg....these are perfect!!! I only got them today. And have only completed one controller. This a little more involved than I thought, but if you are hardware inclined and careful it's easy to install. The feel is sturdy, no additional modifications are needed to put these together. You will need an exacto knife or wire cutters(which I use since I use these for putting together metal models) watch out for the springs that go flyin...that's my fault..but they do provide springs, screws, the driver with two bits (Phillips and Y). The shell all fits perfectly together, just make sure you know what screw comes from where. This OG controller Nintendo aesthetic looks so much cleaner(was using the pastel pink/green controller combo)..and the instant nostalgia I get from looking at it is great. OG NES was my first console. P.S. please forgive my bad grammar.
User
High-Quality Joy-Con Shells with Great Design, But Challenging Installation for Beginners
I recently purchased these shells for my Joy-Cons and was impressed by their quality, appealing design, and reasonable price. The final result looks great, though the installation process was a bit tricky—this is more due to the complexity of working with small electronics rather than any flaw with the product itself. With prior experience disassembling devices like the Switch, Steam Deck, and laptops for repairs or upgrades, I found the process manageable but still challenging.The kit includes useful tools, such as extra screws, springs, and a screwdriver with both Phillips and Y-head bits, which were appreciated. However, I would have liked needle-nose tweezers to be included, as they made handling small components much easier (luckily, I had my own). The installation guide on their website was helpful, but it referenced a slightly different version of the kit, which added some unnecessary steps and caused minor confusion at first. That said, it’s still a good tutorial overall.I don't often write reviews, but this product deserves one. I highly recommend it and might even pick up another set for my second pair of Joy-Cons. That said, if you don’t have experience with electronics repair, this may not be the best project to start with.
User
No quality control during the manufacturing process. Imperfections in the plastic.
I really wanted to give this a 5-star review. This will be a moderately complex installation. The quality of the color is usually 10/10 and true to the imaging. The tool that eXtremeRate give you for the job are not sufficient. This along with inexperience is why you will see people stripping screws frequently. I recommend buying third party tools to ensure the job is done right.It is common to find manufacturing defects in the plastic (pilot holes not threaded; imperfections in the plastic where it seats itself; soft-touch shells experiencing discoloration under normal use, the list goes on. These products are made in China with little to no quality control during or after the manufacturing process. I have ordered many eXtremeRate products because they seem to be “the best of the worst” as their competition typically lack flavor in style/color choice. Hopefully eXtremeRate works on a better quality product because it won’t be hard to switch companies once a worthy competitor comes along. I would still recommend eXtremeRate products despite these things, because they are the best of what is available.I was not compensated for this review, it is impartial.
User
The Great Golden Wave Off Kanagawa
I was searching for a new shell for my Joycons and I can confidently say that the ExtremeRate Great Golden Wave Off Kanagawa is absolutely gorgeous!!!!! The kit comes with the shells and black buttons, but I've decided to purchase the Chrome Gold buttons separately to elevate the look of the shell.The Kit itself comes with extra screws and springs in case you lose one during the shell swap process, a screw driver but i recommend getting a magnetic one instead helps a lot if you don't have small hands or can't sit the screw straight, a set of black buttons that looks nice but I chose to purchase the Golden set instead to personalize my pair more, and the cool shells as well.The shells have a very soft feel to them and the patter is actually textured so you can feel the design instead of it being printed on.I would highly recommend buying a pair if you are looking for a replacement or want something to display alongside your Switch. I don’t normally write reviews but i had to for this product it is absolutely AMAZING!!!! I hope my review helps thank you and have a lovely day :D
User
Awesome Refresh!!!!!
So before you buy these just know that this is a full fledged housing replacement, I advise you to watch a the "Jerry Rig Everything" video where he makes a clear switch; this really helped me a lot. Now I'm not sure if having the black and grey joycons will make this easier, as the internal battery holder bracket might already be black thus eliminating some steps, but if you have the red and blue joycons like I did then just be aware that you are going to need patience and a good pair of tweezers.So you've decided to hit buy button, great you wont regret it. As you can see in the pic the joycons look great, and I especially love how the left joycon now has a D-pad instead of four buttons; though for some reason the kit came with the four buttons in purple with no way to use them. Overall the joycons look great and I love the attention to detail just about everywhere, there is literally no button that isn't replaced with the exception of the joy-sticks and the latch release buttons in the back. Even the SL and SR on both joycons are replaced in purple and I love it. This kit make the switch OLED look mundane by comparison. I also love that you get replacement screws and springs and a nice looking multi-tip screw driver to help with removing and replacing some screws; remember Nintendo uses Tri-tip screws. All in all this has breathed new life into my switch and makes you want to play it even more, eXtreme also makes an SNES back for the switch itself and I definitely plan to buy it. However, one word of caution is that this Kit seems to be made out of the soft type of plastic that has a reputation for rubbing off and peeling. I'm not sure if this'll be the case in the future but the company does offer a one-year warranty that I fully plan to use in the event that this does happen. But for now I'm enjoying my switch even more and the classic games seem much more satisfying to play on the D-pad.
User
Patience is key.
2nd pair I've bought and they're amazing! If you have the patience you can install them easily just take your time. Will run you about 1hr or so depending on your skill. Only thing I wish they did was give us the concave x y buttons as the original snes had. Works fine and looks great especially with an upgraded tmr stick which I recommend you switch to as it'll save you from another tear down later on.
User
NEW TOOLS INCLUDED IN KIT DO NOT WORK
BEWARE! If you watch the instrructional video, and most of the pictures, you will see a kit shipped with two screwdrivers, a small tri-wing (Y) bit and a small Philips (+) bit. I don't know when they changed this, but in the new kits, they are shipping a single EXTREMELY CHEAP aluminum driver with two interchangeable bits, that are extremely soft, deform, and most importantly DO NOT FIT. I am very comfortable and competent working with electronics, and have designed and soldered circuits, as well as done many electronic repairs, so I was not concerned or worried about this replacement. Furthermore, I know how to use a screwdriver. I have a very nice, high quality driver set for this application at work, where I can't go due to quarantine. I did not expect the included tools to be the highest quality given the price point, but I did expect them to at least FIT and work for the included application. THEY DO NOT FIT. The Y-bit, in particular, is the wrong shape and size for the screws Nintendo uses, so it won't seat and "bite" without stripping out, damaging BOTH the screw head AND the driver bit itself! I was unable to get my joycon open using the bit they supplied due to the poor quality, and it totally stripped out the screws. This kit is utterly useless with this change to what is undoubtedly the cheapest tool set possible. I am incredibly disappointed and hope others avoid this product in the future so they also don't walk away frustrated.
User
Classic Gameboy Case - Nach Umbau sehr zufrieden.
Auf ersten Blick sehr wertiges Umbauset. Einige Nutzer schrieben die Schraubendreher seien minderwertig - Bei sorgsamer Benutzung haben sie für den Umbau gehalten, ohne Abnutzungserscheinung. Das Case ist farbig besprüht - Ich bin gespannt wie lange das hält.Der Umbau ist etwas knifflig. Ich empfehle dringend Videos oder Anleitungen anzusehen. Sehr gut ist die Anleitung von Fixit. Schrauben und Federn sind im Set enthalten, ich empfehle die allerdings nur als Ersatz. Habe beim Zusammenbauen die Originale benutzt.Bin soweit aber sehr zufrieden und werde die nächsten Wochen abwarten und gegebenenfalls die Wertung korrigieren.
User
Buena calidad y diseño nostálgico
Estoy muy contento con esta compra. Me han llegado un dia antes de lo que tocaba, y nada más sacarlos de la caja, el tacto se nota bueno, tienen la misma textura que los originales. Se sienten de calidad. Y que decir del diseño... Son preciosos.Traen un set completo de botones abxy y direccionales de colores snes (por si usas carcasa con botones normales), además de la cruceta, esta última negra. También trae un set completo de botones todos negros (no se si por error, ya que en el anuncio no ponía nada de eso), el destornillador con las dos puntas necesarias intercambiables y toda la tornillería (bien en este punto ya que he perdido uno y lo he podido reemplazar).El montaje es delicado, pero con paciencia y mucho cuidado se hace sin problemas. Recomendado mirar un video o instrucciones por internet para no equivocarse en nada. Sobre todo con mucho cuidado y no apretar en exceso los tornillos ya que las roscas hembra del plástico tienen pinta de pasarse con mucha facilidad.Una vez puestos en la consola los siento con mejor sujeción. Encajan en el cuerpo mejor que los originales (los míos tenían algo de holgura desde que la compré hace 2 años) y siento como si ahora mismo tuviera una cosola nueva.En cuanto a duración de la pintura, botones, acabados, etc... Como los acabo de poner no lo se, pero no parece de mala calidad. Actualizaré en un futuro si veo cambios.En conclusión es un buen cambio, relativamente fácil de poner. Recomendado si tienes paciencia y un mínimo de organización a la hora de seguir los pasos.Gracias
User
Look and Feel great, and not as hard to install as most say
This was my first ever experience opening any electronics up, and basically even using a screwdriver aside from a few occasions. I have to say that this process is not nearly as difficult as many people have said. If you are careful, everything should go smoothly. Here are some tips that made it easy for me:1. Use a better set of screwdrivers and get some tweezers2. I found that these screws aren't too bad to work with but be careful not to strip them. I had worse look with the screws on my switch itself then in the joycons. Once you have the Nintendo ones out, switch them with the replacement screws. They strip less easily and are Philip's head.3. Layout tape on a piece of paper in the shape of a joycon (small rectangle). I played out three of those, representing the outer, middle, and bottom layer of the joycon. Each screw I took out was placed on the tape, in the same position that they'd be placed on its respective layer. This helped keep all the screws organized, and made reassembly a breeze.4. One of the difficult parts of this process is fiddling with the delicate ribbon cables. I simply didn't undo any of them, and I unscrewed everything. Once it was all unscrewed, I transferred over all the insides into the shell in one piece. You have to be a little careful moving it. It is also a little harder to work with since you have all the parts dangling around, but I preferred that then dealing with the cables.As for the product itself, it feels very high quality and nice to the touch. It's defintely on par with nintendo's quality. If i saw these at someone else's house, I would believe they were an official nintendo product.
User
Bello e di qualità
Funziona bene, e al tatto è molto piacevole, purtroppo non è per tutti, in quanrto la sua installazione non è semplicissima
User
La mejor opción para darle más color a los joycons
El nuevo aspecto de mis controles es una maravilla!! La instalación es muy fácil, solo hay que perderle el miedo a abrir los controles y a interactuar con los componentes. Si te tomas tu tiempo y lo haces con cuidado difícilmente podrías hacer algo que comprometa la funcionalidad de los mandos.El único contra que encontré es el desarmador Y00, arruinó por completo mis tornillos PERO no se si es por el desarmador en si o por qué fue mi primera vez usando uno tipo Y. Además, con los tornillos Philips de repuesto no hay que preocuparse por rescatar los originales. Es una compra recomendada! El precio es un poco alto, pero la calidad de los materiales y su estética hacen que valga cada centavo.EDIT: usar una lija de agua (sandpaper no.0) en el destornillador tipo y00, si se elimina la punta del mismo embona perfecto en los tornillos y no los estropeará!!! 😁
Trustpilot
1 month ago
1 month ago