We remain fully operational. Our teams are working around the clock to ensure your deliveries continue safely.

DOWNLOAD THE APP


Customer Services
Copyright © 2025 Desertcart Holdings Limited
DOWNLOAD THE APP


🚀 Unleash Your Imagination with Every Print!
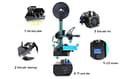
The HICTOP Ender 3D Printer DIY Kit is designed for ease of assembly and versatility, featuring a heated build plate and a maximum printing size of 5.9x5.9x7.8 inches. It supports a variety of filament types and comes with lifetime customer service, making it an ideal choice for both beginners and experienced users.
I**X
Awesome 300x300x400 print volume - easy assembly, minimal adjustments and tweaking to perfect prints.
Some background on me, I'm a very avid 3d Printer, having several machines from plug & play to kits, as well as some custom home built printers I made from scratch. I have printers from 100 x 100 x 100mm build platform to 1000 x 1000 x 500mm built platform. My formal education is in plastics engineering and polymer science, so I have great in-depth knowledge of thermoplastics and lead our additive manufacturing technology areas at work.This CR-10 model has been on my radar for some time, and I don't regret the purchase. Assembly is very easy, 15-20 minutes (a few bolts, couple brackets, and then connecting wires (each set of wires has a yellow plastic piece with X, Y, Z, or E on them to know what axis motor to connect to. The bed heater and extruder have different pins in the connector so you can't mix them up as they will only fit in one place on the control box. This is the same as the yellow creality version, exact same printer other than Hictop name on the controller (all the motors and other parts say creality on them). Some items to be aware of / potential issues you may encounter:- Check the Z axis coupler when you get your machine, these can easily stretch during shipment (very common on this printer). You can compress it back temporarily, purchase another online, or do what I did, reach out to Hictop for a replacement. Hictop was very responsive, got a new one 2 days from sending an email. Easy to swap out, no big deal, very happy with customer service so far.- Be sure to adjust the wheels on each axis, if you can spin the wheel and not move the axis, it needs a little adjustment (lots of great videos on setting up this printer online, watch a few while you wait to get your printer and you'll be all set here).- The glass may not be flat, this is very common in this printer and many others. If you find it not quite level, purchase a pack of 12x12x12 mirrors on IKEA, or purchase replacement glass. You can also reach out to Hictop customer service to get it replaced. This is a common issue on larger printer beds and glass, so it's not isolated to this product.- Cura is the software you are referenced to use, I don't use this software but have heard great things. I can tell you that if you use simplify3d software, do not use the default profile for CR-10 in their software (if you do, you need to adjust starting g-code otherwise you'll run the nozzle across the binder clips holding the glass on). Uncle Jessy and other profiles are out on the web, join the facebook CR-10 group and you'll get tons of help, including from me!- There is a micro SD card in the jump drive, you can try test prints directly from that on the printer.Once you get up and running, there are some parts you will want to print to help make your life and the life of your printer last much much longer! Find these on thingiverse or similar sites, search for CR-10 on there and you'll find tons:- Strain Relief part for the bed heater cables - you will assemble this between the spring and bottom plate of the bed, zip time the power cables to it and you'll not have to worry about breaking wires or solder joints on the bed.- Large bed leveling knobs - get the big ones, this makes adjusting bed level so easy compared to trying to reach the factory tiny knobs that it comes with.- Filament guide - This keeps your filament from rubbing the z axis, while that won't really hurt it, it keeps the filament from picking up grease from the threaded z rod.- Control Box Legs or Extensions - there are some out there that will help keep your control box from tipping if you get a little tangle on the filament reel (it's mounted on top of it, so this can cause it to tip over). Also some have places to hold tools, SD cards, octoprint boxes, etc....- Camera Holder - many of these out there, I got one installed on the bed so it moved with the bed to keep things in focus and up close.Lastly, I'll leave you with some pictures of my printer, setup, and the first benchy test print I did before making any adjustments to my printer so you can see how this printer prints out of the box; as well as some tips.- Don't get frustrated, ask for help. This can be a great first printer or a great printer for your 2nd, 3rd, 4th, and so on. Many of the issues that you may have will be operator error or settings you put into your slicer program. Ask for help, I'm on reddit and facebook forums to help all the time, others are too.- First layer adhesion and bed level is extremely important. You are going to want to either print on the glass direct, put tape on the glass, or buy a PEI sheet to print on. if you do the glass or tape route, aqua net purple can unscented hair spray is the best, spray the bed down good, use a razor to scrape it off when it gets too built up. Adhesion is your friend, not too much, not too little.- Build yourself and octoprint box from a raspberry pi to monitor your prints remotely, to start them remotely, lots of great videos on how to do this. I have one on mine, works perfect, and I get time lapse videos of my prints.- PLA will clog nozzles over time. One tip, put a little dab of canola oil on the filament just before it goes in the extruder every 50 hours of print time and you'll help prevent build ups from happening. If you run other materials or change back and forth with other materials, no need.Again, ask for help if you get stuck or have issues. Great printer, very happy with quality of this, and the large build platform is awesome.
A**R
Easy to assemble, great working 3D printer
I waited to write this review until I'd had a chance to print several long prints (28hrs long) so that I could give a true review. Out of the box, it was easy to put together which isn't true of most 3D printers, so this one was way above the rest in that respect. There was quite a smell to it when we opened it, but I'm sure that was just the materials and manufacturing and with the help of a fan and ventilation we were able to air it out just fine. Just be warned, it smelled very bad at first. Before you assemble the printer, I suggest you take out the included microSD card and provided adapter and read through the material there. It isn't extensive, but it does even include a video on printer assembly. A couple of screws had came loose during shipping, so we did need to figure out where they came from and reattach them but it wasn't a big ordeal or anything. Calibration on this printer takes time, but that isn't any different than any other printer of this style. You can use the YouTube videos for the CR-10 even though they are for a different brand. It still works just fine. I have been using Simplify3D as my slicer and not the included Cura ( which is also included on the microSD card), because I'm already familiar with the other software I had already purchased. When using the software, you can use the Creality CR-10 printer profile, just be sure to remove the start script code where it says to lift the nozzle before printing or your prints won't stick to the bed even if you calibrated it correctly. I've been very happy with the quality of my prints and the reliability of this printer. With other printers, you are always having to wipe the nozzle to ensure the nozzle doesn't clog and stall your print, but I've found with the CR-10 code, it wipes the nozzle before printing on the edge of the print bed and I haven't had any issues even when I don't take good care of the nozzle. Because of the wipe, I also haven't had to use as many skirt layers to prime the nozzle either. Like most printers, the motors do make noise that can at times be a low level screech. I haven't yet bought dampers for this printer, but I'm sure that would take care of the noise. I use green painters tape on the print bed but they did include some masking tape with the printer along with a cutting tool and some white PLA filament. That was a nice unexpected bonus, and great for beginners who wouldn't know they might need those things. I've been printing at 210 for the hot end and 50 for the bed and my prints have came out great. On larger, faster prints, I did use a glue stick to ensure the edges of the print stuck to the bed which worked great. The only negative I can think of is that the spool holder for the filament doesn't accommodate the filament spool size I use from Cubicity, but I was able to connect the holder from my other printer for now until I can get or print another holder. I have found that I do get reliable prints when printing from the SD card which means I don't have to leave my laptop connected all night when running a lengthy print. I didn't need to do any adjustments to the firmware, I did lower the Z offset in my slicer to 0 since I had already got the nozzle positioned perfectly before printing. ( for newbies, the Z offset tells the printer to add or remove distance between the nozzle and print bed when printing which is needed mainly when you have a self calibrating printer that didn't get correctly set). I do think this is a great printer for beginners, but I do suggest learning all about printing before you buy because 3D printing isn't like ink jet, you can't just hook it up and print. There's a lot of tweaking that needs to be done to get a perfect first layer of your print which is very important if you want a successful print. However there are some great rescources online and I do suggest you join a Facebook group for whatever printer you buy as the online community is usually very good at helping troubleshoot issues on the fly. This printer, like most, does originate in China, so support can be delayed due to time zone differences.
O**R
Best thing since sliced bread
I delayed the review for about a month or so so I can be objective. It was literally printing all days and nights straight since I got it.First as always amazon shipping rocks. People who order it from asia wait for weeks and after import duties and shipping the difference is not that much in price.Second the HICTOP company - there was a part missing in the package, non essential, but missing. Contacted HICTOP, got reply the same day that they are sending me replacement part. Got it in about 2 weeks plus some screws few other spare parts and a freebie. Missing part sucks, yes, but I take great support over that any day and HICTOP did everything as fast as they could to fix it, so no issues here.Now the printer - Iike I said, I had been printing since I've got it without stopping - everything, from junk and toys to actually useful stuff and stuff I designed. You can go to thingiverse and look up Oscarko. And yet not a single failed print. Seriously everything was 10/10 (knock on wooden filament). Almost unreal, when you consider that people still in this day have issues with printers from kickstarter etc... and the output quality is among the best I ever seen.Now after assembly - check all the screws, joints and bearings for play. Nothing should be wobbly. All should feel tight.First thing I build was a full enclosure and vent it out from my basement window. Yes, urban legend has it that PLA is very safe being made out of starch and pixie dust and whatnot. Right, I heard that story million times! The PLA of today is not just a plain vanilla PLA (that stuff was brittle, didn't adhere to itself and you could break it just by looking at it). Modern PLA is full of plasticizes, additives, color powders and who knows what. Yes it works wonders now - almost as good as any modern plastic I ever used, but you don't really want to breath the fumes day and night! And having CR-10 you will be printing day and night!Making the enclosure was absolutely worth it and CR-10 is build for enclosure with the separated control board.Bed: I tried the sticky tape I've got with the printer for the bed - just once, since then I use 60 degree heated bed and the washable purple glue stick directly over the glass. Absolutely perfect.Learn how to remove things from the glass - use razor blade at first, then get a thin spatula when you get comfortable yanking plastic out of glass.The printer keeps level like no other I heard of - I don't even bother checking for level anymore before print. Every while I will recheck it, or when I put some upgrade or change something or bump into things too much.As for upgrades: don't just start making mods, there are only few things that are worth, the printer by itself is excellent. The first thing is the support bracket for the bed heater cables - this is a must, the bed moves and within weeks or months the soldered joint will have fail - no other choice. This has been known for long time, yet still the same faulty design. Support bracket from thingiverse will fix this! Second mod is to put the large leveling knobs. (The giant cart wheel ones) Those small one are so hard to turn precisely. Buy the micro SD to SD card extender cable on amazon with your printer. Not sure who thought that micro SD card is a good thing to use on daily basis. Probably someone who has very tiny fingers and eagle eyesight. That's it everything else is optional and take your time, don't rush with it.The optional upgrades and mods would be: get raspberry pi 3, logitech C615 and astroprint. I tried octoprint before but I run into issues when it will randomly disconnect (I am not alone as it turns out) . With astroprint I had been printing big and small, long and short - without a hiccup, not a single issue. I sit in my office and send the files directly over wifi to the raspberry pi in the basement, then check on camera in my browser (google chrome works great, firefox don't like the streaming format)Fans: they used small cheap fans in the control box and it is a bit like airplane starting. Replace the 50mm inside for $10 silent one and print an adapter for the 30mm on the wall so you can use 60mm (the 30 mm is a screamer with high RPM trying to push air). Now the control box is like 10 times more quiet. No need to go overboard, I've got the fractal design silent series - day and night difference.That's mostly it - don't get tempted with any of the UN-necessary mods like replacing hotend (the light stock hotend is perfect, just get spare) or adding any of the nozzle cooling contraptions some people devised. This will make the head assembly heavier and you will potentially start having issues with quality on larger pieces. And it is not needed. or at least don't get tempted from the beginning, get to know the printer as it is, then you will be able to judge if you made it better or worse. I did add the dampers to X and Y step motors which reduces vibrations and bit noise (but the vibrations didn't cause problems anyway). There was no difference in quality of print.As for filament, I've got like 5 spools of the Amz3d right from amazon - it is a perfect filament - strong never brittle, print like butter. For the price you can't get better for this printer. I print at 216 with 60 bed. And the bonus is - the spool hole is the exact size for the spool holder for CR-10.I've also got one hatchbox filament - also good, but no difference from AMZ3d. Don't try to save 2 bucks on untested mee-too filaments, go what others use.I don't remember when I had such fun for so long....there is always something to make.
C**P
Way too high maintenance
This printer after about a month will start giving you all sorts of issues. My advice, spend a bit more money on a better one, don't get this one.Issues :- The belts you have to assemble and adjust yourself will take work. They're either too tight or too loose.- The bed is loose on its rail, a little tap will tip it (If you get this issue, tighten the wheels underneath your bed, tools included will help).- The feed motor for the filament had its mechanism loose, which I had to assemble (Wasn't in the instructions)- The little file explorer slows down to a crawl (Taking 3+ seconds to switch items on a file list) if you have more than 3 files in the folder you're at- The internal fan for the controller chips is making a lot of noise, I had to replace it myself- The feed tube on top where you put your filaments will only work with the AMZ3D filaments, any other and you need something else to hold it.- The bottom of the printer has no rubber pads, so unless you get some yourself, you'll have vibration issues on your printer and bad prints.- There is a fan control in this printer but no fan to control. Had to add it myself (Not mentioned in the manual, etc..)- Many more.Get a better printer. Seriously.
J**M
Review from a noob for noobs
This is my first and only 3D printer but I understand why people have more than one! I joke that 3D printing is a character building hobby but really this printer has been fairly easy to learn how to use. Youtube and Facebook are great resources for learning how to really tweak out the printer to get great results. It seems the glass beds on these printers are often warped so keep that in mind and be prepared to head to Ikea or your local hardware store for some mirrors. Mine was warped, but since I replaced it with a mirror, I have been printing away with very few problems.This printer is not difficult to assemble but I'd recommend searching Youtube to get a few pointers on what should be tweaked and tightened right away.If I have one piece of advise to novice printers, its... level that bed. That can solve so many problems. It will take a little practice but once you done it a hundred times, it'll get easy. :) I use stock paper not regular paper and go for only a slight pull from the paper as I slide it with my fingers pushing down very lightly on either side of the nozzle.
P**.
Great printer as long as you don't mind tinkering with it in the beginning.
This is my first 3D printer and I've been using it for a week now so please bear in mind that I have nothing to compare it to. Overall this is a good printer. From the time I opened the box to printing my first part was about 1 hour and was very easy. Now, keep in mind this is an inexpensive Chinese printer. Don't expect the hassle free use and perfect design of a $3,000 printer here, however, the CR-10 does print very nicely. Out of the box you'll want to print the upgraded leveling knobs from Thingiverse. Originally my Z axis screw was not connected to the coupler on the Z axis motor, and when trying to do so I found that the screw and coupler were not in line with each other. I needed to print a spacer to put between the Z axis motor and the frame in order to have the screw and coupler line up properly. These spacers can be found on Thingiverse also. The tempered glass build plate that came with the printer was warped and not level. I contacted the seller and they told me that if they sent me a replacement that the new glass plate could be warped as well due to the nature of tempered glass(then why include it in the first place?). They told me to go to a local glass shop and have a piece of glass cut to size and they would reimburse my account the amount of the new glass plate. I thought this was very fair. If you're not afraid to tinker around and have to modify or upgrade parts for this printer it will be well worth it in the end. If you're looking for a printer that you don't have to modify or tinker with out of the box, look elsewhere. Considering the price of this printer, the build volume and the quality of prints it produces it is an excellent option. The only reason I don't give it five stars is because it does require quite a bit of tinkering to get things the way they really should be.
D**D
Easy to assemble, produces high quality prints
This printer was by far easier to put together than any of the others ones I saw online. Time is important to me, and it only took a few hours to get it up and running. I watched lots of videos during this time, and was quite cautious. A more seasoned person would take less time I am sure. As for the print quality, I am blown away. Even on the second highest quality setting the prints look superb. I was told there are some parts that should be printed to upgrade this printer (adjustment wheels, and a support for the power cable). I printed the power cable support but when I went to install, I saw it was aready there!
Trustpilot
3 days ago
3 weeks ago