


🔧 Upgrade Your 3D Printing Game!
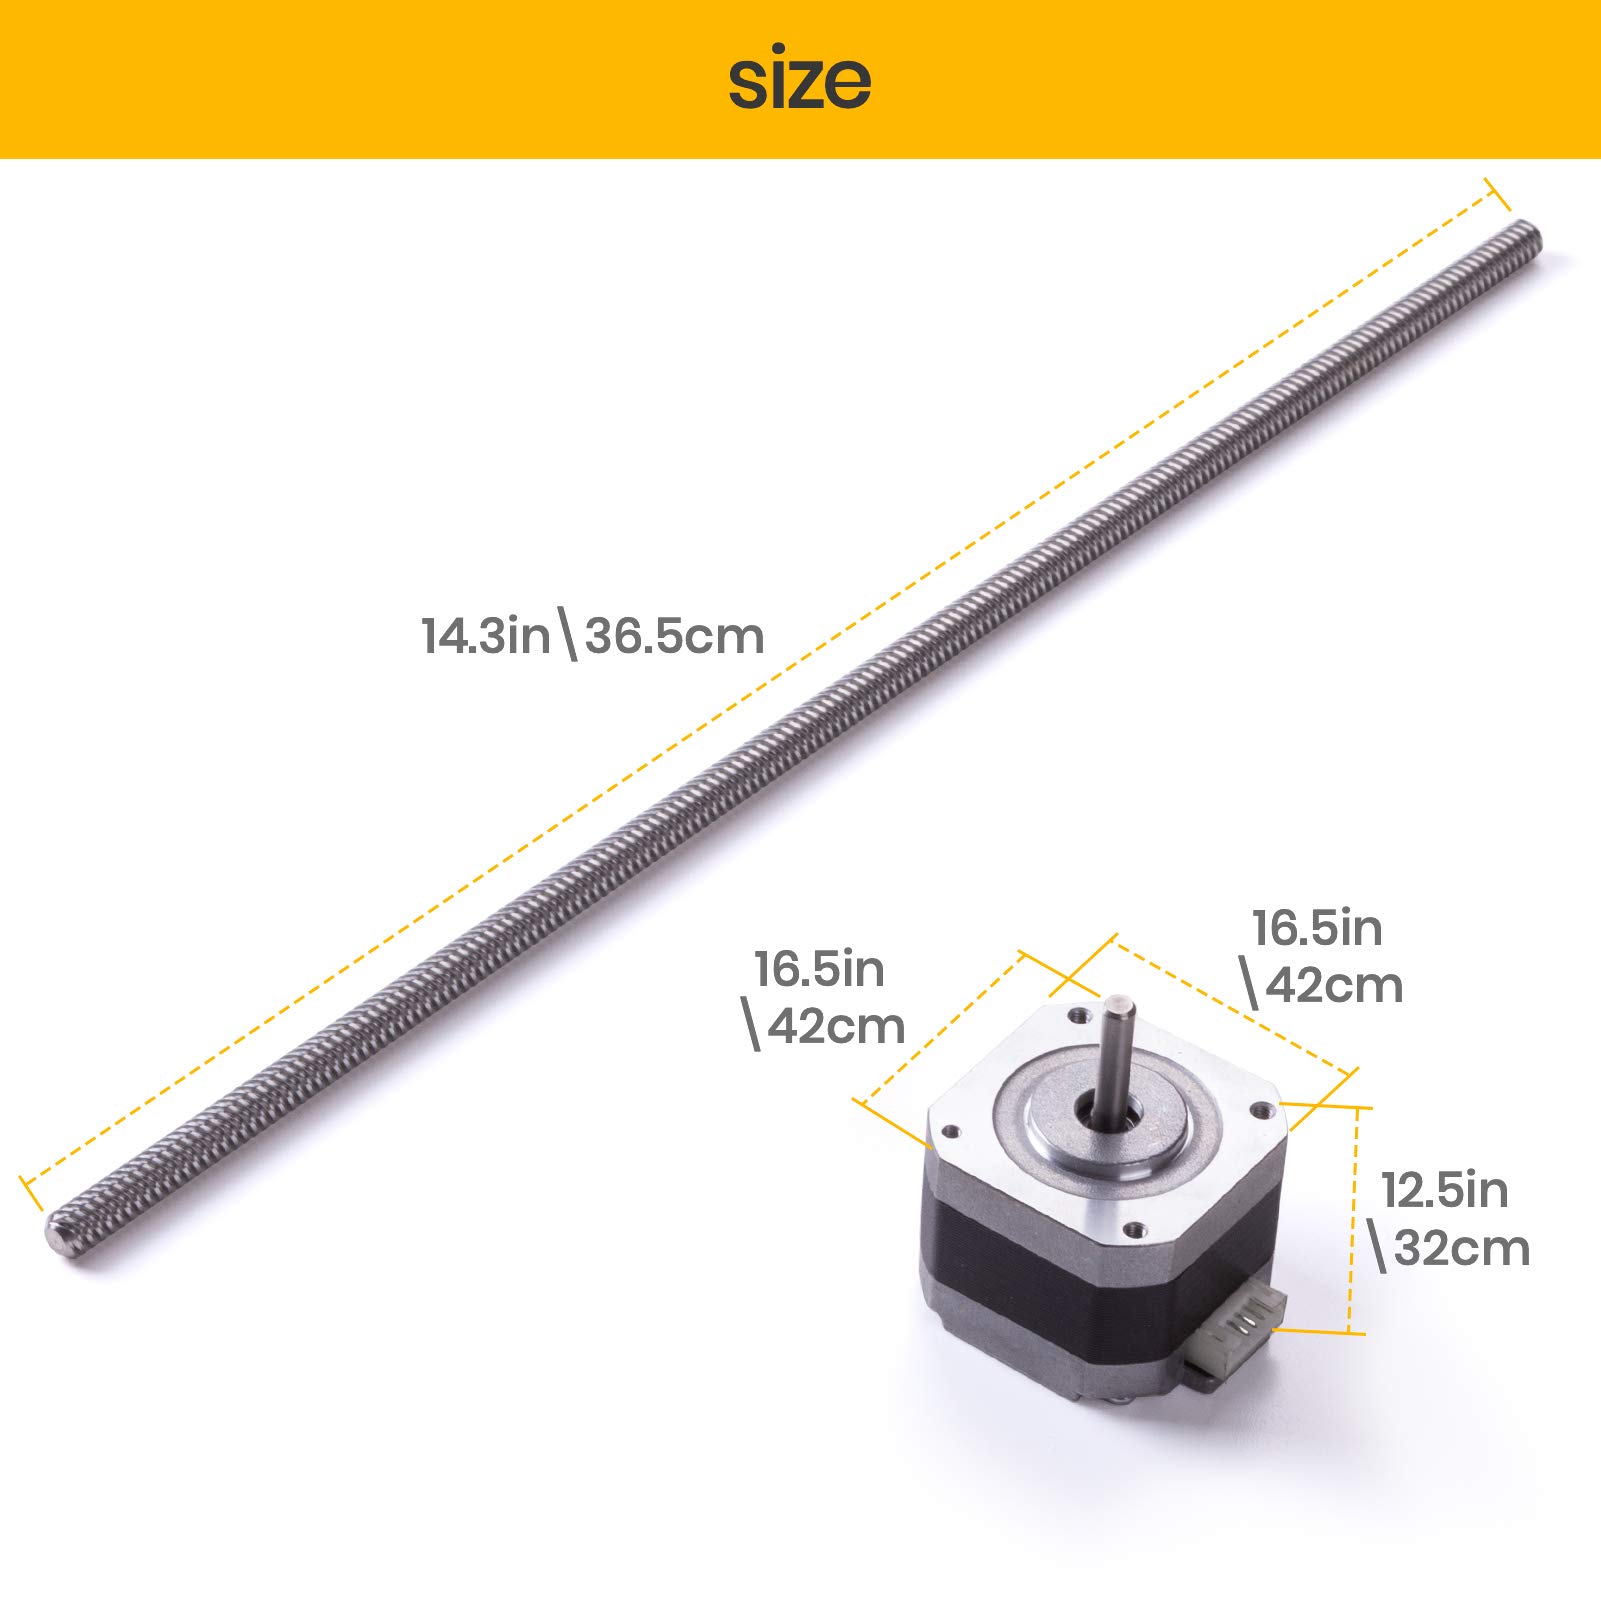
The HICTOPEnder 3 Dual Z-axis Upgrade Kit is designed to enhance the stability and accuracy of your Ender 3 series 3D printers. With a lead screw length of 365mm and all necessary components included, this kit is compatible with various models, ensuring a seamless upgrade experience. The full metal plate design secures the power supply, providing both safety and reliability.
C**A
Love this, was a headache but that was my own mess up
Got one to try out on my Ender V2 Neo. Installation was a HEADACHE but only because I followed a YouTube video that wasn't the one from the manufacture and it let me in a weird direction. I didn't use the one that was suggested because 1) it has no sound and 2) it wasn't my exact printer and I wanted to see someone walk me through my exact set up. For some reason the way the person had me do it made it take so much longer to get both Z axis in sync. I finally found another video of someone upgrading just the Ender 3 Pro. This helped me understand the process better and so I finally got it going. I instantly at that moment bought a second one for my Ender 3 Pro. It came the next day and I installed that one within 20 minutes with no issue. So the initial headache was my fault and I do not fault this upgrade. I do wish the included video/instructions were better so I didn't have to go through that, but I understand for different language reasons why there is no sound.It definitely has helped both my printers in stability greatly. It was also SUPER necessary for my ender 3 pro as I added a direct drive and it's so heavy, it needed more support.The ONLY thing I do not like about this specific version of this, is the included cable to split the Z Axis wire is super short. For my 3 pro it wasn't an issue, but for my Neo I had to put a bunch of electrical tape to keep it in place or else it gets caught on the leveling screws and has held my bed in place and messed up some prints. If the cable was a bit longer, that would be great!
K**Y
Dual z kit
Easy to install and works great.
B**E
Takes a bit to install properly, depending on your set up
So for mine it was an Ender 3 pro with skr 1.4v turbo board, smart bltouch, dual z and tft 35 screen, so for mine I watched few youtube videos that claimed they did it before. I did everything thing they said and it went crazy. So redid it again hour long firmware coding. Same out come so watched another person do it, his coded it wrong again and it started to loose connection with the stepper drivers. So switch to another video configuration is had caused it to repin the motor to E1 not Z2 which bugfix marlin has a bug which causes one motor to spin faster then the other. So deleted all of those firmwares 2 days in. So I went threw and recoded everything they way I thought it should be by the issues I had found between the videos, and ended with marlins newest non bugfix set up running z2 while plugged in and using E1s port and steeper so my z steppers use there own stepper drivers I can also run g34 and it tunes to the bed on its own. Youtube is definitely giving alot of bad advice lately. My printer now doesn't randomly sag on the side without a stepper motor which changed the bed hieght on one side to whatever it felt no matter how the wheels where adjusted, I also keep my z stepper locked so it can not be moved easily if bumped. Take 2 pieces of wood, cut to a length and level the gantry off the side rails not the bed, then level the bed with a mark on the piece of wood and level all 4 corners off that mark from the lower rails, then run the z auto align feature and it sets the whole thing up nice. Also updated my tft screen which helped it connect better. I may or may not make a youtube on how I fixed the issues, I'm not really into that kinda stuff. I even repaired the skr 1.4 turbos onboard SD card reader issue.
Y**L
Part Not Compatible And ask
At the time of installing the kit I realized that the 2 guides with bearings that go on the upper ends of the screws are not compatible with the rails of the Ender 3 V2.The parts have the screw holes farther apart than the rail channels. (As you can see in the photo). And it wasn't possible to install them, those parts don't work for me.I also comment that the included cable to connect the two motors is too tight, it should be at least 20 millimeters longer at the end of each motor.On the other hand, I would like to know if after installing the motor and screw correctly, it is necessary to make any adjustments to the Z-axis driver on the board? To give you more or less energy.
D**D
Solved ALL of my layer line issues!
Here is the deal, when putting my Ender 3 v2 together for the first time I asked myself why just one stepper motor and drive gear? How is this thing going to be precise at all, with one side moving up and down freely?Answer : It can't. Not ever. Not going to happen. It is going to bounce up and down and ruin print quality.Solution : Drop what you are doing and install this kit and watch in amazement as you print nearly glass smooth walls, what you thought you were getting when you first laid down the money for the printer.Also, when you install the kit, keep the stepper motor loose at the bottom so that the lead screw, coupler and motor can find their natural alignment. That and make sure to pay attention and adjust the hex adjustor that came with the original design. The third roller wheel uses it to square the rollers to the vertical track. Rotate it with the provided wrench and watch the slop go away in the roller system. Oh and the top bearings need to be allowed to find their natural path too, so bring the gantry all the way up with them loose and you will see that they poke out the side a bit too much to put the cover caps back on the aluminum, all the way. The people that have binding after, most likely square them to the top without running the extruder arm all the way up first. The unit runs like glass, smooth no vibration with just a little dab of synthetic axle grease along the lead screws to aid long term wear. So happy with this kit! My prints look practically injection molded now!
H**O
Good product
It arrived in time, well packed and nothing was missing, instructions were included but I always prefer watch a video on YouTube. Assembled in my ender 3v2, Everything seems to work fine so far and price was really honest.
P**T
Très simple
Kit très simple à installer et un bon renfort sur l'axe Z de mon imprimante. Installer sur une Ender 3 NEO 👍
V**G
Prima op maat gemaakt produkt van zeer goede kwaliteit
Makkelijk te monteren en met verwijzing naar uitleg via youtube.
V**O
Ottimo acquisto
Logitech G733 Review.vincenzo leuciScrivi una recensione su cuffie gaming Logitech G733Le cuffie gaming Logitech G733 sono un'ottima scelta per chi cerca un'esperienza audio di alta qualità durante le sessioni di gioco. Queste cuffie offrono un suono cristallino e nitido, con bassi potenti e una gamma dinamica impressionante.Il design delle cuffie è moderno e accattivante, con una vasta gamma di colori disponibili per personalizzare il proprio look. La costruzione è leggera e confortevole, con una fascia per la testa regolabile e cuscinetti auricolari morbidi che si adattano perfettamente all'orecchio.Inoltre, le cuffie Logitech G733 offrono molte funzionalità utili per i giocatori, come la possibilità di regolare il volume e il microfono direttamente dalle cuffie. Il microfono stesso è di alta qualità, con una buona sensibilità e una chiara riproduzione della voce.Una delle caratteristiche più interessanti di queste cuffie è la tecnologia wireless LIGHTSPEED di Logitech, che offre una connessione affidabile e di alta qualità senza alcun ritardo o interferenza. La durata della batteria è anche piuttosto impressionante, con fino a 29 ore di autonomia con una singola carica.In generale, le cuffie gaming Logitech G733 sono un'ottima scelta per i giocatori che cercano un'esperienza audio di alta qualità, combinata con un design moderno e funzionalità utili. Sono comode, leggere e offrono un suono cristallino, rendendole una scelta eccellente per i giocatori seri.vincenzo leuciRecensione per guida di scorrimento lineare stampante 3dLa guida di scorrimento lineare per stampanti 3D è un componente essenziale per ottenere stampanti 3D di alta qualità. Ho avuto l'opportunità di provare la guida di scorrimento lineare per stampanti 3D e devo dire che sono rimasto molto soddisfatto della sua prestazione.La guida di scorrimento lineare è costruita con materiali di alta qualità, che ne garantiscono la durata nel tempo. Inoltre, la sua costruzione di precisione assicura una scorrevolezza fluida e senza attrito, che consente di ottenere stampe precise e uniformi.La guida di scorrimento lineare per stampanti 3D è stata progettata per adattarsi a diverse tipologie di stampanti 3D, il che la rende una scelta versatile per chiunque voglia migliorare le prestazioni della propria stampante 3D.L'installazione della guida di scorrimento lineare per stampanti 3D è stata piuttosto semplice e veloce, grazie alla sua compatibilità con molti tipi di stampanti 3D. Una volta installata, ho notato un miglioramento significativo nella qualità delle mie stampe, con linee più precise e meno irregolarità.In generale, la guida di scorrimento lineare per stampanti 3D è un ottimo componente per migliorare le prestazioni della stampante 3D. È costruita con materiali di alta qualità, scorre fluidamente senza attrito e si adatta a molte tipologie di stampanti 3D. La consiglio vivamente a chiunque cerchi di ottenere stampe di alta qualità con la propria stampante 3D.vincenzo leuciRecensione kit di aggiornamento doppio asse z ender 3Ho avuto l'opportunità di provare il kit di aggiornamento doppio asse Z per la stampante 3D Ender 3, e devo dire che sono rimasto molto soddisfatto della sua prestazione.Il kit di aggiornamento doppio asse Z per la stampante 3D Ender 3 è stato progettato per migliorare la stabilità e la precisione dell'asse Z della stampante 3D. L'installazione del kit è stata semplice e veloce, con istruzioni chiare e dettagliate fornite con il pacchetto.Una volta installato, ho notato un significativo miglioramento nella qualità delle mie stampe, con meno vibrazioni e una maggiore stabilità dell'asse Z. Questo ha permesso di ottenere stampe più precise e uniformi, con meno errori di posizionamento dell'asse Z.Il kit di aggiornamento doppio asse Z per la stampante 3D Ender 3 è costruito con materiali di alta qualità, che ne garantiscono la durata nel tempo. Inoltre, la sua costruzione di precisione assicura una scorrevolezza fluida e senza attrito, che consente di ottenere stampe precise e uniformi.In generale, il kit di aggiornamento doppio asse Z per la stampante 3D Ender 3 è un'ottima scelta per chiunque voglia migliorare le prestazioni della propria stampante 3D. È facile da installare, costruito con materiali di alta qualità e migliora notevolmente la stabilità e la precisione dell'asse Z della stampante 3D. La consiglio vivamente a tutti i proprietari di stampanti 3D Ender 3 che cercano di ottenere stampe di alta qualità e precise.
D**D
Calidad precio inmejorable
Una modificación muy recomendable, asequible y fácil de montar.Cosas a tener en cuenta:1- Al montarlo, antes de amarrar el husillo al motor hay que poner el puente a escuadra con ambos husillos y ambos husillos han de estar paralelos entre sí, para no forzar los motores( un nivel de burbuja pequeño y un poco de paciencia es suficiente, aunque mejor un nivel digital)2- MUY IMPORTANTE una vez tengamos todo alineado, no girar los motores de forma manual, ya que se desescuadrarian, aunque le demos a "disable stepers" solo pueden ser movidos a través del panel de control.3-He leído en varios comentarios que el cable de los motores es demasiado corto, no lo conectes a la placa, conéctalo al cable del primer motor (motor con el que te viene la impresora) no hay que modificar nada y entonces ya no te quedará corto.4- Aunque tengas otro eje "Z" no te olvides de ajustar bien las ruedas para evitar vibraciones.Espero que os sirva.
Trustpilot
3 weeks ago
2 months ago