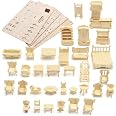
Furniture Set Lr
| Item Dimensions | 14.62 x 9.12 x 0.5 inches |
| Size | One Size |
| Theme | Puzzle, Wooden Puzzle |
| Color | Tan |
| Material Type | Wood |
A**L
excellent kit- some tips for great results!
This kit was fantastic. The plywood sheets arrived in great shape and the pieces were as cleanly punched as one could hope for. I can't believe how great the set is for the price!The furniture is about 1/2 inch to 1 foot scale, so small for most doll houses (standard dollhouse scale being 1 inch to 1 foot), but as I was looking for inexpensive pieces for my toddler daughter to play with, I thought the low price made it worth a try, and boy am I glad I did. I've already ordered 3 more kits from this company, add I had so much fun assembling the furniture.Some tips:1. Punch the pieces out from the back, gently. The cuts are usually pretty clean from the front side, but the back side of the sheet might need some loving to pop the smaller pieces through.2. Sand lightly (I just used a packet of cheap fingernail emery boards) and assemble each piece. This way you can be sure they fit.3. Take each piece apart, one at a time, (don't mix up the pieces!) and brush the slots with wood glue before putting them back together. I also then brushed wood glue all over each piece to smooth the wood and strengthen each piece.4. When the glue has dried, if necessary, sand a little more before painting. I used cheap acrylic art paint and used the colors to create room sets (kitchen yellow, bedroom teal, etc.)5. For finishing touches, I used tiny inexpensive "nail art brushes" to paint on some designs, and then I found little nail art decals that were even easier and more effective! I just put on the stickers, and sealed them on with a coat of clear nail polish.Just delighted with the fun assembly of the set, and thrilled with the results. My daughter loves playing with the furniture in her doll house, and I don't worry that she may break some precious little things.
T**T
Fun, well worth the money.
This set is pretty fun, and you can save a lot of money furnishing a dollhouse if you put some time and effort into customizing each piece.The pieces popped out correctly. Not one piece broke. The instructions are numbered, so you know exactly how to assemble each piece, and after a while you "get it" and you don't refer to the instructions as often. It's sort of addicting to put these pieces together. :)Tips:* I bought a few inexpensive finger files at my local grocery store to sand down rough edges and make some edges rounder which give them a more authentic look. These work great for getting between the pieces that have small narrow openings and they are just the right grit.* I used chops sticks left over from take-out to push the pieces out in order to get into the narrow corners of some pieces while not putting a lot of pressure on the surrounding wood.* Once assembled, I cut some edges off with heavy scissors to make the pieces look less blocky for example the four dining chairs side pegs.* I used regular glue to fill in the seams and edges. Once the glue dried I sanded over them lightly to smooth them out.* Some pieces like the dining room table I layered the top with glue, then sanded to get rid of the joints at the top, then I painted the top to look like wood grain.* I painted the pieces with ordinary acrylic paint, then sprayed on clear gloss. Some of the pieces I did detail work to make them look old.* For the mirror on the vanity I brushed glue just on the circular portion, then placed thin aluminum over the glue and tore away the rest after it had dried. I then painted around the mirror to give it a defined edge.* Finally, if you keep the stencils after you remove the pieces, you can drace them again on any other type of material.These are just some extra creative steps you can take to make the furniture your own. I enjoy doing this sort of craft, so I didn't consider it extra work. It may not be worth the time or trouble for some.Have fun.
A**R
Small but perfect set for furnishing on a budget!
This is a small set but it is sooo perfect for furnishing a house on a budget. It took me 2 nights to assemble and paint (about 8 total hours). It's a little difficult to find dolls small enough to fit but I was able to find wood cutouts from a craft store that I was able to paint into cute dolls that work perfectly. I would highly recommend this if you're on a budget. With dolls, glue and paint I spent around $20 total. My daughter is 4 and not quite ready for the responsibility of expensive furniture so this was a great alternative and she loves it!! Hasn't stopped playing since it was finished!!
R**H
Depends what you're looking for
If you're looking for something like a puzzle to do with your children, my family is enjoying this. We took the advice of a reviewer and glued the pieces together. I let my 4 year old paint the furniture and use them with her little dolls. Some of the furniture broke right away, but I didn't have high expectations because it was so inexpensive. Have fun with it. Don't sweat what breaks as you try to build it and you'll have a fun activity that is worth the price and cool furniture your child can play with and feel like they made. If I spent a hundred dollars on doll furniture and my daughter broke it, I'd be livid. If I spend ten bucks, enjoy the process of building it with my children, and they have some fun with it -- I don't care if it lasts.** for your sanity sake, take a pencil or thin marker and write the numbers on the pieces before you pop them out. There are no real directions -- viola, that's what makes it fun.
A**K
Great price BUT a lot of work!
In terms of affordability, you can't go wrong with this dollhouse furniture set. But, as others have mentioned, be prepared to spend HOURS putting it together! You will need to sand most of the pieces. And I'm not talking about smoothing the edges, but actually sanding the connecting points so the pieces can fit into each other. I also had to sand most of the furniture legs (chairs, tables, beds) to equal their length so they are not shaky. So far I'm done with 2 sheets (there are 4). I, personally, enjoy craft projects, but this requires a lot more work than I expected. On the bright side, I can now add "basic carpentry" to my resume. :-)* Be careful when you remove the pieces from the sheet... I accidentally broke a few.
Trustpilot
1 month ago
2 months ago