We remain fully operational. Our teams are working around the clock to ensure your deliveries continue safely.

DOWNLOAD THE APP


Customer Services
Copyright © 2025 Desertcart Holdings Limited
DOWNLOAD THE APP


E**E
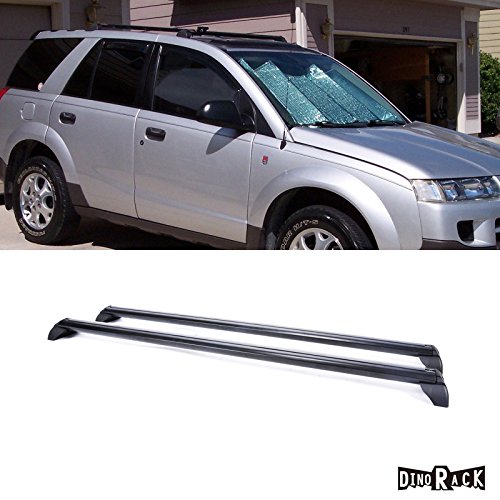
like some other designs
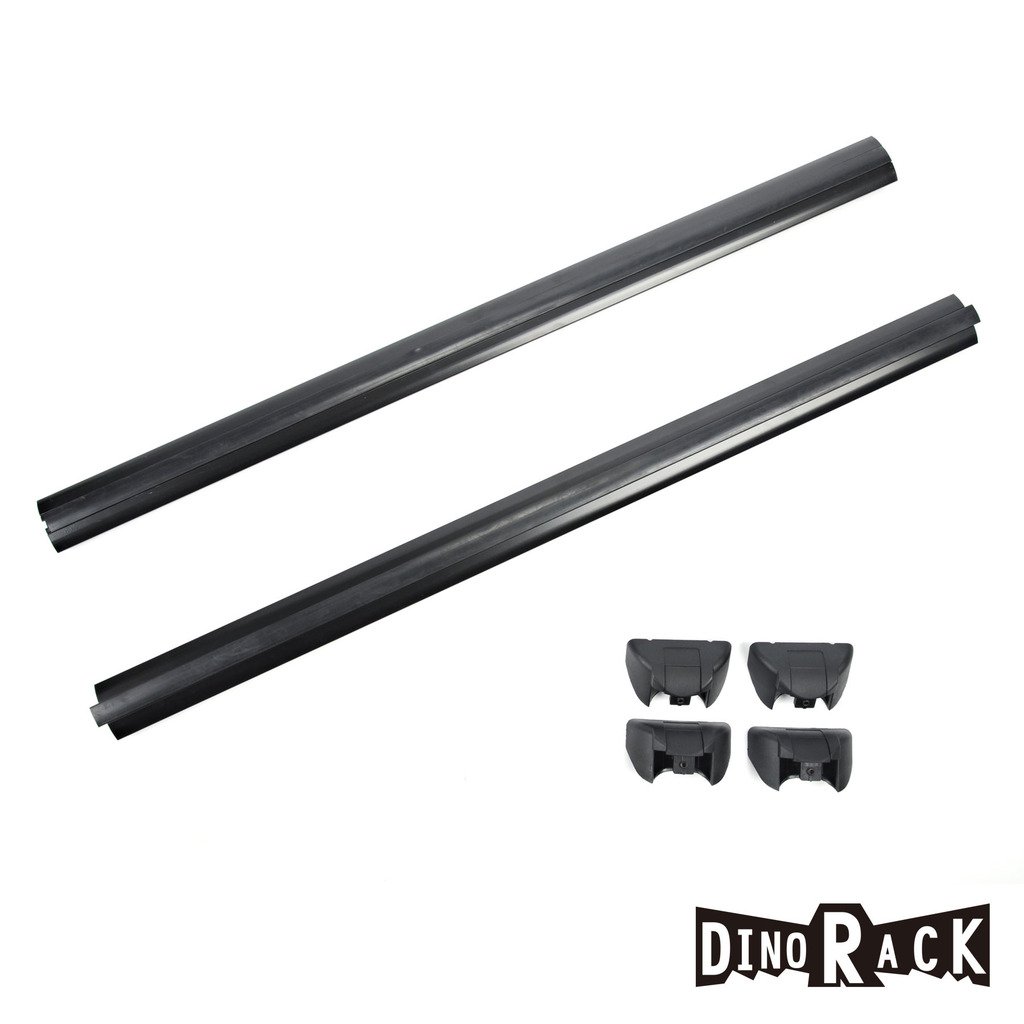
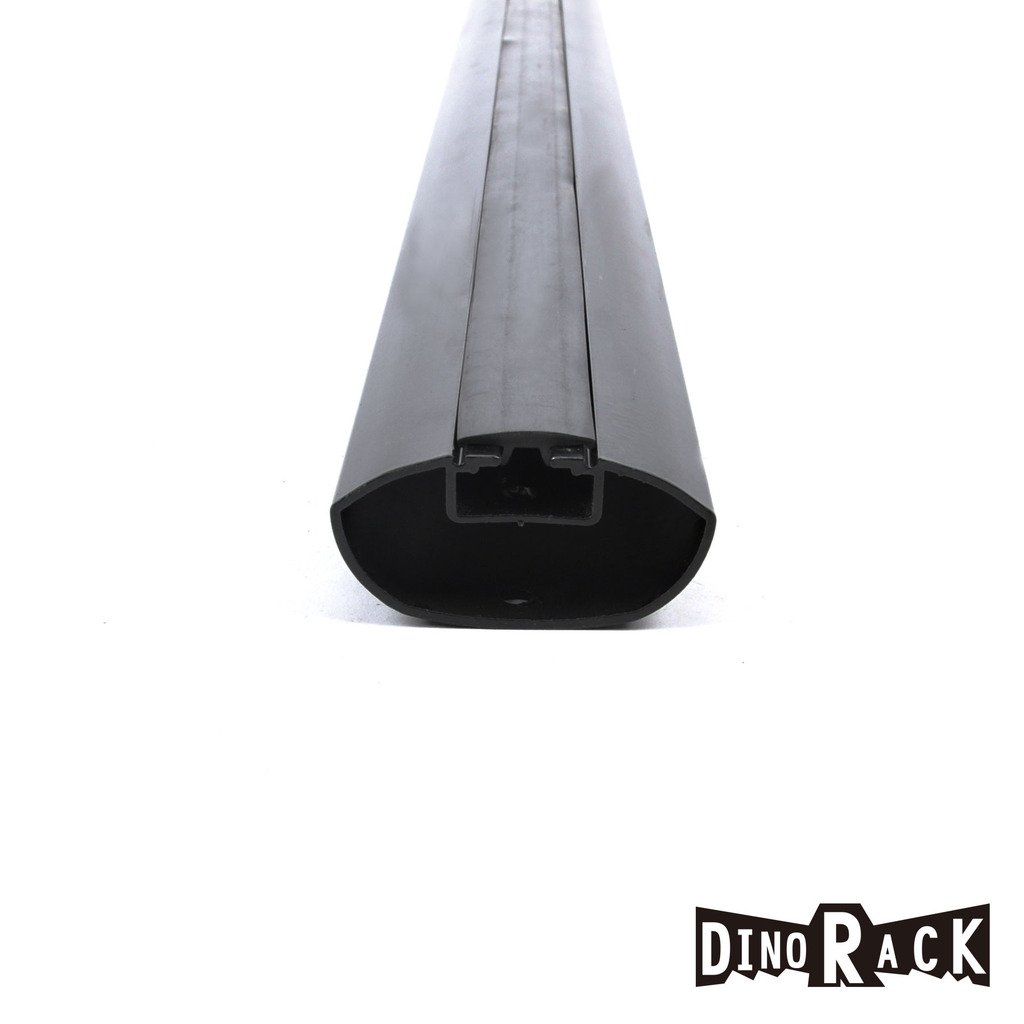
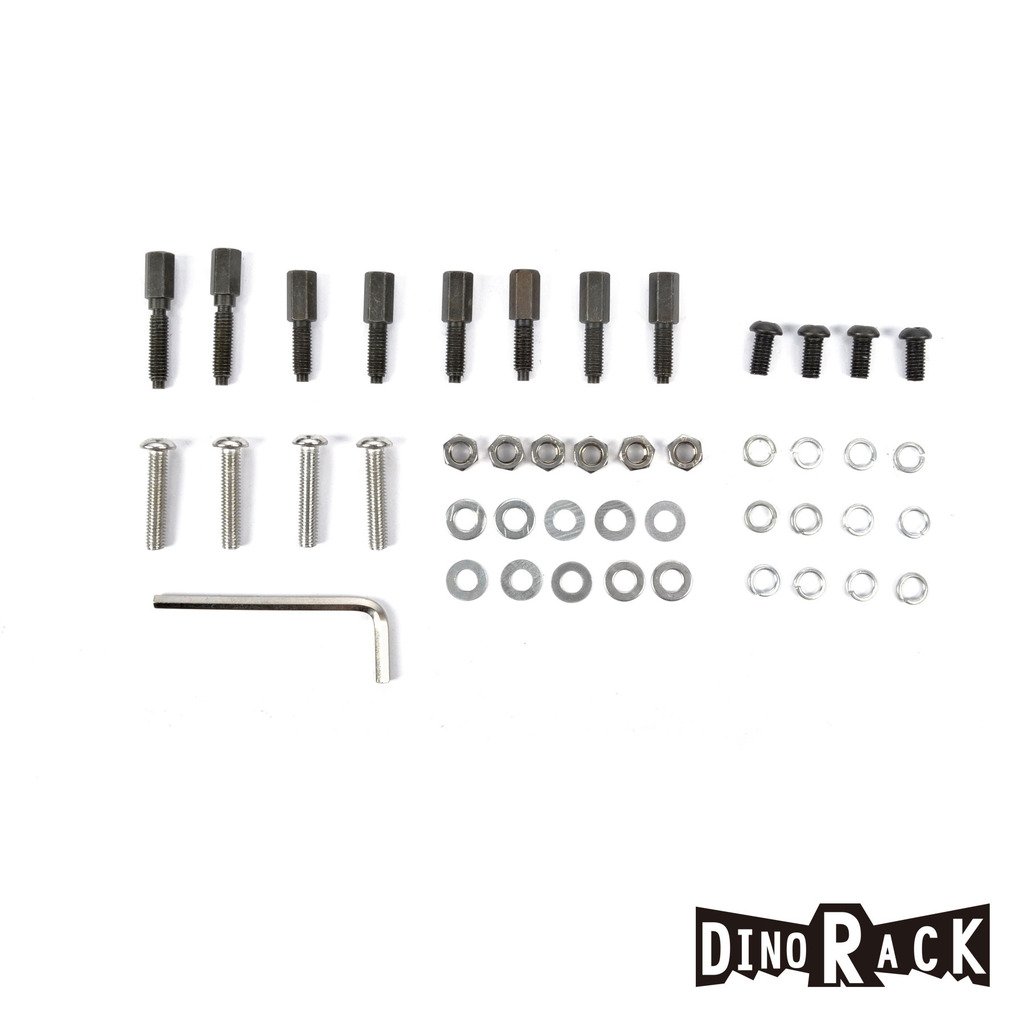
Much less expensive than alternatives, but you'll need a bunch of prep work and extra materials to finish the job.Here are my notes/departures from Russell's incredibly thorough instructions/review (duplicated in full at the end):i) Fastening the crossbars to the standoffs: the hole is too narrow to fit a screwdriver bit though it. Instead, buy some *stainless* M6 1.00 x 16mm socket head cap screws. An allen wrench will fit where a phillips bit can't. Also screwed them into the anchor bolts.ii) I skipped the tap / thread cleanup step because I mounted at positions #3 and #6 only. 7 of 8 anchor bolts had OK thread, so that was enough for me.iii) Use loctite! I skipped this and one crossbar got loose--caught just in time.Thank you Russell for all the saved time!======== Russell's Instructions (copy) =======Bought this DinoRack through another vendor on AmazonGave only 3 stars because:(1) The bolts which screw into the threaded mounting holes in the car roof DO NOT PASS THROUGH THE ALUMINUM RACK RAILS, like some other designs. Those bolts simply fasten the plastic stand-off bracket to the roof, and then the aluminum rails bolt to the plastic stand-off bracket with another 1/4” bolt into a plastic mounting platform on the stand-off 1/8” thick.(2) There are no instructions whatsoever, and there is a plethora of hardware which seems to make no sense whatsoever, until you realize it is intended to allow easy transfer of installed bars to multiple positions, simply using a Phillips head screwdriver.(3) If you install it as intended, using only the hardware supplied, you will either not have it securely installed, or you will irreparably damage the plastic roof strips on your Saturn, and cause leaks.(4) Manufacture is sloppy and needs to be addressed before installingBut if you do buy it, it does look very neat and is reasonably firmly attached if you follow my both my preparation and installation instructions below. Exactly, all 8 steps, 7 out of 8 is not a pass-mark. It is also a bargain compared to the Saturn OEM unit at $230. Below are the instructions and the necessary items you have to buy in order to install it. Hopefully you will have the tools described.Installation Instructions for DinoRack Bars for Saturn VueFirst some basics.The hardware puzzle. Although there is no indication of this, I finally realized that the plethora of hardware provided is to allow you to install the bars so they can be readily moved to any of 5 positions. Even in this they are wrong, the Saturn only permits the bars to be install in a choice of 4 positions. There are 7 positions on the roof, from #1 at the front to #7 at the rear. #1, #2, and # 7 must NOT be used, the front bar goes at #3, and the back bar can be installed at #4, or #5 or #6.Unlike other kits, front and back stand-offs are identical, no need to look for taller ones to put on front, as in other kits.Preparation.(1) The aluminum cross bars have holes drilled in them. In all cases these holes have rough protruding edges where the drill broke through, these must be dressed or they will make hamper assembly, the bolt to mount the rail to the standoff will not pass through far enough, and the endcaps will be difficult to install. Either by a small file or a Dremel tool. It will remove the paint and expose aluminum, but this is no matter as it won’t corrode, and will not be exposed after assembly.(2) The bronze hex-head tapped anchor bolts have poor thread in the tapped heads, and many of them resist the stainless mounting bolts screwing all the way in; clean these up with a 6 mm tap before starting.(3) The rubber inserts overhang the aluminum bars by an inch or two. DO NOT CUT THESE. When the bars are installed, push these in with your thumb and then work towards the center, (tough but doable, until the ends are flush, before installing the endcaps, otherwise you will soon have strips that are too short.InstallationStep 1- Assemble the crossbars to the standoffs, using the four short black bolts. Place a lockwasher on the bolt, then a flat washer, and feed it through the hole from the inside of the tube, with the nut in place in the plastic stand-off. Use Loctite blue, the medium Loctite not requiring heat to remove, on the nut-threads. Now for reasons only known to Loctite and God, the blue comes in a red bottle and the red comes in a blue bottle. You want the blue fluid in the red bottle. Tighten securely with a Phillips screwdriver and make sure the lock washer squashes flat. Do not get Loctite on the aluminum bar, it will mar the surface.Step 2 – Remove the existing bolts from the positions in the car where you intend to install the brackets using a torx bit. You don’t need WD-40, just a firm sharp twist will get them started.Step 3 – install the bronze hex-head tapped anchor bolts where you want to be able to install the bars. Two different types are provided, I don’t know why, they all seat to the same depth and have the same thread depth in their heads. I used the longer ones at #3 and #6 where I will generally keep my bar. Here is where you need to buy hardware, do not use ANY of the washers supplied. If you put any torque on them at all they will deform and the bolt and washer will break through the plastic strips on the roof, and just keep going down. Ask me how I know. Now the bolts you removed had very wide flat heads, were installed without washers, and that is why they could be torqued up firmly without breaking through the plastic, and also seal against water ingress. Saturn specifies 66 in/lbs (that’s 66 INCH/lbs) for its OEM roof rack kit bolts. Buy a ¼”stainless steel washer with .50” outside diameter for each anchor bolt you intend to install. Do not buy the 6mm metric washer, it is not wide enough, and won’t pass over the boss on the four longer anchor bolts. Put a dab of Marine GOOP around the top of the thread of the bolt. Slide on one of the purchased Stainless washers, smooth edges side down to mate with the plastic, another dab of Goop below the washer. Coat the last 8 threads liberally with Loctite blue, and install. Note, NO LOCK WASHER. I torqued mine to 40 inch/lbs, I was nervous to go further after my experiences with the kit washers, and it seemed tight enough.Step 4 – Install the cross bars using the four long Phillips head stainless steel bolts in the kit. They will be much too long, cut 1/4 “ off the ones you install on the back, and 7/16” off the ones you install on the front. Put a lock washer and then a flat washer from the kit on the bolt, insert through oval hole in plastic standoff and then into top of hex head anchor bolt, lifting the standoff slightly will let you see the top of the hex head bolt, BUT DO NOT TIGHTEN YET, only turn down a little more than finger tight. Wait 24 hours until the Loctite on the anchor bolt has fully cured before tightening the stainless steel bolts. I did not use Loctite on these stainless bolts because I intend to move the bars to various positions, and will initially check frequently to see they remain tight. If they loosen I will use Loctite blue.Step 5 – if you don’t like the open hex head bolts at the alternative positions you may have allowed for, install a stainless Phillips head 6mm X 12mm length bolt in these positions, using a washer that came in the kit. Again wait 24 hrs before tighteningStep 6 – Push in rubber strip to be flush with ends of rack aluminum members as described earlier. Remove set screws from endcaps and push into place to keep rubber in and prevent water ingress. Tape end caps in place with insulation tape if you intend to use car at this point, or leave it outside, and it’s raining, otherwise remove unsecured endcaps to use car.Step 7 – After 24 hours remove endcaps, and just loosen rack mounting bolts. Center rack on car and tighten securely, being careful not to tighten to the point you turn the anchor bolt below and break the Locktite seal. Using a torque wrench to make sure it’s about 20 inch/lbs is a good way to do this. Make sure you use the Correct Phillips screw driver, of good quality, it’s the one with the large #3 tip. Phillips screw drivers of even the right size often destroy screw heads, so do not use the wrong size. Tighten the stainless bolts in the alternative positions. If you didn’t install, and won’t use, alternative positions, you can remove the bolts from the bars and put Loctite blue on threads and reinstall.Step 8 - Lift 3” of rubber out of rack ends. Replace set screw in endcaps and install endcaps into standoffs. Tighten set screw down until top is flush with plastic insert tongue of endcap. No more, no less. More will raise tongue and the rubber will not seat properly at ends, less will have screw protruding and the rubber will again not seat properly at ends. Then replace rubber as follows. Pull about 5” total of rubber out of end of rack, and spray the underside with WD-40 for about 2” from the end. Place end of rubber into channel about 2” from end of rack, beyond the end cap tongue. With about 1” of end of rubber properly seated, slide it over the tongue towards you, working the rubber behind the part you are moving into place before it reaches the tongue as you slide it towards you until it reaches the end cap. It will now be lying properly seated over the tongue and set screw, with about 3” lifted out of place beyond that. Work one side of that 3” lifted area into position in the bar, and then work the other side into position.And that’s all there is to it!
F**L
Here are the detailed Instructions on how to Install
Bought this DinoRack through another vendor on AmazonGave only 3 stars because:(1) The bolts which screw into the threaded mounting holes in the car roof DO NOT PASS THROUGH THE ALUMINUM RACK RAILS, like some other designs. Those bolts simply fasten the plastic stand-off bracket to the roof, and then the aluminum rails bolt to the plastic stand-off bracket with another 1/4” bolt into a plastic mounting platform on the stand-off 1/8” thick.(2) There are no instructions whatsoever, and there is a plethora of hardware which seems to make no sense whatsoever, until you realize it is intended to allow easy transfer of installed bars to multiple positions, simply using a Phillips head screwdriver.(3) If you install it as intended, using only the hardware supplied, you will either not have it securely installed, or you will irreparably damage the plastic roof strips on your Saturn, and cause leaks.(4) Manufacture is sloppy and needs to be addressed before installingBut if you do buy it, it does look very neat and is reasonably firmly attached if you follow my both my preparation and installation instructions below. Exactly, all 8 steps, 7 out of 8 is not a pass-mark. It is also a bargain compared to the Saturn OEM unit at $230. Below are the instructions and the necessary items you have to buy in order to install it. Hopefully you will have the tools described.Installation Instructions for DinoRack Bars for Saturn VueFirst some basics.The hardware puzzle. Although there is no indication of this, I finally realized that the plethora of hardware provided is to allow you to install the bars so they can be readily moved to any of 5 positions. Even in this they are wrong, the Saturn only permits the bars to be install in a choice of 4 positions. There are 7 positions on the roof, from #1 at the front to #7 at the rear. #1, #2, and # 7 must NOT be used, the front bar goes at #3, and the back bar can be installed at #4, or #5 or #6.Unlike other kits, front and back stand-offs are identical, no need to look for taller ones to put on front, as in other kits.Preparation.(1) The aluminum cross bars have holes drilled in them. In all cases these holes have rough protruding edges where the drill broke through, these must be dressed or they will make hamper assembly, the bolt to mount the rail to the standoff will not pass through far enough, and the endcaps will be difficult to install. Either by a small file or a Dremel tool. It will remove the paint and expose aluminum, but this is no matter as it won’t corrode, and will not be exposed after assembly.(2) The bronze hex-head tapped anchor bolts have poor thread in the tapped heads, and many of them resist the stainless mounting bolts screwing all the way in; clean these up with a 6 mm tap before starting.(3) The rubber inserts overhang the aluminum bars by an inch or two. DO NOT CUT THESE. When the bars are installed, push these in with your thumb and then work towards the center, (tough but doable, until the ends are flush, before installing the endcaps, otherwise you will soon have strips that are too short.InstallationStep 1- Assemble the crossbars to the standoffs, using the four short black bolts. Place a lockwasher on the bolt, then a flat washer, and feed it through the hole from the inside of the tube, with the nut in place in the plastic stand-off. Use Loctite blue, the medium Loctite not requiring heat to remove, on the nut-threads. Now for reasons only known to Loctite and God, the blue comes in a red bottle and the red comes in a blue bottle. You want the blue fluid in the red bottle. Tighten securely with a Phillips screwdriver and make sure the lock washer squashes flat. Do not get Loctite on the aluminum bar, it will mar the surface.Step 2 – Remove the existing bolts from the positions in the car where you intend to install the brackets using a torx bit. You don’t need WD-40, just a firm sharp twist will get them started.Step 3 – install the bronze hex-head tapped anchor bolts where you want to be able to install the bars. Two different types are provided, I don’t know why, they all seat to the same depth and have the same thread depth in their heads. I used the longer ones at #3 and #6 where I will generally keep my bar. Here is where you need to buy hardware, do not use ANY of the washers supplied. If you put any torque on them at all they will deform and the bolt and washer will break through the plastic strips on the roof, and just keep going down. Ask me how I know. Now the bolts you removed had very wide flat heads, were installed without washers, and that is why they could be torqued up firmly without breaking through the plastic, and also seal against water ingress. Saturn specifies 66 in/lbs (that’s 66 INCH/lbs) for its OEM roof rack kit bolts. Buy a ¼”stainless steel washer with .50” outside diameter for each anchor bolt you intend to install. Do not buy the 6mm metric washer, it is not wide enough, and won’t pass over the boss on the four longer anchor bolts. Put a dab of Marine GOOP around the top of the thread of the bolt. Slide on one of the purchased Stainless washers, smooth edges side down to mate with the plastic, another dab of Goop below the washer. Coat the last 8 threads liberally with Loctite blue, and install. Note, NO LOCK WASHER. I torqued mine to 40 inch/lbs, I was nervous to go further after my experiences with the kit washers, and it seemed tight enough.Step 4 – Install the cross bars using the four long Phillips head stainless steel bolts in the kit. They will be much too long, cut 1/4 “ off the ones you install on the back, and 7/16” off the ones you install on the front. Put a lock washer and then a flat washer from the kit on the bolt, insert through oval hole in plastic standoff and then into top of hex head anchor bolt, lifting the standoff slightly will let you see the top of the hex head bolt, BUT DO NOT TIGHTEN YET, only turn down a little more than finger tight. Wait 24 hours until the Loctite on the anchor bolt has fully cured before tightening the stainless steel bolts. I did not use Loctite on these stainless bolts because I intend to move the bars to various positions, and will initially check frequently to see they remain tight. If they loosen I will use Loctite blue.Step 5 – if you don’t like the open hex head bolts at the alternative positions you may have allowed for, install a stainless Phillips head 6mm X 12mm length bolt in these positions, using a washer that came in the kit. Again wait 24 hrs before tighteningStep 6 – Push in rubber strip to be flush with ends of rack aluminum members as described earlier. Remove set screws from endcaps and push into place to keep rubber in and prevent water ingress. Tape end caps in place with insulation tape if you intend to use car at this point, or leave it outside, and it’s raining, otherwise remove unsecured endcaps to use car.Step 7 – After 24 hours remove endcaps, and just loosen rack mounting bolts. Center rack on car and tighten securely, being careful not to tighten to the point you turn the anchor bolt below and break the Locktite seal. Using a torque wrench to make sure it’s about 20 inch/lbs is a good way to do this. Make sure you use the Correct Phillips screw driver, of good quality, it’s the one with the large #3 tip. Phillips screw drivers of even the right size often destroy screw heads, so do not use the wrong size. Tighten the stainless bolts in the alternative positions. If you didn’t install, and won’t use, alternative positions, you can remove the bolts from the bars and put Loctite blue on threads and reinstall.Step 8 - Lift 3” of rubber out of rack ends. Replace set screw in endcaps and install endcaps into standoffs. Tighten set screw down until top is flush with plastic insert tongue of endcap. No more, no less. More will raise tongue and the rubber will not seat properly at ends, less will have screw protruding and the rubber will again not seat properly at ends. Then replace rubber as follows. Pull about 5” total of rubber out of end of rack, and spray the underside with WD-40 for about 2” from the end. Place end of rubber into channel about 2” from end of rack, beyond the end cap tongue. With about 1” of end of rubber properly seated, slide it over the tongue towards you, working the rubber behind the part you are moving into place before it reaches the tongue as you slide it towards you until it reaches the end cap. It will now be lying properly seated over the tongue and set screw, with about 3” lifted out of place beyond that. Work one side of that 3” lifted area into position in the bar, and then work the other side into position.And that’s all there is to it!
Trustpilot
1 month ago
1 week ago