🌿 Grow Your Green Thumb with Confidence!
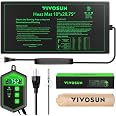
The VIVOSUN 10"x 20.75" Seedling Heat Mat and Digital Thermostat Combo Set is a UL & MET-certified heating solution designed for optimal seedling germination and indoor gardening. With a temperature range of 68-86℉, advanced far-infrared technology, and a waterproof surface, this durable mat ensures reliable results while being energy efficient at just 20 watts. Perfect for both novice and experienced gardeners, it also serves multiple purposes, including home brewing.


G**D
Completely Changed my Germination and Sprouting Results!!! Highly Worthwhile!
This is a beautiful piece of equipment! From the moment I opened the package I knew I had a superior product in my hands.. First off, unlike several of the other brands of heat mats for sale on amazon, there was ZERO time delay to wait for the mat to "flatten out". It was indeed rolled into a cylinder for shipping and packing, but it laid out flat immediately upon unrolling it. One review I read here on another heat mat which sounded pretty good otherwise, said that they had to place books on it for two days before being able to use the mat. Not here! Put this awesome thing into use the moment you unbox it.Next, the functionality and quality are superb. At least one review I read here on this product said that they had to connect this product to a separate thermostat, and/or statements to the effect that this has no proper thermostat, only a thermometer. That is categorically incorrect. This not only comes with a genuine thermostat that works very well, it has a heat probe attached that is accurate and highly useful. Allow me to explain.I bought this heat mat for two purposes. First, to germinate/sprout seeds. Secondly, to assist the germinated seeds in quickly coming up from the soil after planting. This product met my needs and fit the bill 100% in both categories.The first step was to germinate the seeds. I used this mat from the absolute get-go. I found, through testing, that I had to set the thermostat temp to about ten degrees above the temp I was hoping to achieve in my actual seed location. However, this varied depending upon the ambient room temperature. Sometimes I only needed to have it set at about 7 or 8 degrees higher than the temp I wanted to achieve. So for example, to achieve 78 degrees at the temp probe location, I might have to set the thermostat anywhere from 85 to 88 degrees.Try this method: Get a clean plastic plate, preferably one with a flat bottom or mostly flat, so that it makes a lot of surface contact with the mat. Do not use a glass plate, it will not conduct heat well. Take two layers of paper towels, or fold one into two layers, and place in the center of the plate as a square (nothing hanging off of the plate, as this will wick moisture away and possibly allow the paper towels to dry out, a major no-no).Then take a good spray bottle with a nice fine mist and fill it with the following liquids: Reverse Osmosis or filtered water, a small amount of liquid silica and/or fulvic acid (liquid silica for plants), a few drops of food grade hydrogen peroxide, and either aloe vera juice or coconut water or both. If adding aloe vera juice or coconut water to the mix, be sure to use only Harmless Harvest brand coconut water, as it is the only one on the market which is unpasteurized and therefore retains all of the medicinal properties in coconut water. One such component is gibberlic acid, a plant hormone which is a potent stimulator of seed germination. You only need to add about 10% coconut water and 5% aloe vera (which also helps a lot with germination) to the water in the spray bottle, and maybe 5 drops of food grade hydrogen peroxide.Spray the paper towel square that you have put onto the plastic plate until it it saturated. Pour off any excess water into the sink. Now take all of the seeds that you wish to sprout, and carefully place them onto the paper towels so they are not touching one another. Be sure to either make a template of which seeds are where, (my preferred method), or you can even write the names of different seeds right onto the paper towel with a pen before you wet it to let you know which seeds are where if you have multiple types of flowers or veggies that you are sprouting.Once you have your seeds sitting on the towel, take a pair of clean tweezers and gently separate any seeds which are touching or overlapping. Finally, place another folded paper towel on top of the seeds and saturate it with the spray bottle.. Be sure to just get it good and uniformly wet and saturated, but with no standing water. When you have both layers of folded, saturated towels on the plate with the seeds sandwiched between them. just lay the temp probe on the top center of the towels and cover the whole thing with another plate. I found it useful to use a slightly smaller and different type of plate for the bottom plate, so that the top plate's edges hang over the bottom plate, kind of like a "roof". The temp probe sensor hanging out from in between the two plates is actually a good thing, as this gap provides air to the seeds and can help to prevent any mold or bacterial issues.For my particular project, I was shooting for 78 degrees in my little "humidity dome/sprouting nursery". As mentioned previously, I had to set the thermostat about 10 degrees above or less that to get the right temp in between the two plates. Again, it depends in part on the ambient room temp and what surface you have placed your heat mat upon. A good rule of thumb for this step is to check the feel of the paper towels a few times a day by removing the top plate and actually touching the towels for a few seconds. If they feel cool to the touch, it is not hot enough. If they feel slightly warm to moderately warm to the touch, you are Golden. If they feel quite warm or bordering on hot, you definitely need to turn the temp down.So if you are shooting for 75 degrees, try setting the thermostat to about 82-85 degrees, wait a few hours, and then perform the "touch test" and then do that periodically during the whole time you have seeds sprouting on the paper towels. Also be sure to mist the towels from time to time with the same awesome spray mixture, but only if they need it. As long as the paper towels are moist/wet and do not dry out, you are in great shape. Another important tip: If you have added Harmless Harvest coconut water to your spray bottle formula, you will want to keep it in the fridge for the duration of the germination process, as it must remain refrigerated once the bottle is opened. The coconut water on the paper towels is consumed by the seeds and is also subject to evaporation, and further, is protected by the food grade hydrogen peroxide in the formula, which keeps everything nice and sanitary, as well as oxygenated.For me, following this process with this mat gave me the best results ever in germinating/sprouting seeds. If you follow the above procedure to the letter, you have every chance of getting a 100% germination rate. Ah, but it doesn't end there! Once seeds are sprouted, it's time to place them in the soil!Once each seed has a tiny sprout coming out (only around 1/8 inch is needed), it's time to plant them. I like to use a pair of clean tweezers and grab the sprouted seeds one at a time and place them onto soil, and then cover with a little more soil and water as usual (with the same awesome water mix you have been using in your spray bottle).As if this heat mat wasn't awesome enough just for it's ability to accelerate, jump start and massively increase your germination ratios, for me it shines just as brightly in getting the sprouted seeds to come up once planted. I had several sprouted seeds, ready to go into soil, and the room I was planting them in was only a little under 70 degrees, even with a plant light running. Warmer soil temps make a HUGE difference in sprouted seeds coming up out of the soil. HUGE. This product makes this step the easiest of all.Simply lay out your mat on the table under your light, place the soil/seedling pots right on the mat (you shouldn't have to be using drip trays at this point, as tiny seeds/seedlings don't need much water, and no water should be running out the bottom of the containers). I like to water the soil a little first, before planting each seed, and then once covered with soil, I water them in fairly well, but I do not soak/saturate the soil. Once you have your planted seeds in containers sitting on the mat under the lights, take the temp probe and push it directly into the soil in one of the pots. Unlike the wet paper towels, which can take an hour or two in between each reading to allow temp to stabilize, soil can take four or five hours to stabilize. But it is a beautiful thing to watch.Since there will be some heat from the lights raising the soil temps in addition to the heat mat raising the soil temps, you will need to adjust for that, and you may need less than ten degrees over the desired soil temp for the thermostat temp setting. On the other hand you may need a few more than ten degrees higher for the set temp than the desired soil temp result. It depends upon what type of lights you are using and how much heat they emit, and how big and how full your soil containers are, as well as how far away from the lights your pots are. Be SURE to monitor the heat mat and keep it far away enough from any lights, and to touch it periodically to ensure it is warm, not hot.You will find, as I did: If you simply place the planted seeds/soil pots under grow lights, they will indeed come up. However, it will be considerably slower and less vigorous. I took five pots this morning that had five germinated seeds in them, and placed them on the heat mat and put the temp probe into the soil in one of the pots. Within about 20 minutes, I could see the soil temp climbing! Within a few hours, it had raised to 72 degrees! Awesome! Within a few more hours, I had two additional plants come up that would have taken an entire day or more to come up without the heat mat! In all my years of starting plants, I have NEVER had this kind of accelerated sprouting, growth, and emergence of seedlings! Not even close!Summary: This heat mat is a complete game changer for sprouting seeds and starting seedlings! With the right methods and some practice you can expect to have near 100% success time after time. Using my version of the "wet paper towel" technique, combined with this wonderful little mat and thermostat/probe, every seed I put through this process germinated within 48 hours, and some of them in as little as 20 hours or less. Wow! I have NEVER had these kinds of results using wet paper towels to germinate seeds. Oh, it's a good method, but without the heat mat underneath the "nursery", you don't have the evaporation which occurs in the little "plate humidity dome". And convection and evaporation also create and encourage air flow, so it's just a gem of an item for creating the perfect environment for bringing seeds to life! Additionally, using it underneath the soil pots once planted (only for 1-3 days, just until the plants come up, if using lights above them), gave me a 100% success rate with seedlings emerging, and I haven't always had 100% success with that, even when using pre-sprouted seeds. With this heat mat, these methods are as close to fool proof as you can get! Is this mat worth $27? Yep! Yes! Uh Huh! That's an Affirmative Amigo!
M**G
Easy to use.
So far so good. I like that it comes with its own thermostat controller and it is easy to set what temp you want. When it reaches temp it turns off and cools down a bit. Then after (I think) a 5-10 degree drop it kicks back on. I’ve been using it nonstop for 2 weeks for my frog quarantine containers. I have the probe between the mat and the container. And I just placed the mat on top of a flipped baking sheet to help prevent any heat issue on my counter.One complaint is the when it turns itself on/off you can hear an audible click. But I think most on/off thermostats do that.
V**A
Amazing buy!
Love. I use it for my worm bin during the winter/ cold months. It lets me know what the temperature is in the bin and we can set it so the bin does not drop below a certain point in temperature. Decently long probe cord.
R**N
Good quality, price and customer service.
The first unit received came with a defective thermostat. A replacement unit, which is functioning correctly, was shipped immediately after I notified Amazon of the problem. One star deducted for the inconvenience of receiving a defective unit initially, but I am happy with the quality and performance of the replacement unit, so I have ordered an additional two Vivosun heat mats to use with the system.
A**R
Very effective and consistent germination rates finally possible!
Extremely helpful to help with germination of tomatoes and peppers for those of us who don’t receive consistent warm weather.I have it in a storage area of my home in San Francisco. Keeping my seed tray with dome at 70 degrees was only costing me a little more than $2 in electricity per month.Will worth it considering I wasted more than $15 in seeds that failed to germinate before this arrived.
D**S
Great for sourdough
I purchased this to help with getting a good bulk forment. It works great. I set it for 75 to 80. It helps me to adjust the baking time. It folds into a cylinder and stores great.
C**R
Reliable, Consistent Heat—Zero Complaints After 3 Seasons
This seedling heat mat with thermostat has been a staple in my indoor gardening setup for the past three seed-starting seasons, and it’s performed flawlessly. It delivers steady, controlled warmth that helps boost germination rates and keeps seedlings happy—no issues, no hassle.Pros:✅ Consistent Heating – Ideal temp range for seed starting✅ Thermostat Works Great – Simple to set and monitor✅ Durable – Still going strong after multiple seasons✅ UL & MET Certified – Safe for indoor and greenhouse useCons:❌ None so far!Final Thoughts:If you're serious about germination success, this combo set is absolutely worth it. Plug it in, set your temp, and let it do its job—it’s reliable season after season.
Trustpilot
3 weeks ago
2 months ago