🔋 Power Up Your Savings!
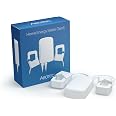
The AEOTECAeotec by Aeon Labs ZW095 is a cutting-edge home energy meter that provides real-time monitoring of electricity usage with 99% accuracy. Designed for both indoor and outdoor use, it features a wireless range of up to 492 feet and can monitor two separate loads with its dual clamps. Compatible with various Z-Wave gateways, this device not only enhances your energy efficiency but also integrates seamlessly into your smart home setup.


| Manufacturer | Aeon Labs |
| Part Number | ZW095 |
| Item Weight | 1.3 pounds |
| Product Dimensions | 2.5 x 1.5 x 5.7 inches |
| Item model number | ZW095 |
| Is Discontinued By Manufacturer | No |
| Size | Small |
| Color | White |
| Power Source | Corded Electric |
| Item Package Quantity | 1 |
| Number Of Pieces | 1 |
| Usage | IP46 for indoor and outdoor use |
| Included Components | Home Energy Meter main unit, clamps(2) |
| Batteries Included? | No |
| Batteries Required? | No |
| Warranty Description | 1 year warranty against manufacturer defects |
L**.
This meter was easier to install than a three-way switch! Lots of numbers and graphs!
The meter installs in less than 5 minutes, if you have an outlet close enough to the main breaker panel (which I did). The only tool I needed was a screwdriver to remove the front cover of the breaker box, and to attach the meters back plate to the wall. The two clamps require no tools to snap over the incoming live wires (they are insulated, so technically there is no need to through the main breaker, although I did it anyway), then feed the two wires through the side of the panel and plug them into the corresponding jacks. Two screws to attach the back plate to the wall then plug the meter into an outlet and installation is done. Connecting to the VeraEdge controller was even smoother, on my iPhone clicked devices, hit the + icon tapped, Energy then selected Aeotec Meter Gen5, (note: I had the latest version of Firmware v1.7.35 & had the ERGY plugin already installed on my controller) then pushed the button on the device and snapped it onto the backplate. It took less than 30 seconds, to be paired and have 3 new devices with power readings. From my desktop I went to the home.getvera.com user login then logged-in and connected to my controller. One of the new devices just adds the other two (which are the two clamps installed around the two live leads from the meater), I renamed that one Main to be easier to remember. Then clicked on Energy from the left sidebar and Energy Profile from the accordiaon. I selected Main from the drop-down under 'Please select a device for total consumption, if applicable' then went to User & Account Info --!> Unit Settings and added a value to 'Cost per KWH (in my case $0.1125) and selected US$. When I returned to the dashbaord the Energy 'widget was populated and under Energy there are some neat charts and data summaries. waiting a few days, weeks, or months and the data will aggregate and become more meaningful.Great little devices, that was really easy to install and setup. Honestly, I know opening the main breaker seems complicated and scary but if you can install a three-way z-wave switch, then installing this meter is easier. Overtime a great deal of data is accumulated and aggregated, which can be useful in conserving energy and reducing utilities. I should note that visiting ERGY's website indicates that at somepoint they plan on charging for the data aggregation but that they are still working on UI7, so while right now all the data collection, etc. is free in the future that could change.
G**N
Failed in 18 months.
Today I noticed that my power readings were about half what they should be, and I found the problem: One of the current clamp channels on the unit is dead. The clamps are OK. Either clamp plugged into the good channel will give me a reading. However, with the other channel out, I'm only measuring power through one leg.This is a rather expensive device, and its sole use is to cross-check my utility company's power bills to make certain they are accurate. (As a solar producer, I sometimes get erroneous bills.) I don't know that I've gotten $115 of benefit out of the 18 months the device was working. Unfortunately the warranty period is only 1 year. I'm not happy.I have ordered a replacement. Unfortunately there are no competitor products that will interface with my solar inverter system. If the next unit last only 18 months, I won't be ordering another one. Instead, I will order a product that doesn't seamlessly integrate with my solar system, but which hopefully will last longer.
C**S
Works for what I need. Paired with my SmartThings Gen 3 hub no problem
I have the Sense whole home energy monitor, but I wanted the ability to focus on only one particular circuit, so I figured I'd give this a shot. Rather than purchase new, I picked up a Used - Very Good model for almost half the price and I couldn't be happier. It came in the retail box and most parts looked like new.I'm new to SmartThings. I use Wink Hub 2 for everything but wanted to expand my horizons and learn new technology, plus this won't work with Wink, so I picked up the Gen 3 SmartThings hub to play with. I read other reviewers who said they couldn't get it to join to their Gen 3 SmartThings hub, but I had no problem at all. I just opened the Smartthings app (new version, not the Classic), clicked Add Device, and then pressed the "Action" button on the underside of the main unit (you have to remove a bracket on the bottom to see it otherwise you don't know it's there). From there it seemed to add it to SmartThings no problem.Out of the box it showed me the total Watts of power being used and showed me kWh Energy Consumption, which can't be reset. After Googling it, I found the code and instructions on Aeotec's website to install a custom device handler. Once I installed everything as documented I still wasn't able to do anything additional in the app. I then discovered I should be using the "Classic" SmartThings app. Once I downloaded and installed that one I could then see the power usage and total kWh just like in the "new" app, but I also had a Refresh button and a 'Reset kWh' button. Overall, I'm happy with it. I just needed an easy way to capture the total kWh any one circuit (or multiple circuits in a sub-pane) is using over time and this does the job.My only complaint is that you really shouldn't need to add the custom device handler code to make it work the way you want. It should just work right out of the box. Luckily I'm technical enough to get it done, and it's not terribly hard, but for others it may be too much to mess with.
J**Y
Works great and is accurate
I have been using this device for almost 3 years now with Home Assistant, and it is still working great. The readings seem to be accurate. I compared my utility Meter to this device from May 29, 2023 to April 29, 2024. The Utility Meter shows 18,176 kWh in that time whereas this device shows 18,014 (0.89% difference) which was much closer than I was expecting. An excellent product.
Trustpilot
2 weeks ago
2 days ago