✨ Elevate your pet's space with style!
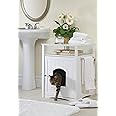
The Merry Pet Cat Washroom Litter Box Cover is a chic and functional solution for pet owners, designed to conceal litter boxes while enhancing your home decor. Made from durable fiberboard with a glossy white finish, it features wainscoting paneling and stainless-steel hardware. This versatile piece fits litter boxes up to 18.5" wide x 16.0" deep, making it suitable for both cats and small dogs. Easy to assemble and designed to minimize odors, it’s the perfect addition to any pet-friendly home.
A**N
Beautiful! Instructions tricky, so I tried to explain them.
I love this. It is a beautiful piece of furniture. The color is darker than the picture, but lovely. It is more of a dark deep cherry or mahogany color. It is not a flat color, it has grains in it if you look closely. From far away though, it is a deep chocolate, almost black. It definitely is NOT the color in the picture.Putting this together was tricky, and I never have trouble assembling items. I will try to walk you through it. Make sure you keep the instructions that come with it and read them along with what I am writing. My instructions were stapled incorrectly and it took me a little while to figure out that step one was on page 3...so read very carefully.Step 1 First you can attach the towel rod to either the right or left. I chose not to, because mine is sitting in my bedroom. If you want the rod on the right (as you are facing the product, then attach it to panel B. If you want the rod on the left, then attach it to panel A. The side with the paneling in the wood is the outside. It is easy to attach. Put the rod through the wood, (paneling side out), then put on a washer and then use the nuts.Now to put the box together.Step 2 Attach locking bolts into the two outside holes on the inside of panel B at the end that has the curve to it. The inside is the side without the paneling. Screw them in using your hands and then use a Philips screwdriver to screw them in. Then put the wooden dowel in the hole in the middle.Then take panel D and turn it so the side with the little groove in it lines up next to the same groove in panel B. (D is the bottom panel, and the part that hangs down is the front...it is easiest to line them up so the grooves will be next to each other) The legs of B stick up in the air (the aren't really legs, they are the top section of B and that really confused me for a bit). You attach the two pieces by sliding D onto the two locking bolts and the dowel. (The dowel doesn't fit in tightly, so be careful not to let it fall out). Once you have the two pieces together, take the SMALL cams and then twist them so the part of the locking bolt that sticks out, fits into the notch in the cam. BE CAREFUL TO USE THE RIGHT CAM! I didn't realize until I had to undo the whole thing, that there were different size cams. Turn the cam until you find the point where it feels like it sits in over the bolt. Once the cam is in, turn it gently with your screwdriver until it is tight. It doesn't take many rotations until it is tight. I think, one to one and a half rotations. Don't over tighten. Tightening too much doesn't make it stronger. You aren't screwing something in, you are twisting the cam so it covers the locking bolt. You do have to get it in snugly, but be gentle.Then put the little brown screw covers into the cams. You don't have to, the screws are only seen from the inside, up to you.Step 3 The instructions then say to take panel G and slide it in the groove. It won't stay in there very well, don't worry, panel A will hold it in better.Step 4 Put the locking pins and the dowels into panel A the same way as you did to B. Attach A to panel D the same way you did with B. The section with the little groove will be lined up with the grooves on panel D. Before you put in the cams (Use the small cams!) and snug it all down, adjust it so you have panel G in the groove properly. It is a little tricky to get it in there, as it keeps trying to jump out. I did it myself, but another pair of hands would have made it easier. You certainly don't need anyone else to help if you don't have a person handy. Part G is the back of the unit, and the side with the sticker on it is the inside. Look at the instructions to see how it all slides together.Put the screw (cam) covers into the cams if you want, again, this is the inside and you won't see those screws.Step 5 was on the back of page two...so again, read carefully. Attach the knob to the outside of Panel E. The outside is the side with the paneling.Step 6 insert 4 locking bolts into part C. Do NOT put the dowels in part C. If you do, when you try to put part C down, they will fall out and you will have to crawl under the couch to find them. Instead, put the dowels in the top of parts A and B. Then, put panel C down over the dowels and lining up the 4 locking bolts into the holes. The notches are there so the C fits around the little legs. (I thought this was all going to be the bottom of the thing, but actually it is the top of the unit). The magnet on part C is the front.After you have part C in place, and BEFORE you put in the cams, attach the door, part E. It is easy, you just have to line up the little pegs in the holes, but if you snug down part C, you can't get the door in. Make sure the magnet on part C lines up with the metal piece on part E.Step 7 insert the SMALL cams and snug them down. This time it is a little harder because you have to reach into the box and do it by feel. But, you have down a bunch of these cams by now and you are a pro! It won't be that hard. Just make sure you twist them right so they can be screwed down. Up to you about those pesky brown cam screw covers.Step 8. (Almost done and it is easier from here.) Put the locking bolts into panel F. This is the top of the unit. The instructions don't say, but there are three sides that have a little lip on part F and one side that is flat. I chose to put the flat side in the back, but it would work either way. If you don't put the flat side in the back, the unit will stick out a little from the wall. Ok...got those locking bolts in place...now put F into the little legs that stick up. NOW, it is time to use the BIG cams. If you got this far, you should have 2 small cams and 5 large cams left. (The 2 small cams are extras and there is an extra large cam too.) Put the large cams into the legs, turn, and tighten. NOW, you want to be sure to use those little brown cam, screw cover things. These holes ARE visible.Step 9. This unit is supplied with 4 dark brown wood plugs that you can put in the holes for the towel rod that you didn't use. On my unit, those plugs fell out every time I tried to put them in. I decided not to use them at all. If you have the same trouble, try using a little glue and I am sure they will stay in. Just remember if you do that, you might have a hard time getting them out, or you might damage the wood, if you later decide to put the towel rod in those holes.Voila!! You are finished. I hope that helps the next person put this thing together a little easier than it was for me. I didn't realize about the different sizes of the cams until I had to take it apart to fix it. And good luck getting the wrong cams out of those holes after you put them in! It took a nail file, gravity, and a lot of frustration to get them out.As everyone has already stated, make sure you get a small litter box. Check the dimensions of this unit and find one that fits. I had what I thought was a small litter box and it is too big. Silly me. Should have measured. I wish I had looked for one on Amazon to order at the same time so I wouldn't be sitting here with a lovely finished piece but no way to use it yet. Ah well, I can wait until tomorrow. The dimensions of the inside are 18 3/4" x 16 1/4".Even though the thing was a little tricky to put together, I gave it 5 stars because it looks lovely. The opening to the unit is 7" x 8". Little kitties will fit in easily. I am not sure about the mega cats. (If you know what I mean.) If you have a super duper sized feline, I would suggest getting a cardboard box first and cut the opening that size and see if your kitty will fit.
K**R
Wonderful litter cabinet
I have 2 of these cabinets from the same maker. The are very functional and attractive. I line the inside with anti scratch clear plastic stick sheets(designed for furniture and upholstery) and white contact paper for the seams. This water proofs for occasional misses and defends against scratching. My cats are determined diggers and scratchers when covering their stuff. This can cause wear and tear on the cabinet. These little upgrades help it to last a long time in great condition. The other cabinet has been with us for years and is still in great condition.
S**Y
Good & Bad - The Inside Scoop
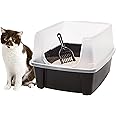
StarCatPositive:Overall, this product does what it's supposed to: hold (disguise) a litter box in a practical and more aesthetically pleasing way. Assembly was very quick and easy and it looks quite nice in the bathroom instead of an ugly plastic litter box. It also cuts down considerably on the litter tracking on the bathroom floor. In the picture it appears to be an ivory color, but mine is white.As others have mentioned, it would be better if it were wider and deeper to accommodate the larger litter boxes, but Amazon carries one (at a great price compared to the local pet stores!) that fits well and is ideal for this unit: Iris CLH-12 Open-Top Litter Box with Shield and Scoop With the cut-out front you can clean the box while inside the unit or easily pull it out to clean, The high sides are great for keeping the litter in the box rather than inside the floor of the unit.I purchased the unit on Amazon a few months ago, but at about $20.00 less than it's featured now - so when I found that "my" unit didn't come with a towel bar I just assumed that was why it was less expensive than others sold here and elsewhere - no fancy accessory, so a lower price. That didn't bother me.Negative:The problem I had with it was a strange smell - either the fiberboard or the paint used had a distinct odor. I noticed it a bit while I was assembling it, but once I got it all together and closed the little front door, it was much more pronounced. There were no stains or marks on it anywhere (that might suggest it was used by someone and then returned; besides it was not a urine odor but more of a chemical smell), and I'm still at a loss to explain it.At first I just covered the front door opening (so the cats couldn't get in) and put a large bowl of baking soda in there - hoping to absorb the odor; checked on it every day for a week and then put in a fresh bowl of baking soda for another week. The odor was still there and still quite noticeable.I was concerned that whatever the cause, it might be something harmful for my cats to inhale, so I took the whole thing apart again and laid out the pieces in my laundry room for two weeks until most of the odor dissipated and then reassembled it.As I said, it's a great looking unit, it was much less expensive (sans the towel bar) than any other I've seen, I just wasn't happy due to the odor and what I had to go through to get rid of it.Ending on a positive note, I'd like to say that I do a great deal of shopping on Amazon, and this is the first time I received a product I was less than happy with. It didn't even occur to me that I might be able to return it as "defective", but I'm sure Amazon would have corrected the problem to our mutual satisfaction.
S**S
Great product!
Great product! Seems more a side table than a cat litter cabinet! Hides sounds and smells, and gives you a place for a lamp and plant!
G**R
Elegant and convenient
It was hard to assemble at first, because I apparently missed one of the steps to do... It was like a house of cards about to collapse. After correctly re-assembling it, the thing was finally sturdy and good looking. I did not need to use wood glue. I bought it when it was on sale, but I still find that it's expensive for what it is. Afterall it's only a plywood box made in China. Otherwise, this is a great furniture for litter boxes. I might buy a second one later on if they put it on sale again, I would like to try the espresso color.
M**A
es un "must have"
Parece una mesita lateral de sala o buró de recámara. Se ve resistente, de buena calidad. Fue fácil de armar y funciona perfecto para guardar el arenero del gato y quitarlo del alcance de mi perra y mi hijo pequeño.Yo no lo tengo en un lugar muy visible, pero para quienes tengan poco espacio, quedaría perfecto en un baño o incluso en una habitación, sin verse feo y las visitas ni se imaginarán que es el "sanitario" del gato.Totalmente recomendable, especialmente si lo encuentran publicado con un buen precio (yo pagué menos de $1100).
M**I
Ben fatta e durevole
La utilizzo da molti mesi, non le ho mai dedicato particolare manutenzione, solo il fondo si è leggermente rovinato a causa dello sfregamento della sabbia. Articolo molto valido, consiglio a chi desidera una lettiera che non vada necessariamente nascosta a meno di non rinunciare all'estetica.
S**B
Maison pour litière chat
Livraison rapide, emballage parfait.Joli meuble, spacieux, notice claire, montage rapide.Possibilité de fixer le porte serviette à droite ou à gauche du meuble.J'enlève une étoile car le bois est légèrement abîmé par endroit (éraflures).
Trustpilot
1 day ago
1 month ago